


Models
>
2539338191
2539338191 Kenmore Refrigerator
Jump to:
Find Part by Name
Keep searches simple, eg. "belt" or "pump".
Keep searches simple, eg. "belt" or "pump".

This is a genuine OEM ice maker assembly for your refrigerator. The ice maker makes eight cubes at a time, by filling the mold with water from the inlet valve, freezing the water until the cubes are f...
In Stock
Order now and your part arrives by Mar 29

$27.28
This 40-watt light bulb has a standard screw-in base and is used in many different appliances. If your current bulb is burnt out or broken you will need to replace it. This light bulb is a genuine OEM...
In Stock
Order now and your part arrives by Mar 29

$39.63
This part is attached to the compressor. It helps the compressor kick on and off while maintaining a constant temperature to keep things frozen in your freezer.
In Stock
Order now and your part arrives by Mar 29

$86.92
This part is the replacement heat-release ice maker unit only. This kit comes with four round female connectors at the end of the wire harness. It also comes with the adaptor that converts the harnes...
In Stock
Order now and your part arrives by Mar 29

$42.85
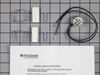
This limiter thermostat cuts out when the temperature inside your refrigerator reaches 55 degrees Fahrenheit and kicks back in when the internal temperature drops to 20 degrees Fahrenheit.
In Stock
Order now and your part arrives by Mar 29

$106.32
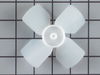
This motor runs the evaporator fan in your refrigerator. It is mounted on the center hub and has three lead wires terminals. This motor rotates in a clockwise fashion. Its shaft has a diameter of 1/8" and is 1-1/4" long.
In Stock
Order now and your part arrives by Mar 29

In Stock
Order now and your part arrives by Mar 29

In Stock
Order now and your part arrives by Mar 29

In Stock
Order now and your part arrives by Mar 29

In Stock
Order now and your part arrives by Mar 29

$32.12
The ejector drive gear is a part for your refrigerator. This icemaker drive gear is for the ejector blades. The part rotates the cube ejector arm, which cycles the icemaker and pushes the cubes out an...
In Stock
Order now and your part arrives by Mar 29

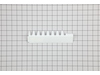
Sold individually. NOTE: For 18 cubic feet refrigerator model order part # 240358005 for the shelf and part# 3201150 end caps, quantity 4.
In Stock
Order now and your part arrives by Mar 29
Questions and Answers
We're sorry, but our Q&A experts are temporarily unavailable.
Please check back later if you still haven't found the answer you need.
Common Problems and Symptoms for 2539338191
Viewing 20 of 20Ice maker not making ice
Fixed by these parts


How to fix it
Fridge too warm
Fixed by these parts


How to fix it
Noisy
Fixed by these parts
How to fix it
Light not working
Fixed by these parts


How to fix it
Will Not Start
Fixed by these parts

How to fix it
Freezer section too warm
Fixed by these parts
How to fix it
Ice maker won’t dispense ice
Fixed by these parts
How to fix it
Freezer not defrosting
Fixed by these parts
How to fix it
Won’t start
Fixed by these parts
How to fix it
Too warm
Fixed by these parts
How to fix it
Fridge and Freezer are too warm
Fixed by these parts
How to fix it
Door Sweating
Fixed by these parts


How to fix it
Leaking
Fixed by these parts
How to fix it
Fridge runs too long
Fixed by these parts
How to fix it
Fridge too cold
Fixed by these parts

How to fix it
Freezer too cold
Fixed by these parts
How to fix it
Frost buildup
Fixed by these parts
How to fix it
Clicking sound
Fixed by these parts
How to fix it
Doesn’t stop running
Fixed by these parts
How to fix it
Door won’t open or close
Fixed by these parts
How to fix it


Keep searches simple. Use keywords, e.g. "leaking", "pump", "broken" or "fit".
- Customer:
- Juan from Miami, FL
- Parts Used:
- 241798231
- Difficulty Level:
- Really Easy
- Total Repair Time:
- 15 - 30 mins
- Tools:
- Socket set
Broken ice maker
Unplugged faulty ice maker, removed two screws holding it to the refrigerator and took it out. Reversed the operation with the new ice maker and after a few minutes presto, we have ice.
Was this instruction helpful to you?
Thank you for voting!
- Customer:
- JACK from MESA, AZ
- Parts Used:
- 5303918277
- Difficulty Level:
- A Bit Difficult
- Total Repair Time:
- 1- 2 hours
- Tools:
- Screw drivers
Ice Maker Stopped Working
It was pretty straight forward. Remove the two screws that hold the unit to the wall of the freezer. In my case, I had to use a different ice maker than what came with the frig. In order to install the replacement unit they sent a wire adaptor so it would attach to the existing wiring. That too was all fine and dandy. The only p
... Read more
roblem was that the end of the wire adaptor did not fit through the existing hole in the rear of the frig. I used a utility knife to cut through the thin metal lining. That worked just fine. However, I could not cut through the insulation because I could not reach it through the small hole. The excess wire was supposed to be pulled through the hole and out through the back of the unit. So now the excess is between the wall of the freezer and the insulation. The unit is working wonderfully. In fact, it is making more ice than I can use. I am very pleased with the replacement unit. This is the 3rd ice maker that has been in this frig. All the others had a design flaw that had a leak in the rear of the unit. This caused all the ice to form into a big block. The replacement unit has not had this problem so far. Thank you for allowing me to explain my situation so that maybe others may benifit from my experience. Thank you. Jack
Read less
Was this instruction helpful to you?
Thank you for voting!
- Customer:
- Jordan from Maumee, OH
- Parts Used:
- 5308000010, 5300158289
- Difficulty Level:
- Easy
- Total Repair Time:
- 1- 2 hours
- Tools:
- Nutdriver
Noisy fan
1. Removed the 7 nuts using the nut driver from the freezer back panel inside the freezer.
2. Remove the back panel. The evaporator motor and fan are located above the coils.
3. Unplug the wiring harness.
4. Remove the two gold mounting screws holding the motor and fan in place.
5. Remove the motor and fan including th ... Read more e brackets.
6. Install the new motor and fan onto the mounting bracket.
6a. Attach the green ground to the mounting bracket.
7. Screw the two gold screws back into the freezer.
8. Attach the new wiring harness. Note, the old harness had a mounting hole/space for it to connect to the wiring harness of the freezer. The new motor's harness was not long enough for this, so it is connected freely to the freezer harness.
9. Use the hair dryer to melt any ice that may have formed on the coils and hole where the fan goes.
10. Turn the freezer on to see if the fan turns on.
11. Reinstall the back panel.
All done!
Read less
Was this instruction helpful to you?
Thank you for voting!