


Models
>
10676392411
10676392411 Kenmore Refrigerator
Jump to:
Find Part by Name
Keep searches simple, eg. "belt" or "pump".
Keep searches simple, eg. "belt" or "pump".

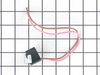
The bi-metal defrost thermostat is attached to the evaporator, and its purpose is to protect the evaporator from overheating when the defrost cycle is running. If there is frost building up in your fr...
In Stock
Order now and your part arrives by Aug 6

$13.07
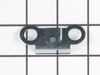
This hinge bracket, also known as a door stop, is attached to the bottom of the door and is used to limit how far the door swings out to protect the refrigerator itself, and any surrounding cabinets f...
In Stock
Order now and your part arrives by Aug 6

In Stock
Order now and your part arrives by Aug 6

In Stock
Order now and your part arrives by Aug 6

$51.43
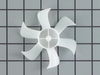
This part is used to circulate air through the inside of the refrigerator to help improve the cooling efficiency.
In Stock
Order now and your part arrives by Aug 6

$56.24
This door bin is for refrigerators. Door bin attaches to the inside of the refrigerator door and typically holds jars and bottles.
In Stock
Order now and your part arrives by Aug 6

$85.05
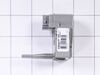
The Compressor Start Relay with Overload fits various refrigerator models and helps start the compressor motor. It includes overload protection to safeguard the compressor. Before installation, unplug...
In Stock
Order now and your part arrives by Aug 6

In Stock
Order now and your part arrives by Aug 6

In Stock
Order now and your part arrives by Aug 6

In Stock
Order now and your part arrives by Aug 6

Special Order

In Stock
Order now and your part arrives by Aug 6
Common Problems and Symptoms for 10676392411
Viewing 14 of 14Fridge too warm
Fixed by these parts
How to fix it
Door won’t open or close
Fixed by these parts
How to fix it
Freezer not defrosting
Fixed by these parts
How to fix it
Freezer section too warm
Fixed by these parts
How to fix it
Fridge and Freezer are too warm
Fixed by these parts
How to fix it
Fridge too cold
Fixed by these parts
How to fix it
Frost buildup
Fixed by these parts
How to fix it
Freezer too cold
Fixed by these parts
How to fix it
Noisy
Fixed by these parts
How to fix it
Too warm
Fixed by these parts
How to fix it
Fridge runs too long
Fixed by these parts
How to fix it
Will Not Start
Fixed by these parts
How to fix it
Clicking sound
Fixed by these parts
How to fix it
Leaking
Fixed by these parts
How to fix it


Keep searches simple. Use keywords, e.g. "leaking", "pump", "broken" or "fit".
- Customer:
- Cathy from Winter Park, FL
- Parts Used:
- WPW10225581
- Difficulty Level:
- A Bit Difficult
- Total Repair Time:
- 15 - 30 mins
- Tools:
- Nutdriver
Fridge was getting too warm, ice buildup on coils.
WARNING: REPLACING THIS PART REQUIRES CUTTING AND SPLICING ELECTRICAL WIRES. RISK OF ELECTRICAL SHOCK OR FIRE. DO NOT ATTEMPT THIS REPAIR IF YOU ARE NOT EXPERIENCED WITH ELECTRICAL WIRING.
Part Info:
The bi-metal strip is clipped onto the evaporator coils and is designed to regulate the defrost coil temperature. If it is n ... Read more ot functioning properly you may notice ice buildup preventing air flow (and preventing proper refrigeration), or more rarely the freezer side may get too warm during the defrost cycle.
Materials:
* Replacement bi-metal strip
* Wire cutters
* Wire strippers
* Wire nuts
* Electrical tape
* 10MM socket
Steps:
1: UNPLUG THE FRIDGE! If there is ice buildup, wait until the ice has melted. A box fan blowing at the ice will help melt it more quickly.
2: Remove the panel covering the evaporator coils. It's located inside the fridge, on the freezer side.
3: Un-clip the bi-metal strip from the evaporator coils.
4: Unplug the wires from the evaporator fan, defrost coil and bi-metal strip, then disconnect the main connector that is plugged into the rear wall.
5: Clip both wires to the old ( bad ) bi-metal strip. Cut close to the casing of the bi-metal strip so there are long wires to splice onto.
6: Strip 1/4 to 1/2 inches of insulation off of the ends of the wires ( depending on the size of the wire-nuts you use). Twist the bare wires slightly to prevent fraying.
7: Do the same for the ends of the wires on the (new) bi-metal strip.
8: Take the ends of the wires belonging to the (new) bi-metal strip and the wires coming from the main plug. Take the like-colored wires, and twist the bare metal ends together.
9: Twist on wire nuts, for both sets of wires. Make sure they are snug, with no bare wire showing.
10: Tape over the wire nuts with electrical tape. Tape over the wires nuts in a spiral fashion, completely covering the nut and both wires that are now spliced together. This will prevent accidental shorting.
11: Plug the main plug back into the rear wall of the fridge. Also re-connect the connectors to the evaporator fan and defrost coil. Make sure the clips on the connectors are snug to ensure a good connection.
12: Clip the new bi-metal strip onto the coils, in the same spot as before. ( Usually just after the small incoming copper tubing that connects to the coils, known as the expansion valve. That is usually the coldest spot on the coils during operation).
13: Replace the panel that covers the coils.
14: Plug the fridge back in... Now you fridge should defrost correctly. If it does not, your defrost coil could be burned out, or the control board could be faulty.
Read less
Was this instruction helpful to you?
Thank you for voting!
- Customer:
- James from Ringoes, NJ
- Parts Used:
- WPW10225581
- Difficulty Level:
- Easy
- Total Repair Time:
- 15 - 30 mins
- Tools:
- Nutdriver, Screw drivers
Auto Defrost Freezer keeps defrosting SIDE BY SIDE KITCHENAID
DISCONNECT POWER. Removed all shelves/baskets.Popped upper panel off (just clips in) Removed 6 screws in lower back panel ( 3 each side) slid panel in place but down. You can then easily see the defrost thermostat/defrost termination switch. Cut the wire connectors (pink n brown wire) stripped back wire, attached new defrost thermostat.
... Read more
Thermostat clips on. New thermostat ohm's at 5.5, old one was "open". Slid cover back up meeting the upper cover grooves. Screwed lower panel in. Put shelves etc back in. Plugged in. Turns on, put a bottle of water in freezer. Checked a while later, frozen. has been frozen for a week.
-James
-James
Read less
Was this instruction helpful to you?
Thank you for voting!
- Customer:
- Robert from Doral, FL
- Parts Used:
- WPW10225581
- Difficulty Level:
- Easy
- Total Repair Time:
- 30 - 60 mins
- Tools:
- Pliers, Screw drivers
Refrigerator Wasn't Cooling,Evaporater Coil Freezing Up
I have a side by side so in order to access the bi-metal switch I first had to empty out the freezer. The switch is clipped on to the top of the evaporator coil. I had to remove 8 screws to remove the back panel of the freezer compartment. The bi-metal switch was right there in plain view. There are two colored wires that come out of
... Read more
the switch. I tried pulling them out of the socket they were plugged into but gave up for fear of breaking something. I ended up cutting the wires and splicing them together. I used the plastic twist caps. I made sure when I closed everything back up that the open end of the caps were pointing down so no water can accumulate in them. It has been 3 days now and so far so good
Read less
Was this instruction helpful to you?
Thank you for voting!