


Models
>
10651764511
10651764511 Kenmore Refrigerator
Jump to:
Find Part by Name
Keep searches simple, eg. "belt" or "pump".
Diagrams for 10651764511
Viewing 11 of 11


 Diagram and Parts List for Kenmore Refrigerator")


Keep searches simple, eg. "belt" or "pump".

$17.44
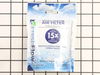
Your refrigerator air filter should be replaced at least every 6 months to ensure its working as it should. This part is responsible for reducing common food odors and bacteria in the air, improving u...
In Stock
Order now and your part arrives by Jul 31

$36.42
The gallon door bin attaches to the inside of the refrigerator door and is typically used to hold jars and bottles within easy reach. These bins are clear, as the white version has been discontinued b...
In Stock
Order now and your part arrives by Jul 31

In Stock
Order now and your part arrives by Jul 31

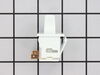
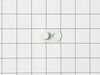
$31.05
This part includes one authentically sourced 3-pin rocker switch for a refrigerator. It is responsible for turning the light on inside the fridge when the door is open. It is commonly replaced because...
In Stock
Order now and your part arrives by Jul 31

$80.95
This OEM ice maker assembly fits select Whirlpool, Maytag, and KitchenAid refrigerators. It includes the ice mold and control unit, and automatically produces and ejects ice into the bin. Ideal for re...
In Stock
Order now and your part arrives by Jul 31

$24.15
This 18 ml bottle of white appliance touch-up paint is used to cover scratches or marks on your appliance. The white touch-up paint can be used on refrigerators, microwaves, ranges, clothes dryers, an...
In Stock
Order now and your part arrives by Jul 31

$11.98
This authentic OEM part is a mounting screw for the door handle on your refrigerator. If the door handle is loose or you are having issues opening or closing the door, a new mounting screw may solve t...
In Stock
Order now and your part arrives by Jul 31

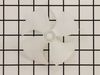
$28.91
If your refrigerator or freezer is too warm, or making noises, you may need to replace the fan blade. The fan blade attaches to the evaporator motor, which is in the freezer section, to help circulate...
In Stock
Order now and your part arrives by Jul 31

In Stock
Order now and your part arrives by Jul 31

$13.07
This part is a replacement refrigerator drive shaft seal for your refrigerator. The drive shaft seal protects the auger motor from water and condensation that may leak down the drive shaft from the ic...
In Stock
Order now and your part arrives by Jul 31

In Stock
Order now and your part arrives by Jul 31

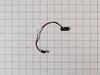
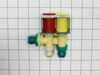
$110.14
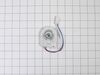
When energized, this part releases water from the supply line into the ice mold.
In Stock
Order now and your part arrives by Jul 31
Common Problems and Symptoms for 10651764511
Viewing 14 of 14Light not working
Fixed by these parts
How to fix it
Ice maker not making ice
Fixed by these parts
How to fix it
Leaking
Fixed by these parts

How to fix it
Ice maker won’t dispense ice
Fixed by these parts
How to fix it
Door won’t open or close
Fixed by these parts
How to fix it
Noisy
Fixed by these parts
How to fix it
Fridge too warm
Fixed by these parts
How to fix it
Not dispensing water
Fixed by these parts
How to fix it
Fridge too cold
Fixed by these parts
How to fix it
Clicking sound
Fixed by these parts
How to fix it
Freezer section too warm
Fixed by these parts
How to fix it
Door Sweating
Fixed by these parts
How to fix it
Too warm
Fixed by these parts
How to fix it
Freezer not defrosting
Fixed by these parts
How to fix it


Keep searches simple. Use keywords, e.g. "leaking", "pump", "broken" or "fit".
- Customer:
- Clint from Rayville, MO
- Parts Used:
- W11384469
- Difficulty Level:
- Really Easy
- Total Repair Time:
- Less than 15 mins
- Tools:
- Screw drivers
Lights inside refrigerator not working
I used a flat-head screwdriver to pop out the old light rocker switch. Then, I unplugged the wires, plugged them into the new light rocker switch, and then popped the new switch into the hole. That's it! Lights began working again.
Was this instruction helpful to you?
Thank you for voting!
- Customer:
- Kevin from Beckley, WV
- Parts Used:
- W11396033
- Difficulty Level:
- Really Easy
- Total Repair Time:
- Less than 15 mins
- Tools:
- Screw drivers
while closing the door, the light switch fouled, resulting in the switch breaking
I used a flat screwdriver and released the lock tab on the bottom of the light switch, and pried the switch out, being careful to not damage the plastic around the mounting place of the switch, unplugged wiring from old switch, plugged in the new one and pushed the new switch into place. Job finished light switch now working.
Was this instruction helpful to you?
Thank you for voting!
- Customer:
- James Richard from St. Cloud, MN
- Parts Used:
- W11384469
- Difficulty Level:
- Easy
- Total Repair Time:
- Less than 15 mins
- Tools:
- Socket set
Light Switch broke
An easy job for smaller hands. Removed the two bolts holding the light cover. Removed two electrical connections from the old switch by pinching the retaining clip,removed the switch, snapped in the new one and re-attached the connectors. Your online illustrations helped me to know that the plastic housing for the light switch would only
... Read more
swing down so far and was not intended to be removed. Saved me from breaking that plastic cover's tabs. This home repair saved me more than 5 times the cost of hiring a professional to do it. Very happy homeowner.
Read less
Was this instruction helpful to you?
Thank you for voting!