


Models
>
HPE16BTNDRWW
HPE16BTNDRWW Hotpoint Refrigerator
Jump to:
Find Part by Name
Keep searches simple, eg. "belt" or "pump".
Keep searches simple, eg. "belt" or "pump".

$16.95
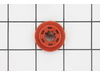
The evaporator fan grommet is used to provide a cushion between the fan motor and the motor mounting bracket in your freezer. This genuine OEM part is about one inch in diameter and is red in color. I...
In Stock
Order now and your part arrives by Jul 23

$15.26
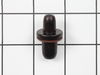
This is the replacement hinge washer for your refrigerator. The hinge washer is mounted on the top of the door hinge pin, and supports the refrigerator door, allowing it to open and close easily. The ...
In Stock
Order now and your part arrives by Jul 23

In Stock
Order now and your part arrives by Jul 23

In Stock
Order now and your part arrives by Jul 23

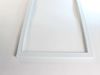
The freezer door gasket creates a seal around the door to prevent warm air from entering the freezer compartment.
In Stock
Order now and your part arrives by Jul 23

In Stock
Order now and your part arrives by Jul 23

$29.98
Replace a broken or missing dairy door with this durable OEM part. It covers the compartment for butter and other dairy items, helping maintain freshness and organization. Easy to install for a perfect fit.
In Stock
Order now and your part arrives by Jul 23

$54.95
This genuine OEM cover fits over the crisper drawer to help maintain optimal humidity, keep produce fresh, and prevent spills inside the refrigerator. Made from durable plastic, it ensures proper airf...
In Stock
Order now and your part arrives by Jul 23

In Stock
Order now and your part arrives by Jul 23

$160.50
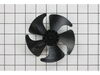
This main control board regulates key refrigerator functions like temperature, fan operation, and defrost cycles. It includes integrated LED lighting and responds to sensor input to maintain efficient...
In Stock
Order now and your part arrives by Jul 23

In Stock
Order now and your part arrives by Jul 23

In Stock
Order now and your part arrives by Jul 23
Common Problems and Symptoms for HPE16BTNDRWW
Viewing 8 of 8Noisy
Fixed by these parts
How to fix it
Fridge too warm
Fixed by these parts
How to fix it
Door won’t open or close
Fixed by these parts

How to fix it
Clicking sound
Fixed by these parts
How to fix it
Light not working
Fixed by these parts

How to fix it
Freezer section too warm
Fixed by these parts
How to fix it
Leaking
Fixed by these parts
How to fix it
Frost buildup
Fixed by these parts
How to fix it


Keep searches simple. Use keywords, e.g. "leaking", "pump", "broken" or "fit".
- Customer:
- GLENN from PENSACOLA, FL
- Parts Used:
- WR14X27230
- Difficulty Level:
- Very Easy
- Total Repair Time:
- Less than 15 mins
Condensation freezing on the ceiling of the freezer, indicating the gasket allowing warm air into the freezer.
Do not uninstall the old gasket until you have read all of these instructions. Upon receipt of the new gasket, compare the model number of the GE refrigerator to the paperwork included. Unpack the gasket by hand to ensure not to damage the new gasket. There is no specified top or bottom, left or right to the gasket but there is a front si
... Read more
de (to the freezer face) and a back side (attaches to freezer door). Hold the new gasket up to the installed old gasket to ensure the size is identical (close in size WILL NOT work). Once the size is verified, pull the old gasket from the door, starting at any corner. The front side of the gasket is broader than the back side which presses into the door slot. Make sure that the door slot is clean to ensure a perfect fit. Recommend the new install begin at a top corner. Gently press the new gasket into the slot along the top. Do a side next, working the gasket in along the bottom to the last corner. Ensure the freezer face is clean for the best seal. Make sure the new gasket is dry, a wet gasket may freeze and pull the new gasket out! A good seal is verified by the "suction" when trying to open the door. A good seal is also indicated by no moisture/condensation the following day.
Read less
Was this instruction helpful to you?
Thank you for voting!
- Customer:
- Dustin from Marlow, OK
- Parts Used:
- WR02X27092
- Difficulty Level:
- Really Easy
- Total Repair Time:
- Less than 15 mins
- Tools:
- Screw drivers
Bottom door hinge was lost during move
I had lost the bottom hinge during a move and so I rigged the hinge using an old tv antenna and the door never really quite worked right and it was VERY annoying. I stumbled upon this site and was surprised how inexpensive the part I needed was. I was very impressed with the speed of shipping and the install took maybe 5 minutes. The f
... Read more
ridge works as good as new. Thanks a ton!
Read less
Was this instruction helpful to you?
Thank you for voting!
- Customer:
- Christopher from Sparta, NJ
- Parts Used:
- WR55X43825
- Difficulty Level:
- Easy
- Total Repair Time:
- 30 - 60 mins
- Tools:
- Screw drivers
Refrigerator light not working
1. Order replacement board so it's on hand.
2. Unplug appliance or turn off appropriate circuit breaker.
3. Remove all items on top shelf of refrigerator to allow yourself working room.
4. Remove one phillips head screw, at front of control panel bezel.
5. Allow bezel to hang down a little so you can disconnect mu ... Read more lti-pin connector, by squeezing the tabs on opposite sides and pulling down. Note black dot on tab for easier orientation of replacement connector.
6. Gently pull the entire assembly forward to remove. It has two pins that align and hold the back of the assembly to the deck.
7. Place assembly on a table with the control board facing up.
8. Remove plastic push pin that holds protective cover over the control circuit board.
9. Remove temperature control knob by pulling straight out.
10. Push back 2 locking tabs at the front of the control circuit board so it will become loose.
11. Pry up cable tie mount that holds wire bundle to the assembly.
12. Free thermistor wire from it guides and flip over the assembly that is holding the sensor.
13. Peel up the tape holding the wire in the molded groove so wire/sensor can be removed. It is not necessary to remove the tape since you will use it again.
14. Remove the two wires that connect to the door switch at the front left of the assembly. It's a tight fit, but you can remove the spade connectors.
15. Now the circuit board assembly can be removed and set aside.
16. Optional - at this time you can use the continuity tester to verify the door switch is working properly.
17. Now install the new control board by reversing the removal steps.
Read less
Was this instruction helpful to you?
Thank you for voting!