


Models
>
CTX18LYZLRWH
CTX18LYZLRWH Hotpoint Refrigerator
Jump to:
Find Part by Name
Keep searches simple, eg. "belt" or "pump".
Diagrams for CTX18LYZLRWH
Viewing 3 of 3


Keep searches simple, eg. "belt" or "pump".

$21.95
This 40-Watt light bulb is sold individually.
It is specially designed to withstand extreme temperatures, so this bulb is compatible with a variety of appliance types including refrigerators, ranges,...
In Stock
Order now and your part arrives by Jul 27

$53.95
This part establishes and maintains the internal temperature of the refrigerator.
In Stock
Order now and your part arrives by Jul 27

$93.07
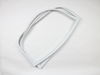
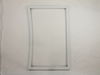
This white fresh food door gasket is used to seal the refrigerator door when closed to keep the cool air inside and the room air out.
In Stock
Order now and your part arrives by Jul 27

In Stock
Order now and your part arrives by Jul 27

$185.75
This part is the replacement stationary wire shelf for your refrigerator. It is white in color and is approximately 24 1/2 inches by 14 3/8 inches. The stationary wire shelf rests on grooves in the re...
In Stock
Order now and your part arrives by Jul 27

$40.65
This door shelf retainer bar is a manufacturer-approved replacement part for your refrigerator. This bar is made of white plastic and is about 21 1/4 inches in length and 2 inches deep. It helps keep ...
In Stock
Order now and your part arrives by Jul 27

This part is located in the back of the freezer and circulates air over the refrigerator coils. These coils will convert the heat into cool air which is then circulated.
No Longer Available

Special Order

The defrost heater keeps the cooling coils from frosting over.
Special Order

In Stock
Order now and your part arrives by Jul 27

In Stock
Order now and your part arrives by Jul 27

Special Order
Common Problems and Symptoms for CTX18LYZLRWH
Viewing 10 of 10Fridge too warm
Fixed by these parts

How to fix it
Fridge too cold
Fixed by these parts
How to fix it
Door Sweating
Fixed by these parts
How to fix it
Fridge runs too long
Fixed by these parts
How to fix it
Fridge and Freezer are too warm
Fixed by these parts
How to fix it
Door won’t open or close
Fixed by these parts
How to fix it
Freezer section too warm
Fixed by these parts
How to fix it
Will Not Start
Fixed by these parts
How to fix it
Frost buildup
Fixed by these parts
How to fix it
Leaking
Fixed by these parts
How to fix it


Keep searches simple. Use keywords, e.g. "leaking", "pump", "broken" or "fit".
- Customer:
- Thomas from key west, FL
- Parts Used:
- WR24X10228
- Difficulty Level:
- A Bit Difficult
- Total Repair Time:
- 30 - 60 mins
- Tools:
- Nutdriver
Freezer door gasket was torn and loose.
Unplugged refrigerator.Checked that new gasket was the right size for freezer.Opened freezer door and lifted inside edge to access screw's. Loosened top screw's and screw's half way down each side and pulled gasket out. Installed new gasket into slot where old gasket was and tightened screw's across top and the first couple down side's.Li
... Read more
fted edge of old gasket and loosened screw's holding remainder of old gasket in place and finished removing old gasket.Finished putting new gasket in slot and tightened remaining screw's. The reason for only doing gasket half at a time is to keep the door square and not getting out of shape. If new gasket is warped when removed from shiping box run under hot water or soak in hot water until more flexible.
Read less
Was this instruction helpful to you?
Thank you for voting!
- Customer:
- Thomas from Germantown, TN
- Parts Used:
- WR09X20002
- Difficulty Level:
- Very Easy
- Total Repair Time:
- Less than 15 mins
- Tools:
- Screw drivers
Everything was freezing in the bottom and top
Pulled out the control sensor on the ceiling of the fridge. (2 screws) Took a picture with phone on how everything was installed. Unplugged all wires and pulled out Control Temp sensor. Installed new one and attached all wires. Installed back in fridge and plugged it back in. Everything works like new.
Was this instruction helpful to you?
Thank you for voting!
- Customer:
- Hollis from Daphne, AL
- Parts Used:
- WR71X10378
- Difficulty Level:
- Really Easy
- Total Repair Time:
- Less than 15 mins
Neeed extra shelves for new purchased refrigerator
Simple install. .
Was this instruction helpful to you?
Thank you for voting!