


Models
>
PSDS3YGXAFSS
PSDS3YGXAFSS General Electric Refrigerator
Jump to:
Find Part by Name
Keep searches simple, eg. "belt" or "pump".
Diagrams for PSDS3YGXAFSS
Viewing 9 of 9


Keep searches simple, eg. "belt" or "pump".

$229.80
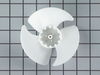
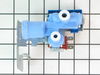
The ice maker assembly makes ice by filling the tray with water from the inlet valve, freezing it until solid cubes are formed, and then ejecting them into the ice bucket. This process will repeat unt...
In Stock
Order now and your part arrives by Jul 23

$16.95
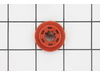
The evaporator fan grommet is used to provide a cushion between the fan motor and the motor mounting bracket in your freezer. This genuine OEM part is about one inch in diameter and is red in color. I...
In Stock
Order now and your part arrives by Jul 23

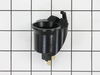
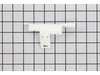
The dispenser door solenoid is the part that controls the flapper door on your ice maker, allowing it to open and close when dispensing ice. If your ice maker is not dispensing ice or water, the door ...
In Stock
Order now and your part arrives by Jul 23

$50.55
This is a genuine OEM replacement insert for the shelves found on your refrigerator door. This clear plastic insert fits into the front of the shelf and helps to keep bottles and containers in place. ...
In Stock
Order now and your part arrives by Jul 23

$15.26
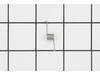
This door recess spring or dispenser lever spring in your refrigerator is used to return the ice door to the closed position or the dispenser lever to the home position once released. You will find th...
In Stock
Order now and your part arrives by Jul 23

Quick connector for plastic water line - 5/16" to 5/16"
In Stock
Order now and your part arrives by Jul 23

$21.95
This 40-Watt light bulb is sold individually.
It is specially designed to withstand extreme temperatures, so this bulb is compatible with a variety of appliance types including refrigerators, ranges,...
In Stock
Order now and your part arrives by Jul 23

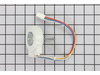
This genuine OEM light switch is used to control the light in your refrigerator. When the fridge door is closed, it depresses the switch and turns the light off. When the fridge door opens, it release...
In Stock
Order now and your part arrives by Jul 23

In Stock
Order now and your part arrives by Jul 23

$15.26
This genuine OEM replacement part is a bumper for your refrigerator. The bumper is made of orange rubber and measures less than half an inch in diameter. The bumper is used to prevent the fan motor fr...
In Stock
Order now and your part arrives by Jul 23

$15.26
This crank door recess is supplied directly from the original equipment manufacturer. The plastic part is fastened behind the interface dispenser assembly in the freezer door. Activated by the dispens...
In Stock
Order now and your part arrives by Jul 23

$69.82
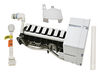
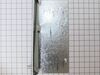
This OEM water filter works with side-by-side and bottom freezer refrigerators. You will find this filter mounted in a vertical position in the back upper right-hand corner of the refrigerator compart...
In Stock
Order now and your part arrives by Jul 23
Common Problems and Symptoms for PSDS3YGXAFSS
Viewing 21 of 21Noisy
Fixed by these parts

How to fix it
Leaking
Fixed by these parts
How to fix it
Ice maker not making ice
Fixed by these parts

How to fix it
Light not working
Fixed by these parts


How to fix it
Ice maker won’t dispense ice
Fixed by these parts
How to fix it
Not dispensing water
Fixed by these parts
How to fix it
Door won’t open or close
Fixed by these parts
How to fix it
Fridge too warm
Fixed by these parts
How to fix it
Door latch failure
Fixed by these parts
How to fix it
Door Sweating
Fixed by these parts
How to fix it
Freezer section too warm
Fixed by these parts
How to fix it
Frost buildup
Fixed by these parts
How to fix it
Fridge and Freezer are too warm
Fixed by these parts
How to fix it
Will Not Start
Fixed by these parts
How to fix it
Clicking sound
Fixed by these parts
How to fix it
Ice maker dispenses too little ice
Fixed by these parts
How to fix it
Ice maker dispenses too much ice
Fixed by these parts
How to fix it
Freezer not defrosting
Fixed by these parts
How to fix it
Won’t start
Fixed by these parts
How to fix it
Fridge runs too long
Fixed by these parts
How to fix it
Too warm
Fixed by these parts
How to fix it


Keep searches simple. Use keywords, e.g. "leaking", "pump", "broken" or "fit".
- Customer:
- Gregory from El Dorado, AR
- Parts Used:
- WR17X11843
- Difficulty Level:
- Easy
- Total Repair Time:
- 30 - 60 mins
- Tools:
- Screw drivers
Trough Drain pan was rusted
First I removed the shelving from the refrigerator side I then removed the cover to the refrigerator condenser which consisted of a plastic cover and a styrofoam inner chamber cover. The Condenser is held in place with two stainless phillips head screws. I removed the screws and gently pulled the condenser forward so that the Drain pan co
... Read more
uld be easily removed. The drain pan is made out of thin sheet metal with a galvanized coating that will not hold up it will start rusting in a short time. I inspected the drain pan cleaned it up with a little Muretic acid and it had too many rust holes so I couldn't repair it. I ordered a new Drain pan on Part Select and when it came in I washed it and dried it completely then I sprayed it with Cold Galvanizing compound with zinc particles. You can get this from Home Depot on the spray paint isle. Hopefully the spray Galvanizing will keep it from rusting in the future and leaking inside the refrigerator. The Trough Drain Pan should have been made of Stainless sheet metal or plastic I don't really know why they used the galvanized coated pan. Everything went back together in reverse with no problems. Hopefully this drain pan will last longer than the first drain pan because it was only 4 years old. I remember when the older refrigerators would run for decades.
Read less
Was this instruction helpful to you?
Thank you for voting!
- Customer:
- Paul from Suwanee, GA
- Parts Used:
- WR60X10209
- Difficulty Level:
- Easy
- Total Repair Time:
- 30 - 60 mins
- Tools:
- Nutdriver
Warm freezer and no ice
This story starts with a GE side-by-side refrigerator that has always had wide temperature swings and a temperamental water dispenser. The ice maker was not making ice, and the built in digital thermometer showed it was running warm. I suspected that the heat exchanger was full of dust and so looked there. What I found was that the con
... Read more
denser tank was hot to the touch and the fan wasn’t running. As an experiment, I aimed a fan at the it for a while I saw that the freezer temperature dropped back to normal.
.The fan is marked as 11.2 DC so I checked for voltage at the fan and found some. With three wires and no wiring diagram I wasn’t sure this answered all the questions, but hooking the fan to a 12 volt power supply didn’t get it to spin.
I priced parts at a couple websites before using partselect.com . They also have a good diagram to look at (Sears diagrams are really poor). I ordered the part with 2-day shipping; it arrived on time, was correct and fixed the problem.
Read less
Was this instruction helpful to you?
Thank you for voting!
- Customer:
- Gerald from Benicia, CA
- Parts Used:
- WR30X10093
- Difficulty Level:
- Easy
- Total Repair Time:
- 15 - 30 mins
- Tools:
- Nutdriver, Screw drivers
ice stalactites were drooling out of the icemaker and gumming up the cubes in the receiving tray.
I first shut off water flow to the fridge. Examination of the package (which was not exact in appearance to the original) demonstrated that the electrical connectors were well-insulated so I arrogantly and successfully proceded without disconnecting the power. My fridge is old enough that the model doesn't appear exactly on anyone's list
... Read more
so I wasn't alarmed that it took an extra 10 minutes or so to noodle out how to adapt the slightly different inlet cowling and electrical cord with extension, but the device is pretty simple.
Soon I loosened the two mounting screws with a nut driver, used a screwdriver to pry away the plastic snap-in housing over the electrical socket on the fridge inner wall and pulled away the electrical plug. The original water fill tube remained in its cavity, ready for re-use.
The new unit's mounting points matched the original screw locations perfectly, as did the fill cowling - which on the replacement icemaker has two possible attachment points. The new unit's electrical connector required an extension pigtail to adapt to my socket, but it was included in the package. The extra cable posed a minor cosmetic issue because it hangs in the collection basket a bit, but that will soon be remedied with a tie wrap.
After the water was restored and an anxious wait of a few hours, we had well-formed ice cubes that weren't all stuck together and the stalactites haven't reappeared.
Read less
Was this instruction helpful to you?
Thank you for voting!