


Models
>
ZISW42DCB
ZISW42DCB General Electric Refrigerator
Jump to:
Find Part by Name
Keep searches simple, eg. "belt" or "pump".
Diagrams for ZISW42DCB
Viewing 9 of 9


Keep searches simple, eg. "belt" or "pump".

$216.23
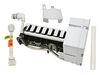
The ice maker assembly makes ice by filling the tray with water from the inlet valve, freezing it until solid cubes are formed, and then ejecting them into the ice bucket. This process will repeat unt...
In Stock

This is a genuine OEM replacement door flap for the ice maker in your refrigerator. This part goes by many different names, including door recess assembly, ice door assembly, dispenser door, ice chute...
In Stock

$8.56
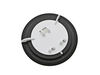
The light switch in your refrigerator is used to turn the light on and off when the fridge door opens or closes. This is considered a closed switch, which means that when the fridge door depresses the...
In Stock

It is used with those refrigerators that have an ice and water dispenser in the door.
No Longer Available

$93.29
This defrost timer will cycle for twenty-five minutes after every six hours of run time. The timer itself is made of plastic, and its terminals are bent, the leads are internal, and the label is orange.
In Stock

$182.85
This water valve assembly has been redesigned. It has a new quick connect style valve. To install: Cut original plastic nuts off tubing and gently push into valve until they stop. No other nuts or connectors needed.
In Stock

$78.77
This part has one port and 2 solenoids and comes with a mounting bracket. The water valve is a solenoid-operated switch located at the bottom of the refrigerator. When it is energized by electrical p...
In Stock

$279.30
This auger and bucket assembly is used on 25 cubic feet and 27 cubic feet side by side models.
In Stock

This kit includes 1 cube solenoid, 1 armature, 2 tooth washers and 2 1/4 hex head screws.
In Stock

$25.98
Found at the end of the auger in the ice container - replace when the icemaker doesn't dispense ice.
In Stock

$90.29
This kit is used on the water/ice dispenser door. This part allows water/ice to be dispensed on demand.
In Stock

Questions and Answers
We're sorry, but our Q&A experts are temporarily unavailable.
Please check back later if you still haven't found the answer you need.
Common Problems and Symptoms for ZISW42DCB
Viewing 19 of 19Ice maker not making ice
Fixed by these parts


How to fix it
Leaking
Fixed by these parts

How to fix it
Light not working
Fixed by these parts

How to fix it
Ice maker won’t dispense ice
Fixed by these parts
How to fix it
Not dispensing water
Fixed by these parts
How to fix it
Fridge too warm
Fixed by these parts


How to fix it
Door Sweating
Fixed by these parts
How to fix it
Freezer section too warm
Fixed by these parts
How to fix it
Frost buildup
Fixed by these parts
How to fix it
Freezer not defrosting
Fixed by these parts
How to fix it
Noisy
Fixed by these parts

How to fix it
Door won’t open or close
Fixed by these parts
How to fix it
Will Not Start
Fixed by these parts


How to fix it
Ice maker dispenses too little ice
Fixed by these parts
How to fix it
Ice maker dispenses too much ice
Fixed by these parts
How to fix it
Fridge and Freezer are too warm
Fixed by these parts
How to fix it
Fridge runs too long
Fixed by these parts
How to fix it
Won’t start
Fixed by these parts
How to fix it
Freezer too cold
Fixed by these parts
How to fix it


Keep searches simple. Use keywords, e.g. "leaking", "pump", "broken" or "fit".
- Customer:
- James from Centerville, OH
- Parts Used:
- WR57X10023
- Difficulty Level:
- Easy
- Total Repair Time:
- Less than 15 mins
- Tools:
- Nutdriver, Socket set, Wrench (Adjustable)
Leaking water valve
Removed black cardboard covering on back of refrig with nut driver (6 screws), turned off water supply to pump, removed cooper waterline to pump with adjustable wrench, removed 1 screw holding pump to refrigerator, removed plastic waterline from pump by turning hose counter clockwise. Inserter plastic water line in new pump by screwing li
... Read more
ne in clockwise, pushed orange plastic stop around waterline into pump, connected cooper water line to pump first wrapping threads on pump with teflon plumbers tape, reinstalled pump to refrig and cardboard back on refrig with 6 screws.
One side note:.
This is the second pump which has burst at the blue plastic seam in seven years.
One side note:.
This is the second pump which has burst at the blue plastic seam in seven years.
Read less
Was this instruction helpful to you?
Thank you for voting!
- Customer:
- Jonathan from Lilburn, GA
- Parts Used:
- WR23X10725
- Difficulty Level:
- Really Easy
- Total Repair Time:
- Less than 15 mins
- Tools:
- Pliers, Screw drivers
Sticking Light Switch
I applied some tips learned by reading other reviews. So before I started I grabbed my trusty vise grip pliers and a small screw driver. I locked onto the switch actuator, the part that the refrigerator door pushes in, with the vise grips and pulled on it just hard enough to get the screw driver inserted in the right side to push in the c
... Read more
atch clip so the switch could be pulled out further each time the catch clip was depressed to the next detent. Then I used the screw driver on the left site to encourage the switch past the detents on the left and very quickly the switch was out of the mount. The wires from the refrigerator pulled out with the old switch. I unplugged the old switch from the wires and plugged in the new switch and shoved the new switch back into the mount, wiggled it a couple of times to make sure it was secure and the job was done. Once I applied the vise gripes at first, the whole job took less than a minute.
Read less
Was this instruction helpful to you?
Thank you for voting!
- Customer:
- Michael from Allen, TX
- Parts Used:
- WR55X129
- Difficulty Level:
- Really Easy
- Total Repair Time:
- Less than 15 mins
- Tools:
- Screw drivers
Ice cubes do not dispense because auger does not turn. Bad switch on control board.
1) Turn off water line and unplug power.
2) Pop off front panel plate at ice cube select switch area.
3) Unscrew 4 screws that holds control panel housing in place.
4) Remove panel assembly by disconnecting two different wiring plugs.
5) Unscrew 2 screws that allows access to control circuit board at end cap.
6) R ... Read more emove circuit board by sliding it out of the assembly housing.
7) Install new circuit control board in assemble housing and screw on end cap retainer.
8) Attach two electrical wiring plugs.
9) Install control board assemble housing into frig opening and secure with 4 screws.
10) Install front panel plate (pops on).
11) Plug in power and turn on water line.
Read less
Was this instruction helpful to you?
Thank you for voting!