


Models
>
CZS22MP2NES1
CZS22MP2NES1 General Electric Refrigerator
Jump to:
Find Part by Name
Keep searches simple, eg. "belt" or "pump".
Diagrams for CZS22MP2NES1
Viewing 10 of 10


Keep searches simple, eg. "belt" or "pump".

$35.95
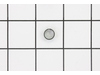
The temperature sensor, also referred to as a thermistor, is used to monitor the refrigerator and freezer internal temperatures. The sensor is a small capsule like device that is protected by a white ...
In Stock
Order now and your part arrives by Jul 30

$38.45
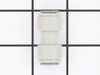
This is an OEM clear plastic module shelf insert (door shelf trim), which is the part of the door shelf bin that snaps onto the front to keep items contained securely on the shelf. This is the shelf i...
In Stock
Order now and your part arrives by Jul 30

$229.80
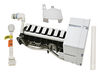
The ice maker assembly makes ice by filling the tray with water from the inlet valve, freezing it until solid cubes are formed, and then ejecting them into the ice bucket. This process will repeat unt...
In Stock
Order now and your part arrives by Jul 30

$16.95
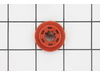
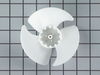
The evaporator fan grommet is used to provide a cushion between the fan motor and the motor mounting bracket in your freezer. This genuine OEM part is about one inch in diameter and is red in color. I...
In Stock
Order now and your part arrives by Jul 30

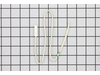
This is a genuine OEM replacement door flap for the ice maker in your refrigerator. This part goes by many different names, including door recess assembly, ice door assembly, dispenser door, ice chute...
In Stock
Order now and your part arrives by Jul 30

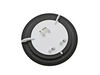
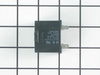
The dispenser door solenoid is the part that controls the flapper door on your ice maker, allowing it to open and close when dispensing ice. If your ice maker is not dispensing ice or water, the door ...
In Stock
Order now and your part arrives by Jul 30

If you are experiencing temperature issues with your refrigerator, there may be an issue with the defrost heater. If this part has failed, it can cause your fridge and freezer to get too warm. It can ...
On Order

$15.26
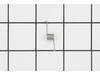
This door recess spring or dispenser lever spring in your refrigerator is used to return the ice door to the closed position or the dispenser lever to the home position once released. You will find th...
In Stock
Order now and your part arrives by Jul 30

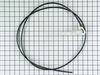
Quick connector for plastic water line - 5/16" to 5/16"
In Stock
Order now and your part arrives by Jul 30

This genuine OEM light switch is used to control the light in your refrigerator. When the fridge door is closed, it depresses the switch and turns the light off. When the fridge door opens, it release...
In Stock
Order now and your part arrives by Jul 30

$15.26
This OEM compression ring is used to hold the evaporator fan motor in place. Signs that you may need to replace the compression ring are if the fan is noisy, or your fridge or freezer are too warm. We...
In Stock
Order now and your part arrives by Jul 30

$76.98
Designed to enhance water quality in select refrigerators, this NSF-certified water filter (Standards 42, 53, and 401) reduces lead, VOCs, and more than 50 other contaminants. It ensures your water ta...
In Stock
Order now and your part arrives by Jul 30
Common Problems and Symptoms for CZS22MP2NES1
Viewing 26 of 26Leaking
Fixed by these parts

How to fix it
Fridge too warm
Fixed by these parts


How to fix it
Noisy
Fixed by these parts
How to fix it
Freezer section too warm
Fixed by these parts
How to fix it
Ice maker not making ice
Fixed by these parts

How to fix it
Not dispensing water
Fixed by these parts
How to fix it
Freezer not defrosting
Fixed by these parts
How to fix it
Ice maker won’t dispense ice
Fixed by these parts
How to fix it
Light not working
Fixed by these parts

How to fix it
Door Sweating
Fixed by these parts
How to fix it
Frost buildup
Fixed by these parts
How to fix it
Fridge too cold
Fixed by these parts
How to fix it
Door won’t open or close
Fixed by these parts
How to fix it
Fridge and Freezer are too warm
Fixed by these parts
How to fix it
Door latch failure
Fixed by these parts
How to fix it
Will Not Start
Fixed by these parts
How to fix it
Too warm
Fixed by these parts
How to fix it
Freezer too cold
Fixed by these parts
How to fix it
Fridge runs too long
Fixed by these parts
How to fix it
Clicking sound
Fixed by these parts
How to fix it
Ice maker dispenses too little ice
Fixed by these parts
How to fix it
Ice maker dispenses too much ice
Fixed by these parts
How to fix it
Doesn’t stop running
Fixed by these parts
How to fix it
Too cold
Fixed by these parts
How to fix it
Won’t start
Fixed by these parts
How to fix it
Leaks water
Fixed by these parts
How to fix it


Keep searches simple. Use keywords, e.g. "leaking", "pump", "broken" or "fit".
- Customer:
- michele from North Smithfield, RI
- Parts Used:
- WR55X10025
- Difficulty Level:
- Really Easy
- Total Repair Time:
- 15 - 30 mins
- Tools:
- Pliers
my refigerator was warm but the freezer was cold and working correcttly
I went to a GE repair center to explain my problem, the service center reccomended that I have a techinician come out o look at it. $75.00 for the visit and what ever labor and materials wuld cost.
I went on line to see if there were others having this same problem and found that there were many with the same problem.
... Read more />After reading some of the ways that people found out what was wrong ...it became a matter of three components, the timer, heater or thermostat.
I tried the most common component and the less expensive one first , the thermostat switch I installed it very easily snipping two wires and attaching the news using wire nuts I used the diagram on this website to pinpoint the component and there has not been a problem since.
Read less
Was this instruction helpful to you?
Thank you for voting!
- Customer:
- Joe from Maryville, TN
- Parts Used:
- WR62X10055, WR17X11653, WR23X10783, WR02X10585
- Difficulty Level:
- Easy
- Total Repair Time:
- 30 - 60 mins
- Tools:
- Screw drivers, Wrench set
Flapper Door Stuck Open Allowing Ice Tube To Frost Shut
I read in a previous post how to do the job from outside fridge which saved me lots of time. No need to remove inner door lining. Here is my procedure:
1.Turned off power. 2.Snapped off outside trim ring. 3.Located three small holes inside lip just above ice tube. The center hole was not used. 4.Pushed rather firmly up through ... Read more two remaining holes with small Allen wrench to release front control panel. 5.Removed (3) wire connectors from printed circuit board. Firmly pull/pry them straight out as lifting on retaining clip will break it off. I broke one & had to elect. tape it back in place later although I doubt it would have ever come off. 6.Release secondary panel by removing (4) screws. The problem was obvious as the solenoid had broken the crank arm off the flapper rod & trapped it open 7.Replaced solenoid, crank arm with flapper attached, spring & micro switch. Switch was okay but I changed anyway. 8.Cleaned all areas with 1/10 bleach water to sanitize. 9.Re-installed evrything in reverse order & all is okay. Thanks to someone for telling about those two small holes. Made job easy versus a very hard one.
1.Turned off power. 2.Snapped off outside trim ring. 3.Located three small holes inside lip just above ice tube. The center hole was not used. 4.Pushed rather firmly up through ... Read more two remaining holes with small Allen wrench to release front control panel. 5.Removed (3) wire connectors from printed circuit board. Firmly pull/pry them straight out as lifting on retaining clip will break it off. I broke one & had to elect. tape it back in place later although I doubt it would have ever come off. 6.Release secondary panel by removing (4) screws. The problem was obvious as the solenoid had broken the crank arm off the flapper rod & trapped it open 7.Replaced solenoid, crank arm with flapper attached, spring & micro switch. Switch was okay but I changed anyway. 8.Cleaned all areas with 1/10 bleach water to sanitize. 9.Re-installed evrything in reverse order & all is okay. Thanks to someone for telling about those two small holes. Made job easy versus a very hard one.
Read less
Was this instruction helpful to you?
Thank you for voting!
- Customer:
- Larry from Menomonie, WI
- Parts Used:
- WR55X10025
- Difficulty Level:
- A Bit Difficult
- Total Repair Time:
- 15 - 30 mins
refrigerator was getting too cold
I removed the old temperature sensor by cutting the wires. I attached the wires of the new sensor with wire nuts and mounted it in the same bracket.
Was this instruction helpful to you?
Thank you for voting!