


Models
>
TBX18AGC
TBX18AGC General Electric Refrigerator
Jump to:
Find Part by Name
Keep searches simple, eg. "belt" or "pump".
Keep searches simple, eg. "belt" or "pump".

$36.42
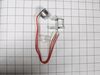
The light switch in your refrigerator is used to turn the light on and off when the fridge door opens or closes. This is considered a closed switch, which means that when the fridge door depresses the...
In Stock
Order now and your part arrives by Jul 30

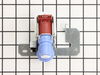
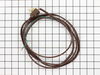
This single outlet valve has 1/4 inch compression fittings, and is intended for use with refrigerators that have ice makers that make crescent shaped ice cubes.
NOTE: As per the manufacturer this v...
In Stock
Order now and your part arrives by Jul 30

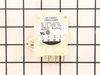
This is a package of twelve Phillips-head screws. They can be used as replacement screws in refrigerators, ice makers, or freezers. Be sure to check that your appliance model is compatible with these ...
No Longer Available

In Stock
Order now and your part arrives by Jul 30

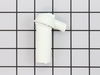
This almond colored door shelf end cap is a little under three inches long.
No Longer Available

In Stock
Order now and your part arrives by Jul 30

In Stock
Order now and your part arrives by Jul 30

In Stock
Order now and your part arrives by Jul 30

In Stock
Order now and your part arrives by Jul 30

Special Order

$39.95
This refrigerator defrost timer will cycle for thirty minutes after every ten hours of run time.
In Stock
Order now and your part arrives by Jul 30

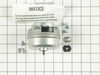
$194.82
This condenser fan motor operates in a clockwise fashion. The fan itself has two 1/4 inch spade terminals. It carries 2 watts and 115 volts. This motor NO longer comes with cover for terminals.
Special Order
Common Problems and Symptoms for TBX18AGC
Viewing 10 of 10Light not working
Fixed by these parts

How to fix it
Leaking
Fixed by these parts
How to fix it
Ice maker not making ice
Fixed by these parts
How to fix it
Noisy
Fixed by these parts
How to fix it
Fridge too warm
Fixed by these parts
How to fix it
Ice maker won’t dispense ice
Fixed by these parts
How to fix it
Not dispensing water
Fixed by these parts
How to fix it
Freezer section too warm
Fixed by these parts
How to fix it
Will Not Start
Fixed by these parts
How to fix it
Freezer not defrosting
Fixed by these parts
How to fix it


Keep searches simple. Use keywords, e.g. "leaking", "pump", "broken" or "fit".
- Customer:
- Jonathan from Lilburn, GA
- Parts Used:
- WR23X37285
- Difficulty Level:
- Really Easy
- Total Repair Time:
- Less than 15 mins
- Tools:
- Pliers, Screw drivers
Sticking Light Switch
I applied some tips learned by reading other reviews. So before I started I grabbed my trusty vise grip pliers and a small screw driver. I locked onto the switch actuator, the part that the refrigerator door pushes in, with the vise grips and pulled on it just hard enough to get the screw driver inserted in the right side to push in the c
... Read more
atch clip so the switch could be pulled out further each time the catch clip was depressed to the next detent. Then I used the screw driver on the left site to encourage the switch past the detents on the left and very quickly the switch was out of the mount. The wires from the refrigerator pulled out with the old switch. I unplugged the old switch from the wires and plugged in the new switch and shoved the new switch back into the mount, wiggled it a couple of times to make sure it was secure and the job was done. Once I applied the vise gripes at first, the whole job took less than a minute.
Read less
Was this instruction helpful to you?
Thank you for voting!
- Customer:
- Paul from Galien, MI
- Parts Used:
- WR57X10033, WR2X8474
- Difficulty Level:
- Easy
- Total Repair Time:
- 15 - 30 mins
- Tools:
- Nutdriver, Wrench (Adjustable)
Icemaker fill tube and funnel icing up; no icecubes
The old fill valve was leaking water at a very low rate, sort of like a dripping faucet. Water was then freezing up in the fill tube and funnel areas, eventually causing the fill tube to push out of the grommet and allowing it to leak into the freezer's rear coil compartment. This resulted in a large icicle forming on the left side of the
... Read more
coils and defrost thermostat.
In addition to low icecube production, I also began to see excessively warm defrost cycles, due to the defrost thermostat being iced over. (Telltale signs--1.Ice cubes melted/frozen into a massive block in the bottom of the ice bucket, 2.Soggy frozen food boxes and soft icecream, 3.Water accumulating under the crisper drawers in the refrigerator.)
I ended up replacing the fill valve, which is about a 10min job, and also had to remove the icemaker and interior rear cover from the freezer compartment to de-ice the coils. This was a NECESSARY step as the freezer is not able to defrost and clear this amount of ice on its own. I used a small hair dryer, being careful not to get it wet. If you tap on the ice to break it up, don't use anything sharp. Just let it thaw--
My circa-1992 Kenmore fridge (363.9711780) does not show up at Sears Parts Direct anymore, but it's a GE unit, and in my case the parts were all listed in the owner's manual using GE "WR" part numbers.
Good Luck!
Read less
Was this instruction helpful to you?
Thank you for voting!
- Customer:
- thomas from richmond, VA
- Parts Used:
- WR57X10033
- Difficulty Level:
- Easy
- Total Repair Time:
- 30 - 60 mins
- Tools:
- Nutdriver, Screw drivers
not making ice
when the ice maker runs through its cycle, you should be able to hear the solinoid valve open, letting water into the ice maker. this was not happening for me. you can dissconnect the plug on the valve and put the two probes from a multimeter in the plug and set for AC volts. when the ice maker runs its cycle, at the end you should see t
... Read more
he meter jump as power is applied to the valve then turns off. this means you do have power to the valve so the valve is defective. turn off water supply to the valve, disconnect the water supply tube to the valve, remove the screw holding the valve, disconnect supply tube to icemaker then hook up supply tube to bottom of valve, screw braket back to refrig, install suppy back to valve, turn water back on and check for leaks and your ice maker should be working properly again.
these guys were really fast on delivery too!
these guys were really fast on delivery too!
Read less
Was this instruction helpful to you?
Thank you for voting!