


Models
>
GTH15BBRLC
GTH15BBRLC General Electric Refrigerator
Jump to:
Find Part by Name
Keep searches simple, eg. "belt" or "pump".
Keep searches simple, eg. "belt" or "pump".

$81.95
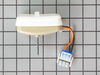
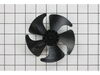
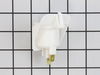
This is an evaporator fan motor, located in the freezer compartment. It is sold as a single unit. It is responsible for moving air over the evaporator coils as the compressor is running. When this par...
In Stock
Order now and your part arrives by Jul 23

$73.79
The crisper drawer cover contains the rails that your crisper drawers slide in and out on, as well as acting as a shelf to store other items in your fridge. If your drawers are difficult to open and c...
On Order

$16.95
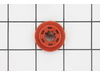
The evaporator fan grommet is used to provide a cushion between the fan motor and the motor mounting bracket in your freezer. This genuine OEM part is about one inch in diameter and is red in color. I...
In Stock
Order now and your part arrives by Jul 23

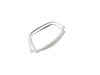
The end cap is used to hold the retainer bar on the fridge door in place. This genuine OEM part is made of white plastic and can be used for either the left or righthand side of the bar. The retainer ...
In Stock
Order now and your part arrives by Jul 23

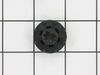
This grommet is found on both the front and back of the fan motor assembly for the condenser and the evaporator in your fridge. It is used to provide a buffer between the fan motor and the mounting br...
In Stock
Order now and your part arrives by Jul 23

$21.95
This 40-Watt light bulb is sold individually.
It is specially designed to withstand extreme temperatures, so this bulb is compatible with a variety of appliance types including refrigerators, ranges,...
In Stock
Order now and your part arrives by Jul 23

$36.42
The light switch in your refrigerator is used to turn the light on and off when the fridge door opens or closes. This is considered a closed switch, which means that when the fridge door depresses the...
In Stock
Order now and your part arrives by Jul 23

$15.26
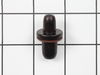
This genuine OEM replacement part is a bumper for your refrigerator. The bumper is made of orange rubber and measures less than half an inch in diameter. The bumper is used to prevent the fan motor fr...
In Stock
Order now and your part arrives by Jul 23

$53.85
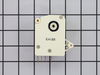
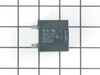
This device acts like a clock. It continually advances and alternates between activating the cooling cycle and the defrost heater.
In Stock
Order now and your part arrives by Jul 23

This is a replacement shelf bar end cap. The end cap connects to the shelf bar on either side, and then snaps into position on the freezer door. This will allow you to store items in the freezer door....
In Stock
Order now and your part arrives by Jul 23

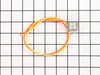
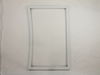
This white rubber door gasket creates an airtight seal for the refrigerator door, helping maintain temperature and energy efficiency. It replaces worn or damaged seals that cause leaks, condensation, ...
In Stock
Order now and your part arrives by Jul 23

This is a package of twelve Phillips-head screws. They can be used as replacement screws in refrigerators, ice makers, or freezers. Be sure to check that your appliance model is compatible with these ...
No Longer Available
Common Problems and Symptoms for GTH15BBRLC
Viewing 16 of 16Noisy
Fixed by these parts
How to fix it
Fridge too warm
Fixed by these parts
How to fix it
Light not working
Fixed by these parts

How to fix it
Freezer section too warm
Fixed by these parts
How to fix it
Freezer not defrosting
Fixed by these parts
How to fix it
Will Not Start
Fixed by these parts

How to fix it
Door won’t open or close
Fixed by these parts

How to fix it
Clicking sound
Fixed by these parts
How to fix it
Fridge and Freezer are too warm
Fixed by these parts
How to fix it
Frost buildup
Fixed by these parts
How to fix it
Fridge runs too long
Fixed by these parts
How to fix it
Door Sweating
Fixed by these parts
How to fix it
Leaking
Fixed by these parts
How to fix it
Too warm
Fixed by these parts
How to fix it
Freezer too cold
Fixed by these parts
How to fix it
Won’t start
Fixed by these parts
How to fix it


Keep searches simple. Use keywords, e.g. "leaking", "pump", "broken" or "fit".
- Customer:
- Luis from College Station, TX
- Parts Used:
- WR60X31522
- Difficulty Level:
- Really Easy
- Total Repair Time:
- 15 - 30 mins
- Tools:
- Screw drivers, Socket set
Freezer Fan
I removed two srews from the back panel inside fthe reezer compartment and the two that hold the air manifold/baffle? and pulled the baffle out. Then, I removed the two srews that hold the front part of the fan bracket behind the baffle and the back panel came out easily. Two more screws and one quick connect plug attached to the fan and
... Read more
I was done with removal. Insallation was even quicker, I slid the original fan right off the old motor and slid it on the new motor's shaft. Piece of cake! Thanks Partselect.
Read less
Was this instruction helpful to you?
Thank you for voting!
- Customer:
- Adrian from Louisville, KY
- Parts Used:
- WR9X489
- Difficulty Level:
- Really Easy
- Total Repair Time:
- 1- 2 hours
- Tools:
- Nutdriver
Refrigerator temp was warm
Per the trouble shooting guide on the home page of the website. I suspected the defrost timer was bad because ice had heavily accumulated on the back wall of the freezer compartment and the temperature inside the refrigerator was warm. First, I removed all the freezer racks. Then removed the (4) screws on the back wall in the freezer c
... Read more
ompartment. I then removed the ben from the ice maker to allow more room. Once I saw all the ice, I unplugged the refrigerator, and used a hair dryer to defrost ( it took about an hour to get it all). Once the ice was all gone, I then moved into the refrigerator compartment and removed the top shelve. This allowed me more room and access to the defrost timer which was behind the back panel. I used the trouble shooting guide to test the old timer prior to removing the new one from the package, (just in case I needed to send it back). Through this test I determined that the timer was bad, it wasn't the heating element or the t-stat. It was very easy to access, I removed the two knobs and lifted up the panel. I located the defrost timer and removed the screws as directed. I replaced the timer just as I had removed it, plugging in the electrical terminals per the removal process. I then reversed the order and put the panel and top shelve back on. Once all complete, I then moved back into the freezer compartment and replace the back panel and then the ice ben. I plugged it in and haven't had a problem since. This site has saved me a tremendous amount of money, a service contractor quoted us $300, to determine the problem. I ordered the part and it was sitting on our door stoop the next morning.
Read less
Was this instruction helpful to you?
Thank you for voting!
- Customer:
- alex from rohnert park, CA
- Parts Used:
- WR60X46086, WR60X31522, WR02X12008
- Difficulty Level:
- Really Easy
- Total Repair Time:
- 30 - 60 mins
- Tools:
- Pliers, Screw drivers, Socket set, Wrench (Adjustable)
evaporator fan making lots of noise
the repair was really easy!!! took longer to put the little clip on the fan part than it was to install the whole moter and put everthing back together
save money do it yourself.....
save money do it yourself.....
Was this instruction helpful to you?
Thank you for voting!