


Models
>
GTN/GTL142WK2
GTN/GTL142WK2 Frigidaire Refrigerator
Jump to:
Find Part by Name
Keep searches simple, eg. "belt" or "pump".
Diagrams for GTN/GTL142WK2
Viewing 6 of 6


Keep searches simple, eg. "belt" or "pump".

$41.75
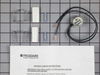
This limiter thermostat cuts out when the temperature inside your refrigerator reaches 55 degrees Fahrenheit and kicks back in when the internal temperature drops to 20 degrees Fahrenheit.
In Stock
Order now and your part arrives by Jul 23

In Stock
Order now and your part arrives by Jul 23

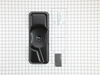
This kit includes the drain pan, thermal mastic, sound dampening pad and 2 retainer wires. This part mounts to the top of the compressor.
No Longer Available

$63.45
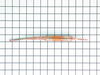
Built to secure critical defrost components in place, this genuine OEM evaporator heater strap ensures proper positioning and heat distribution during the refrigerator’s defrost cycle. Its flexible al...
In Stock
Order now and your part arrives by Jul 23


In Stock
Order now and your part arrives by Jul 23

This part provides protection for the compressor motor against excessive current and excessive temperature use.
No Longer Available

Special Order

Special Order

Special Order


In Stock
Order now and your part arrives by Jul 23
Common Problems and Symptoms for GTN/GTL142WK2
Viewing 11 of 11Fridge too warm
Fixed by these parts
How to fix it
Freezer not defrosting
Fixed by these parts
How to fix it
Freezer section too warm
Fixed by these parts
How to fix it
Fridge runs too long
Fixed by these parts
How to fix it
Freezer too cold
Fixed by these parts
How to fix it
Frost buildup
Fixed by these parts
How to fix it
Fridge and Freezer are too warm
Fixed by these parts
How to fix it
Fridge too cold
Fixed by these parts
How to fix it
Leaking
Fixed by these parts
How to fix it
Too warm
Fixed by these parts
How to fix it
Will Not Start
Fixed by these parts
How to fix it

Keep searches simple. Use keywords, e.g. "leaking", "pump", "broken" or "fit".
- Customer:
- FREDDIE from WHITAKERS, NC
- Parts Used:
- 5303276514, 5303007173
- Difficulty Level:
- Really Easy
- Total Repair Time:
- Less than 15 mins
- Tools:
- Pliers, Screw drivers
Freezer stopped freezing food.
I unplugged electrical cord to the freezer. I removed the cover to the relay and load protector. I labeled the wires and made a diagram on the proper placement of each wire going to the relay. I unplugged each wire and removed the relay. Then I removed the load protector. I installed the new load protector and new relay. I placed the wire
... Read more
s on the proper terminals of the relay. I replaced the electrical cover to the relay and load protector. I plugged the electrical cord back in the electrical outlet. My freezer started working again. I placed several bottles of water in the freezer to make sure the freezer was working properly before I restocked it with food.
Thanks again for the help. You just saved me about $400.
Thanks again for the help. You just saved me about $400.
Read less
Was this instruction helpful to you?
Thank you for voting!
- Customer:
- debra from new washington, OH
- Parts Used:
- 5303917954
- Difficulty Level:
- Really Easy
- Total Repair Time:
- 15 - 30 mins
- Tools:
- Nutdriver, Pliers
freezer kept icing over, refrigerator too hot
First, I unplugged the appliance. Safety, first.
Than I removed the shield which was held in by screws. This covered the fan, thermometer.
The defrost thermostat was taken out, with a little extra force. The wires on the defective part were no longer attached to the part. The instructions were easy to follow in replacing the d ... Read more efrost thermostat. I stripped the coating on the wire, attached it with the enclosed electical bugs. The assy was able to follow, and the part went back on. The refrigerator is working perfectly. I couldn't have done it without the help in diagnosing the problem and with the speedy delivery of the new part. Thanks for all your help and the ease of the installing the new part!
Read less
Was this instruction helpful to you?
Thank you for voting!
- Customer:
- John from Forest, VA
- Parts Used:
- 5303917590
- Difficulty Level:
- A Bit Difficult
- Total Repair Time:
- 1- 2 hours
- Tools:
- Pliers, Wrench (Adjustable)
Drip pan had rusted & was leaking water on the floor
The BIG problem was getting the old drip pan off. The bolt on top of the compressor was too long to allow the removal of the old drip pan. I removed the old drip pan by cutting most of it away with tin shears then cutting the remaining part of the pan around the bolt with a hack saw (taking care not to damage freon lines and raising the p
... Read more
an above the threads of the bolt so as not to damage the threads). I still had to cut half the bolt away with a hack saw by replacing the nut and cutting a third of the bolt away (above the nut), so the new pan would fit. Putting the new pan on was a breeze after that. It may be easier to just cut the bolt off altogether on top of the compressor and use the wire clips per the instructions supplied with the kit to install the new one.
Read less
Was this instruction helpful to you?
Thank you for voting!