


Models
>
FFHI1817LB1
FFHI1817LB1 Frigidaire Refrigerator
Jump to:
Find Part by Name
Keep searches simple, eg. "belt" or "pump".
Diagrams for FFHI1817LB1
Viewing 8 of 8


Manuals & Guides for FFHI1817LB1
Click to downloadInstall
Installation Instructions
(0.84MB)
Install
Installation Instructions
(1.38MB)
Manual
Owner's Manuals
(1.52MB)
Manual
Owner's Manuals
(6.51MB)
Wiring
Wiring Diagram
(0.27MB)
Keep searches simple, eg. "belt" or "pump".

$47.25
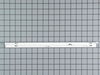
This is a genuine door shelf retaining bar for a refrigerator. It attaches to the inside of the door on the refrigerator and helps to secure items placed on the shelf. It is made of white plastic and ...
In Stock
Order now and your part arrives by Jul 30

$38.24
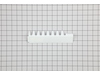
This middle shelf retainer bar attaches to the inside of the refrigerator door and helps to contain items on the shelf inside your appliance, like condiments and small containers. Its approximate size...
In Stock
Order now and your part arrives by Jul 30

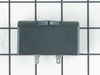
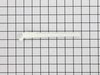
The drawer track support provides support for the right side of the sliding drawer to help it move open and closed easily. This part is sold individually, so if you also require the left side rail it ...
In Stock
Order now and your part arrives by Jul 30

$43.95
This authentic replacement crisper pan, also known as a vegetable drawer, inserts into the refrigerator crisper area. It is used to hold produce and maintain an ideal temperature to help preserve them...
On Order

$53.53
This glass shelf sits above the crisper drawers in your refrigerator. This part is just the glass, there are no brackets or additional mounting hardware (these can be purchased separately if needed). ...
In Stock
Order now and your part arrives by Jul 30
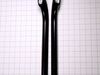
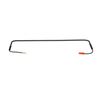
 - Black – Part Number: 5304506471")
This kit comes with the handles for both the freezer and the refrigerator doors, please note that these parts are not sold separately and are only available as a set. They are genuine OEM parts that m...
In Stock
Order now and your part arrives by Jul 30

If you notice that opening and closing the meat pan drawer in your refrigerator has become difficult, there may be an issue with the support rails. Regular wear and tear, or excess weight on the shelf...
In Stock
Order now and your part arrives by Jul 30

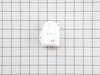
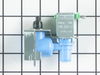
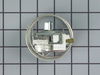
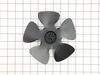
This is a genuine OEM ice maker assembly for your refrigerator. The ice maker makes eight cubes at a time, by filling the mold with water from the inlet valve, freezing the water until the cubes are f...
In Stock
Order now and your part arrives by Jul 30

This is a genuine OEM replacement crisper drawer cover for your refrigerator. It measures approximately 27 inches by 20 inches and does not include the glass insert for the self. You can reuse the gla...
In Stock
Order now and your part arrives by Jul 30

$27.45
This 40-watt light bulb has a standard screw-in base and is used in many different appliances. If your current bulb is burnt out or broken you will need to replace it. This light bulb is a genuine OEM...
In Stock
Order now and your part arrives by Jul 30

$17.47
This screw is used to secure the handle to your refrigerator and comes in a pack of four. This genuinely sourced part can be loosened and tightened with a Phillips-head or square-head screwdriver. Wit...
In Stock
Order now and your part arrives by Jul 30

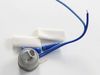
$59.35
When energized, the water inlet valve will release water from the supply line into the ice mold and the water dispenser in the refrigerator. If the ice maker is not making or dispensing ice, not disp...
In Stock
Order now and your part arrives by Jul 30
Common Problems and Symptoms for FFHI1817LB1
Viewing 21 of 21Fridge too warm
Fixed by these parts
How to fix it
Door won’t open or close
Fixed by these parts

How to fix it
Ice maker not making ice
Fixed by these parts
How to fix it
Freezer not defrosting
Fixed by these parts
How to fix it
Freezer section too warm
Fixed by these parts
How to fix it
Will Not Start
Fixed by these parts
How to fix it
Noisy
Fixed by these parts

How to fix it
Leaking
Fixed by these parts
How to fix it
Fridge and Freezer are too warm
Fixed by these parts
How to fix it
Too warm
Fixed by these parts
How to fix it
Ice maker won’t dispense ice
Fixed by these parts
How to fix it
Won’t start
Fixed by these parts
How to fix it
Light not working
Fixed by these parts

How to fix it
Frost buildup
Fixed by these parts
How to fix it
Door Sweating
Fixed by these parts
How to fix it
Fridge runs too long
Fixed by these parts
How to fix it
Fridge too cold
Fixed by these parts
How to fix it
Freezer too cold
Fixed by these parts
How to fix it
Clicking sound
Fixed by these parts
How to fix it
Not dispensing water
Fixed by these parts
How to fix it
Doesn’t stop running
Fixed by these parts
How to fix it


Keep searches simple. Use keywords, e.g. "leaking", "pump", "broken" or "fit".
- Customer:
- Juan from Miami, FL
- Parts Used:
- 241798231
- Difficulty Level:
- Really Easy
- Total Repair Time:
- 15 - 30 mins
- Tools:
- Socket set
Broken ice maker
Unplugged faulty ice maker, removed two screws holding it to the refrigerator and took it out. Reversed the operation with the new ice maker and after a few minutes presto, we have ice.
Was this instruction helpful to you?
Thank you for voting!
- Customer:
- Greg from Hanover Township, PA
- Parts Used:
- 5303918202
- Difficulty Level:
- A Bit Difficult
- Total Repair Time:
- 30 - 60 mins
- Tools:
- Nutdriver, Pliers, Screw drivers
evaporator coil kept freezing up, refridgerator warm.
This was the second part I tried. The defrost timer was first, but that did not fix it. To do this I had to remove the ice maker and the back plate of the freezer. Then I defrosted the coil and cut the wires. stripped them back and installed the new thermostat. re-assembled and tested. has been working great ever since.
Was this instruction helpful to you?
Thank you for voting!
- Customer:
- Bruce from Alton, IL
- Parts Used:
- 241537103
- Difficulty Level:
- Really Easy
- Total Repair Time:
- Less than 15 mins
- Tools:
- Pliers, Screw drivers
Refrigerator would not run but interior light was on.
I unplugged the refrigerator, then opened the door and removed four screws holding the plastic electrical panel to the interior top of the main refrigerator compartment and noticed the cold control was corroded badly, apparently from moisture in the panel. I ordered a new one from partselect.com. When it arrived the next day, I then pul
... Read more
led off the control knob, unclipped the cold control, unplugged the three wires to the control, then removed the styrofoam insulation blocks holding the thermocouple wire and then removed the thermocouple wire to complete the removal. I then reversed the process to install the new thermostat and control. That is repositioned the thermocouple wire, put the insulation blocks back to hold the wire, then replugged the three electrical wires, clipped the control back and pushed the control knob back on and finally screwed the panel back to the top of the main compartment and plugged the refrigerator electrical cord back in to provide current to the refrigerator. It immediately started up and ran fine. Total time - about 8 minutes.
Read less
Was this instruction helpful to you?
Thank you for voting!