


Models
>
FCD14TFW0
FCD14TFW0 Frigidaire Refrigerator
Jump to:
Find Part by Name
Keep searches simple, eg. "belt" or "pump".
Diagrams for FCD14TFW0
Viewing 3 of 3


Keep searches simple, eg. "belt" or "pump".

$26.20
This 40-watt light bulb has a standard screw-in base and is used in many different appliances. If your current bulb is burnt out or broken you will need to replace it. This light bulb is a genuine OEM...
In Stock
Order now and your part arrives by Mar 21

This white door shelf end cap is used for right side of some refrigerator door shelves.
In Stock
Order now and your part arrives by Mar 21

This white door shelf end cap is used for left side of some refrigerator door shelves.
In Stock
Order now and your part arrives by Mar 21

$55.03
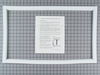
This rack may be longer than what is needed. You will need to cut this rack to make it fit your appliance.
In Stock
Order now and your part arrives by Mar 21

In Stock
Order now and your part arrives by Mar 21


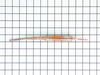
This white door gasket is used to make an air-tight seal for the cabinet when the door is closed.
No Longer Available

This white hinge pin bearing pivots the freezer and refrigerator door.
No Longer Available

In Stock
Order now and your part arrives by Mar 21


In Stock
Order now and your part arrives by Mar 21
Questions and Answers
We're sorry, but our Q&A experts are temporarily unavailable.
Please check back later if you still haven't found the answer you need.
Common Problems and Symptoms for FCD14TFW0
Viewing 4 of 4Light not working
Fixed by these parts

How to fix it
Door Sweating
Fixed by these parts
How to fix it
Fridge too warm
Fixed by these parts
How to fix it
Leaking
Fixed by these parts

How to fix it


Keep searches simple. Use keywords, e.g. "leaking", "pump", "broken" or "fit".
- Customer:
- John from Forest, VA
- Parts Used:
- 5303917590
- Difficulty Level:
- A Bit Difficult
- Total Repair Time:
- 1- 2 hours
- Tools:
- Pliers, Wrench (Adjustable)
Drip pan had rusted & was leaking water on the floor
The BIG problem was getting the old drip pan off. The bolt on top of the compressor was too long to allow the removal of the old drip pan. I removed the old drip pan by cutting most of it away with tin shears then cutting the remaining part of the pan around the bolt with a hack saw (taking care not to damage freon lines and raising the p
... Read more
an above the threads of the bolt so as not to damage the threads). I still had to cut half the bolt away with a hack saw by replacing the nut and cutting a third of the bolt away (above the nut), so the new pan would fit. Putting the new pan on was a breeze after that. It may be easier to just cut the bolt off altogether on top of the compressor and use the wire clips per the instructions supplied with the kit to install the new one.
Read less
Was this instruction helpful to you?
Thank you for voting!
- Customer:
- D KIRKE from CORVALLIS, OR
- Parts Used:
- 5309918806
- Difficulty Level:
- Really Easy
- Total Repair Time:
- Less than 15 mins
Erratic light.
Simple switch repair: Unplug fridge, pull down to remove switch assembly, slip contacts off. Reverse with replacement switch. HOWEVER, check first to see if the bulb filament might be broken, as this could cause the same symptom. OR in my case, the light socket connection was the culprit. Check that too before ordering a replacement s
... Read more
witch.
Read less
Was this instruction helpful to you?
Thank you for voting!
- Customer:
- John from Bowling Green, KY
- Parts Used:
- 5303297557
- Difficulty Level:
- A Bit Difficult
- Total Repair Time:
- 1- 2 hours
- Tools:
- Nutdriver
Refrigerator door gasket was torn at the bottom
After unpacking the new gasket, I laid it in the sun to warm up and become flexible. Then I removed the freezer and refrigerator doors (removing the freezer door was necessary in order to remove the refrigerator door). Then I laid the refrigerator door flat on the door, and loosened the nuts securing the gasket. I removed the old gaske
... Read more
t. Starting at the door's bottom corner, my wife and I worked the new gasket into place, tightening the nuts as we progressed. Fitting the corners in place was the trickiest step. Then we fitted the sides, and finally the top. (I reasoned that if there were any slack, it would be best at the top.)
Read less
Was this instruction helpful to you?
Thank you for voting!