


Models
>
FPIM-18MW2
FPIM-18MW2 Frigidaire Refrigerator
Jump to:
Find Part by Name
Keep searches simple, eg. "belt" or "pump".
Keep searches simple, eg. "belt" or "pump".

$102.10
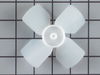
This motor runs the evaporator fan in your refrigerator. It is mounted on the center hub and has three lead wires terminals. This motor rotates in a clockwise fashion. Its shaft has a diameter of 1/8" and is 1-1/4" long.
In Stock
Order now and your part arrives by Mar 26

In Stock
Order now and your part arrives by Mar 26

This water vavle kit comes with a single outlet water valve, union, two screws, and some tubing pieces.
No Longer Available

In Stock
Order now and your part arrives by Mar 26

Special Order

Special Order


Special Order


Questions and Answers
We're sorry, but our Q&A experts are temporarily unavailable.
Please check back later if you still haven't found the answer you need.
Common Problems and Symptoms for FPIM-18MW2
Viewing 5 of 5Noisy
Fixed by these parts

How to fix it
Fridge too warm
Fixed by these parts
How to fix it
Ice maker not making ice
Fixed by these parts

How to fix it
Light not working
Fixed by these parts

How to fix it
Freezer section too warm
Fixed by these parts
How to fix it


Keep searches simple. Use keywords, e.g. "leaking", "pump", "broken" or "fit".
- Customer:
- Jordan from Maumee, OH
- Parts Used:
- 5308000010, 5300158289
- Difficulty Level:
- Easy
- Total Repair Time:
- 1- 2 hours
- Tools:
- Nutdriver
Noisy fan
1. Removed the 7 nuts using the nut driver from the freezer back panel inside the freezer.
2. Remove the back panel. The evaporator motor and fan are located above the coils.
3. Unplug the wiring harness.
4. Remove the two gold mounting screws holding the motor and fan in place.
5. Remove the motor and fan including th ... Read more e brackets.
6. Install the new motor and fan onto the mounting bracket.
6a. Attach the green ground to the mounting bracket.
7. Screw the two gold screws back into the freezer.
8. Attach the new wiring harness. Note, the old harness had a mounting hole/space for it to connect to the wiring harness of the freezer. The new motor's harness was not long enough for this, so it is connected freely to the freezer harness.
9. Use the hair dryer to melt any ice that may have formed on the coils and hole where the fan goes.
10. Turn the freezer on to see if the fan turns on.
11. Reinstall the back panel.
All done!
Read less
Was this instruction helpful to you?
Thank you for voting!
- Customer:
- ROY from PENSACOLA, FL
- Parts Used:
- 5308000010, 5300158289
- Difficulty Level:
- A Bit Difficult
- Total Repair Time:
- 1- 2 hours
- Tools:
- Pliers, Screw drivers
The Evaporator Fan Burnt Up
The fan motor all but caught the inside of the freezer on fire . Had to remove then clean, and I mean clean the walls of the freezer . Then had to pry out the old fan without breaking anything . Replacement of new fan was quick and easy because all the parts that I needed were in the bag
Was this instruction helpful to you?
Thank you for voting!
- Customer:
- ERIC from SAN ANTONIO, TX
- Parts Used:
- 5303917098
- Difficulty Level:
- Really Easy
- Total Repair Time:
- 15 - 30 mins
- Tools:
- Nutdriver, Pliers
Icemaker Wasnt Making Ice
After unplugging electric cord and turning off water at wall, I then removed the two screws that secured the valve to the refrigerator. I then removed the water connections to the valve and removed a short portion of the hose going to the icemaker. I then installed the connection pieces provided package and reversed the procedures to
... Read more
install the new part. It was easier than I thought it would be.
Read less
Was this instruction helpful to you?
Thank you for voting!