


Models
>
GFS2271L10
GFS2271L10 (MN10) Caloric Refrigerator
Jump to:
Find Part by Name
Keep searches simple, eg. "belt" or "pump".
Diagrams for GFS2271L10
Viewing 10 of 10


Keep searches simple, eg. "belt" or "pump".

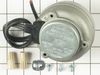
This condenser fan motor is used with frost-free refrigerators with a condenser coil. When the compressor runs, so does this fan, circulating air through the refrigerator grille, cooling the compresso...
In Stock
Order now and your part arrives by Aug 2

In Stock
Order now and your part arrives by Aug 2

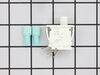
Made for use with older model Maytag brand series 06 Halo of Heat style electric clothes dryers, this pre-stretched heating element coil carries 240 volts.
No Longer Available

$45.00
This filter dryer is for refrigerators and filters refrigerant that travels through the sealed system of the refrigerator.
In Stock
Order now and your part arrives by Aug 2

$17.44
This microwave time delay fuse is a 20-amp safety component designed to protect the appliance from damage caused by power surges. If your microwave fails to start, a blown fuse may be the reason. Repl...
In Stock
Order now and your part arrives by Aug 2


Special Order
Common Problems and Symptoms for GFS2271L10
Viewing 10 of 10Fridge too warm
Fixed by these parts
How to fix it
Noisy
Fixed by these parts
How to fix it
Freezer section too warm
Fixed by these parts
How to fix it
Fridge runs too long
Fixed by these parts
How to fix it
Fridge and Freezer are too warm
Fixed by these parts
How to fix it
Will Not Start
Fixed by these parts
How to fix it
Won’t Start
Fixed by these parts
How to fix it
Running With Door Open
Fixed by these parts
How to fix it
Too warm
Fixed by these parts
How to fix it
Leaking
Fixed by these parts
How to fix it


Keep searches simple. Use keywords, e.g. "leaking", "pump", "broken" or "fit".
- Customer:
- Tom from Franklin, WI
- Parts Used:
- 833697
- Difficulty Level:
- A Bit Difficult
- Total Repair Time:
- 15 - 30 mins
- Tools:
- Nutdriver, Pliers
Sometimes the condenser fan would start causing the refrigerator to overheat.
Unplug the appliance.
Removed the screws holding the back panel.
Removed the fan blade.
removed 3 screws holding the condenser fan.
Remove the 3 metal brackets attached to the fan.
(First note which studs the brackets are attached to. Attach the 3 metal brackets to the new fan. (New screws were supplied)
Cut ... Read more and strip the wire about two inches from the fan.
Cut and strip the new wire. I cut the new wire in half (about 6 inches.) Connect the two wires, twist and used 2 wire nuts. Tie wrap the wire to the wire harness. Mount the new fan (three screws)
Screw the back panel back on.
Mount the new
Read less
Was this instruction helpful to you?
Thank you for voting!
- Customer:
- Don from Jacksonville, FL
- Parts Used:
- W10169313
- Difficulty Level:
- Really Easy
- Total Repair Time:
- 15 - 30 mins
- Tools:
- Nutdriver
Switch sticking in on position
FIRST unplug dryer from electrical source, CAUTION, the top of this dryer does not open with clips, do not pry on top to open! On the front of the dryer look under the lower panel, and find two screws, one on the left side, and one on the right, remove these screws, and pull slightly down on panel to remove. Behind this panel find two s
... Read more
crews holding the door panel, one on the left, and one on the right, remove the left, and support the door panel while removing the right side. Gently pull the bottom of door panel outward, and the clips on top of door panel will unhinge from top, carefully rotate left side of door panel to floor, and note the wire connections on switch, and orientation of switch, then unplug wires, and move door panel to a comfortable working positon. Door must be open to remove switch, then depress the two plastic retaining keepers on each side of switch, and push switch through toward door. Replace with new switch, reconnect the wires, and reassymble in reverse order. Remember, door assymbly must be inserted in dryer top at an angle, and then bottom rotated downward, and bottom panel nylon guildes inserted into door panel bottom.
Read less
Was this instruction helpful to you?
Thank you for voting!
- Customer:
- robert from nashotah, WI
- Parts Used:
- 833697
- Difficulty Level:
- A Bit Difficult
- Total Repair Time:
- 30 - 60 mins
- Tools:
- Nutdriver, Socket set
noisy fan motor
rmv panel (5min) rmv fan/motor 3 screws (10 m) cut wire 2in from motor, re route remainder of wire to front so can strip for wire nuts. ( 10m) attach old fan to new motor, place in old opening ,3 screws, a little fussy to align, ( 15m ) route and strip wire from new motor , zip ties work well, wire nuts , plug in fridge vola, no noise, c
... Read more
lose up, reverse panel. ( 20m). i also took time to clean grilles with small vac and damp rag, ( looks and sounds like new) bob Wi.
Read less
Was this instruction helpful to you?
Thank you for voting!