This is a genuine OEM Torx screw that measures 7-18 and 3/4-inch. The screw is sold individually and can be used in a variety of appliances. The star shaped head allows the screw to have more torque a...
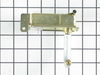
This genuine OEM part is a replacement sensor for your oven. The sensor works with the control board to measure and regulate the temperature in your oven. If the sensor has become defective, the tempe...
This is a genuine OEM replacement knob for your range. It is black in color and made of plastic. The knobs are sold individually and designed to fit onto a D-shaped shaft. The knobs are used to turn o...
This is a screw and it is made for multiple appliances in your home. This model is called a sheet metal screw because it has sharp points, and the threads are closer together. This screw is designed t...
Restore your oven’s performance with this easy-to-install gas igniter. It connects via a wire harness and requires only a screwdriver for replacement. Ideal for ovens that won’t start or heat properly...
This oven rack is an OEM part designed specifically for ovens. It provides an accessible storage system for oven racks and baking sheets when not in use. This rack measures 15.5 x 25in.
Noticing heat escaping from your oven? This door gasket might be the fix. It wraps around the edge of the oven door to keep heat in, helping your meals cook faster and more evenly. It’s made from toug...
Ask our experts a question about this part and we'll get back to you as soon as possible!
2 questions answered by our experts.
< Prev
1
Next >
Sort by:
Search filter:
Clear Filter
Your search term must have 3 or more characters.
Keep searches simple. Use keywords, e.g. "leaking", "pump", "broken" or "fit".
Sorry, we couldn't find any existing answers that matched. Try using some different or simpler keywords, or submit your new question by using the "Ask a Question" button above!
Ron
July 25, 2023
Burner is off but still ticks
For model number WFG320M0BW2
Hi Ron, Thank you for reaching out. The most common cause is a build up on the burner. We suggest removing and cleaning the Burner around the ignition spark igniter. We hope this helps!
Was this helpful?
Thank you for voting!
Daylon
February 15, 2026
Replaced igniter and oven gas valve. Oven will light but is slow to heat. Only reaches about 380 degrees. Has propane conversion.
For model number WFG320M0BW2
Hello Daylon, thank you for contacting us. Since replacing the igniter and oven gas valve did not help, we would recommend checking the oven temperature sensor, part number FIX11749737. It might be sending incorrect resistance readings to the control board, which prematurely cuts the gas flow before the target heat is reached. Over time, these sensors can drift out of calibration or develop internal shorts, tricking the oven into thinking it has reached the maximum heat when the physical cavity is still much cooler. Replacing it might help fix the issue. Good luck with your repair!
I numbered every part. ex: 1 L., for first part removed left side. I used a magic marker to circle the holes and wrote the number of screws used on the part, set the srews in a separete place, so that I new where these screws went to. The cleanup was pretty time consuming, but I was able to keep my stove, when every repairman I called to
... Read more fix my stove told me I was better off buying a new stove. ($600.00 stove 2 years old)Please Note: The insulation blanket needed for the entire stove is two pieces, the sides and top are one part # and the bottom and back, are another part #. I did not know this. I just purchased the top and sides. I got lucky, the back and bottom were still in good shape. So I guess I should have read the description of the part more carefully to see what it covers, before I ordered it. It took two people two hours to do the work, it was really nice to have an extra set of eyes, to remember what direction pieces of metal from the stove went. I would do it all over in a heart beat instead of buying a new stove.
Opened up the back of the stove. Unpluged the sensor. Replaced the sensor. Replace the back of the stove.
The sensor that has been replaced is not what is expected. After reading all of the instructions for adjusting the temperatures, the only temp that stays steady is when we first turn on the oven to 350 degrees. That stays s
... Read moreteady but when I turn it to 400 it slowly goes up to 425 degrees.
Google the error code that the range was displaying and found others with the same symptoms. Then found several people that had fixed the problem by replacing the oven sensor. I then ordered the sensor and replaced it, which fixed the problem.


 Diagram and Parts List for Whirlpool Range")