


Models
>
GY396LXPS01
GY396LXPS01 Whirlpool Range
Jump to:
Find Part by Name
Keep searches simple, eg. "belt" or "pump".
Diagrams for GY396LXPS01
Viewing 6 of 6


Manuals & Guides for GY396LXPS01
Click to downloadInstall
Installation Instructions
(0.47MB)
Install
Installation Instructions
(1.98MB)
Manual
Owner's Manuals
(2.14MB)
Keep searches simple, eg. "belt" or "pump".

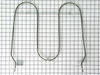
$63.68
The bake element is located in the bottom of the oven and is used to heat the oven for cooking and baking. If the element is not heating up, providing little or inconsistent heat, or is getting too ho...
In Stock
Order now and your part arrives by Jul 31

$83.81
This chrome oven rack is a genuine replacement component designed to fit a variety of standard ovens. Measuring approximately 24.76 inches wide by 15.78 inches deep, it provides a stable surface for b...
In Stock
Order now and your part arrives by Jul 31

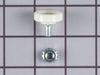
$21.82
This is a screw and it is made for multiple appliances in your home. This model is called a sheet metal screw because it has sharp points, and the threads are closer together. This screw is designed t...
In Stock
Order now and your part arrives by Jul 31

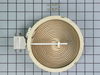
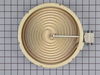
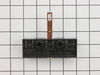
This 6 Inch 1200-watt radiant surface element with limiter is located under the main cooktop. When the element is turned on, it will heat up and provide heat to the cooking area on top of the range. I...
In Stock
Order now and your part arrives by Jul 31

$24.15
This 18 ml bottle of white appliance touch-up paint is used to cover scratches or marks on your appliance. The white touch-up paint can be used on refrigerators, microwaves, ranges, clothes dryers, an...
In Stock
Order now and your part arrives by Jul 31

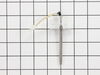
$73.24
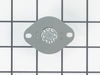
This temperature sensor detects the temperature within the oven cavity.
In Stock
Order now and your part arrives by Jul 31

$53.58
This part establishes and maintains the internal temperature of the oven cavity.
In Stock
Order now and your part arrives by Jul 31
 – Part Number: WP4173175")
$49.29
This 15-watt, 120-volt light bulb is designed to illuminate the interior of wall ovens and ranges, allowing clear visibility during cooking. It serves as a direct replacement for burned-out bulbs and ...
In Stock
Order now and your part arrives by Jul 31

$94.41
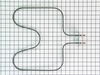
Designed for electric ranges and wall ovens, this broil element provides the heat needed for broiling from the top of the oven. It’s a direct replacement for faulty or burnt-out elements and fits sele...
In Stock
Order now and your part arrives by Jul 31

In Stock
Order now and your part arrives by Jul 31

In Stock
Order now and your part arrives by Jul 31

In Stock
Order now and your part arrives by Jul 31
Common Problems and Symptoms for GY396LXPS01
Viewing 8 of 8Element will not heat
Fixed by these parts
How to fix it
Little to no heat when baking
Fixed by these parts
How to fix it
Will Not Start
Fixed by these parts
How to fix it
Oven is too hot
Fixed by these parts
How to fix it
Oven not heating evenly
Fixed by these parts
How to fix it
Little to no heat when broiling
Fixed by these parts
How to fix it
Door won’t close
Fixed by these parts
How to fix it
Door won’t open after self cleaning cycle
Fixed by these parts
How to fix it


")


Keep searches simple. Use keywords, e.g. "leaking", "pump", "broken" or "fit".
- Customer:
- Mark from Loxahatchee, FL
- Parts Used:
- W10823711
- Difficulty Level:
- Really Easy
- Total Repair Time:
- 15 - 30 mins
- Tools:
- Nutdriver, Screw drivers
Right rear burner went bad
Turned the breaker off, I removed 2 screws securing the range top to the range, opened the top and secured it in the up position, Removed the 2 screws securing the element ,one at a time I swapped the quick connectors from the old element to the new and repeated the process in reverse. I save over $100.00 in labor, plus most companies get
... Read more
you for a trip charge. It was easy!!
Read less
Was this instruction helpful to you?
Thank you for voting!
- Customer:
- Daniel from Cheraw, SC
- Parts Used:
- WPW10207397
- Difficulty Level:
- Really Easy
- Total Repair Time:
- Less than 15 mins
- Tools:
- Screw drivers
I broke the Bake Element while cleaning the oven.
I removed the two screws that held the bake element in place. Next I removed the Bake Element. I had to unscrew the oven to go behind it because when one piece off of the element broke, it slide back behind the oven. I pushed the wire back thru the piece holes, connected the Element, and pushed the element with the wires back through the
... Read more
holes. I rescrewed the element in place and the oven. PartSelect helped me to save this year's Christmas.
Read less
Was this instruction helpful to you?
Thank you for voting!
- Customer:
- Frederick from St. Louis, MO
- Parts Used:
- WP9759243
- Difficulty Level:
- Easy
- Total Repair Time:
- 15 - 30 mins
- Tools:
- Nutdriver, Pliers
No heat after cleaning oven
This built-in oven was slid out of it's space and set on a box. I removed the back cover with nut driver and located the safety overload device. removed nuts and used pliers to remove wires and replace them. The power must be off to do this repair.Replaced the cover and slid back into place. This could be a lot more difficult if your pow
... Read more
er cord or gas line is not long enough to make it out of your wall space. Or of your oven is attached well to the frame.
Read less
Was this instruction helpful to you?
Thank you for voting!