


Models
>
WEG750H0HB7
WEG750H0HB7 Whirlpool Range
Jump to:
Find Part by Name
Keep searches simple, eg. "belt" or "pump".
Diagrams for WEG750H0HB7
Viewing 6 of 6


 Diagram and Parts List for Whirlpool Range")
Keep searches simple, eg. "belt" or "pump".

In Stock
Order now and your part arrives by Jul 31

$21.82
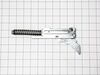
This is a screw and it is made for multiple appliances in your home. This model is called a sheet metal screw because it has sharp points, and the threads are closer together. This screw is designed t...
In Stock
Order now and your part arrives by Jul 31

In Stock
Order now and your part arrives by Jul 31

In Stock
Order now and your part arrives by Jul 31

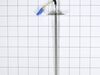
$108.03
This oven temperature sensor is a key component in maintaining accurate heat levels during cooking. It detects the internal temperature of the oven and sends signals to the control board to regulate h...
In Stock
Order now and your part arrives by Jul 31

In Stock
Order now and your part arrives by Jul 31

In Stock
Order now and your part arrives by Jul 31

In Stock
Order now and your part arrives by Jul 31

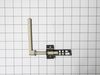
$80.98
This bake igniter is used in gas ovens with Direct Spark Ignition (DSI). It ignites the gas for the bake burner. Turn off the circuit breaker and gas supply before installation. Check compatibility before ordering.
In Stock
Order now and your part arrives by Jul 31

In Stock
Order now and your part arrives by Jul 31

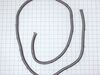
$51.43
This oven door gasket prevents heat from escaping the oven cavity when in use. It contains all of the attaching clips needed for installation.
In Stock
Order now and your part arrives by Jul 31

On Order
Common Problems and Symptoms for WEG750H0HB7
Viewing 6 of 6Little to no heat when baking
Fixed by these parts
How to fix it
Oven not heating evenly
Fixed by these parts
How to fix it
Door won’t close
Fixed by these parts
How to fix it
Will Not Start
Fixed by these parts
How to fix it
Oven is too hot
Fixed by these parts
How to fix it
Gas igniter glows, but will not light
Fixed by these parts
How to fix it


Keep searches simple. Use keywords, e.g. "leaking", "pump", "broken" or "fit".
- Customer:
- Wendy from Red Hook, NY
- Parts Used:
- WPW10208653
- Difficulty Level:
- Easy
- Total Repair Time:
- More than 2 hours
- Tools:
- Screw drivers
mice had made nests in the insulation wrap in the range
I numbered every part. ex: 1 L., for first part removed left side. I used a magic marker to circle the holes and wrote the number of screws used on the part, set the srews in a separete place, so that I new where these screws went to. The cleanup was pretty time consuming, but I was able to keep my stove, when every repairman I called to
... Read more
fix my stove told me I was better off buying a new stove. ($600.00 stove 2 years old)Please Note: The insulation blanket needed for the entire stove is two pieces, the sides and top are one part # and the bottom and back, are another part #. I did not know this. I just purchased the top and sides. I got lucky, the back and bottom were still in good shape. So I guess I should have read the description of the part more carefully to see what it covers, before I ordered it. It took two people two hours to do the work, it was really nice to have an extra set of eyes, to remember what direction pieces of metal from the stove went. I would do it all over in a heart beat instead of buying a new stove.
Read less
Was this instruction helpful to you?
Thank you for voting!
- Customer:
- Sarah from Raleigh, NC
- Parts Used:
- W10833885
- Difficulty Level:
- Really Easy
- Total Repair Time:
- 15 - 30 mins
- Tools:
- Screw drivers
Oven temperature was WAY off, sometimes 50 degrees.
Turned the breaker off. Removed the racks, pulled the oven out and removed the back. Disconnected and unscrewed the old sensor from the back, connected and screwed in the new one. Returned the racks and slid the oven back in.
The only remotely challenging part was disconnecting the old sensor. I had to figure out where to pres ... Read more s with the flat screwdriver to get it to release.
I had found a good YouTube video and didn't use the app.
The only remotely challenging part was disconnecting the old sensor. I had to figure out where to pres ... Read more s with the flat screwdriver to get it to release.
I had found a good YouTube video and didn't use the app.
Read less
Was this instruction helpful to you?
Thank you for voting!
- Customer:
- Richard from MAGALIA, CA
- Parts Used:
- W10919249
- Difficulty Level:
- Very Easy
- Total Repair Time:
- Less than 15 mins
burned the rubber feet off of the burner grates
cleaned the hole and inserted glue, then the rubber feet.
Was this instruction helpful to you?
Thank you for voting!