


Models
>
MER6770AAW
MER6770AAW Whirlpool Range
Jump to:
Find Part by Name
Keep searches simple, eg. "belt" or "pump".
Keep searches simple, eg. "belt" or "pump".

In Stock
Order now and your part arrives by Aug 2
Common Problems and Symptoms for MER6770AAW
Viewing 3 of 3Element will not heat
Fixed by these parts
How to fix it
Little to no heat when baking
Fixed by these parts
How to fix it
Oven not heating evenly
Fixed by these parts
How to fix it
Keep searches simple. Use keywords, e.g. "leaking", "pump", "broken" or "fit".
- Customer:
- Ernest from Live Oak, FL
- Parts Used:
- 74004105
- Difficulty Level:
- Easy
- Total Repair Time:
- 15 - 30 mins
- Tools:
- Screw drivers
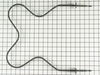
Heating element did not heat
I removed the two small screws, gently pulled the element outward, slid the wire connectors off the ends of the element legs and reversed the process to install the new one. THE ELEMENT STILL DOES NOT HEAT. There must be a bad switch or thermostat at the ON switch area. That will be checked out by a Repair man as soon as I can get a sched
... Read more
ule from him.
Read less
Was this instruction helpful to you?
Thank you for voting!
- Customer:
- Madelyn from BOCA RATON, FL
- Parts Used:
- 74004105
- Difficulty Level:
- Really Easy
- Total Repair Time:
- 15 - 30 mins
- Tools:
- Pliers, Screw drivers
The much used, upper oven heating element burned out and needed to be replaced.
I pulled the range out, unplugged it and removed the back panel with a Phillips-head screwdriver. I then removed the two screws inside the oven that holds the element in place. I located the two wires on the back of the range attached to the element. I gently pulled off the wires using a pliers and then easily removed the burned out el
... Read more
ement. I put the ends of the replacement element into the respective holes, screwed them in and then plugged the wires back on at the back of the range. After replacing the back panel, I plugged the range back in. I turned the oven on with an oven thermometer inside, to test it out. I imagine I saved at least a couple of hundred dollars for the repair with this simple DIY, if not, the cost of a new double oven range!
Read less
Was this instruction helpful to you?
Thank you for voting!
- Customer:
- JAMES from WAYNE, PA
- Parts Used:
- 74004105
- Difficulty Level:
- A Bit Difficult
- Total Repair Time:
- More than 2 hours
- Tools:
- Pliers, Screw drivers
dual oven range, upper bake element melted
Removed oven door and rack. Removed two screws holding element. Disconnected wires to element. One of the wires slipped into the back wall of the oven. The range had to be removed from the counter and back panel removed to gain access to the element wires. Install new bake element in upper oven. Connect wires to element spade lugs.
... Read more
Install rear panel. Restore power at circuit breaker panel. Very important - aways disconnect power before starting work.
Read less
Was this instruction helpful to you?
Thank you for voting!