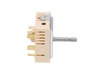
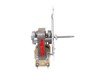
This infinite switch, also known as a regulator control, is designed for triple burner elements in compatible range ovens. Located within the control panel, it manages the operation of the surface ele...
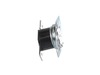
This convection fan motor assembly is designed to circulate hot air throughout the oven cavity, promoting even heat distribution for more consistent baking and roasting results. By keeping air moving ...
This oven temperature sensor plays a critical role in maintaining consistent cooking performance by monitoring the internal temperature and relaying that data to the control board. By regulating the h...
This main top is for ranges. It provides a stable cooking surface and houses the surface cooking burners.
In Stock
Order now and your part arrives by Aug 2
Questions and Answers
Ask our experts a question about this part and we'll get back to you as soon as possible!
5 questions answered by our experts.
< Prev
1
Next >
Sort by:
Search filter:
Clear Filter
Your search term must have 3 or more characters.
Keep searches simple. Use keywords, e.g. "leaking", "pump", "broken" or "fit".
Sorry, we couldn't find any existing answers that matched. Try using some different or simpler keywords, or submit your new question by using the "Ask a Question" button above!
Diane
February 5, 2022
The clock on the panel is barely visible, even when you touch the wake up
For model number NE58F9710WS
Hello Diane, thank you for writing. We have researched the model you have provided and have found the part you are looking for is the control module board Fix Number: FIX8764881. We hope to hear from you soon.
1 person found this helpful.
Was this helpful?
Thank you for voting!
Jordan
June 18, 2022
Oven range works but oven key pad won’t wake up nor will the oven come on.
For model number NE58F9710WS
Hello Jordan, Thank you for your inquiry. We have researched the model number that you have provided and if you've already held control lock for 3 seconds, first try unplugging the stove to try and reset the control board. If that does not fix the issue, you may need to replace the control board, part# FIX8764881. We hope this helps and if you need help placing an order, customer service is open 7 days a week. Please feel free to give us a call. We look forward to hearing from you!
Oven will not heat on any setting. Nor, will heating drawer. Blower working.
For model number NE58F9710WS
Hello Jeff, thank you for your question. These parts are controlled by the Assembly DISPLAY;NE-F900A,IC part PS8764881. If you need help placing an order, customer service is open 7 days a week. Please feel free to give us a call. We look forward to hearing from you.
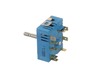
Hello James, thank you for your inquiry. According to our research, the problem appears to be with the Surface Element Control Switch, part number FIX11735755. If that does not take care of the issue, then most probably replacing the Radiant Element, part number FIX11720670, will solve the issue. Customer service is always available to help you place an order if you are having trouble doing so. Good luck with your repair.
Oven wont heat past 175 until you've tried about 20+ times.
For model number NE58F9710WS
Hello Megan, Thank you for writing. We suggest testing the Oven Temperature Sensor. Testing the temperature sensor probe on your oven is easy. With the sensor at room temperature, measure the resistance between the two prongs at the end of the sensor connector. The resistance of the sensor should read approximately 1080 – 1090 ohms at room temperature. If the Sensor is good, you have a faulty Oven Control and Display Board. We hope this helps!
I removed the control panel with a Phillips screwdriver and unplugged the burner switch and replaced the new switch and put the control panel back in place and turned on the burner and it worked as it should.i realized that I only would have only had to remove the 4 screws on the bottom of the control panel. All I would have had to do was
... Read more just take those 4 screws out and remove the switch control knob and the two screws that held the switch in. Am very happy with the results
This oven has two fans that counter rotate. One spins clockwise, the other counterclockwise. Because of this, the motors and the fan blades are different. The schematic shows the counter clockwise rotating fan with a right hand threaded shaft/nut on the bottom and the clockwise motor and fan with the left hand nut on the top. My range
... Read more had the motors in the exact opposite orientation, but the fan blades on the motors as shown on the schematic. The incorrect assembly at the factory (I bought new in the box, so I know this is the first repair) meant that nether fan blade was turning the correct direction. So do yourself a favor, be sure you’re buying the right motor (clockwise or counterclockwise) and be sure you put the right fan blade on the right motor. The Samsung motor ending in F is the counterclockwise motor that has the right hand threaded shaft the clockwise motor with the left hand threaded shaft ends in E.
Cool oven, open door. Turn off electrical power. I laid a cloth over door to protect and to catch ant screws that my fat fingers would drop. I removed 4 screws under control panel. I pulled panel up and off stove face. My wife held it safely as I removed the triple burner knob. I then placed new switch, on stove top in same position as ol
... Read mored one. I then removed screws holding old knob to release from control panel. The removed electrical connections one at a time and installed on new switch. Reinstalled switch back in control panel. Reinstalled control panel. Placed knob back in place. Turned electrical power back on. Then tested burner. Wife is happy and so am I.