


Models
>
SGS395XX0
SGS395XX0 Roper Range
Jump to:
Find Part by Name
Keep searches simple, eg. "belt" or "pump".
Diagrams for SGS395XX0
Viewing 7 of 7


Manuals & Guides for SGS395XX0
Click to downloadKeep searches simple, eg. "belt" or "pump".

$19.75
This is a genuine OEM 40-Watt replacement light bulb that is compatible with various types of appliances. It has a frosted glass bulb with a standard metal socket base, making it easy to screw and uns...
In Stock
Order now and your part arrives by Jul 24

$57.30
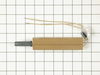
This is an authentic OEM replacement part.?This flat style over igniter is commonly used in ranges and wall ovens. This igniter is specifically used to ignite the broil element. The igniter pulls curr...
In Stock
Order now and your part arrives by Jul 24

In Stock
Order now and your part arrives by Jul 24

$82.76
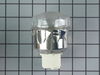
This is an authentic OEM replacement part. This oven light assembly is used in a number of appliances, most often it can be found in ranges, wall ovens, microwaves, and microwave oven combos. This lig...
In Stock
Order now and your part arrives by Jul 24

Special Order

$112.81
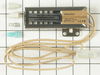
This igniter is lighted by the spark switch to produce a flame to ignite the oven.
In Stock
Order now and your part arrives by Jul 24


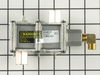
This part makes sure that no gas is released until the igniter gets enough power to ignite the gas range.
No Longer Available

This is an authentic OEM replacement part. This gas valve burner orifice is designed for use with ranges, cooktops, and microwave oven combos. This part features a small hole the works to supply the ...
No Longer Available

In Stock
Order now and your part arrives by Jul 24

Special Order

This part sends enough current to the igniter to create a spark to the bottom of the burner cap.
No Longer Available
Common Problems and Symptoms for SGS395XX0
Viewing 5 of 5Gas igniter glows, but will not light
Fixed by these parts
How to fix it
Will Not Start
Fixed by these parts
How to fix it
Little to no heat when baking
Fixed by these parts
How to fix it
Element will not heat
Fixed by these parts
How to fix it
Little to no heat when broiling
Fixed by these parts
How to fix it


Keep searches simple. Use keywords, e.g. "leaking", "pump", "broken" or "fit".
- Customer:
- John from Niles, MI
- Parts Used:
- 786324
- Difficulty Level:
- Easy
- Total Repair Time:
- 15 - 30 mins
- Tools:
- Screw drivers
Oven wouldn't heat. Glow ignitor was weak and wouldn't ignite flame.
After shutting off the gas and removing the oven door, which simply slid off of the hinges, I removed the oven plate. The ignitor was attached to the manifold. I removed that and noted the wires were attached back behind a hole in the back of the oven. I thought I would have to access them from the back but when I pulled on them I was
... Read more
able to reach them from the front. I was surprised to find plastic lugs covering the wire ends, rather than ceramic. I attached the new ignitor wires and reused the plastic lugs, as no ceramic ones came with the new ignitor. I carefully slid the new ignitor back into the cage/shield attached to the manifold and replaced the manifold. I then turned the gas back on and tested the ignitor (which worked perfectly) before replacing the oven plate. The repair took less than 30 minutes, but my wife and I thoroughly cleaned the door and interior while we had it apart. The hardest part was getting the door back on the hinges, but this too was accomplished after several attempts. The oven heats up beautifully now.
Read less
Was this instruction helpful to you?
Thank you for voting!
- Customer:
- Wendy from Red Hook, NY
- Parts Used:
- WPW10208653
- Difficulty Level:
- Easy
- Total Repair Time:
- More than 2 hours
- Tools:
- Screw drivers
mice had made nests in the insulation wrap in the range
I numbered every part. ex: 1 L., for first part removed left side. I used a magic marker to circle the holes and wrote the number of screws used on the part, set the srews in a separete place, so that I new where these screws went to. The cleanup was pretty time consuming, but I was able to keep my stove, when every repairman I called to
... Read more
fix my stove told me I was better off buying a new stove. ($600.00 stove 2 years old)Please Note: The insulation blanket needed for the entire stove is two pieces, the sides and top are one part # and the bottom and back, are another part #. I did not know this. I just purchased the top and sides. I got lucky, the back and bottom were still in good shape. So I guess I should have read the description of the part more carefully to see what it covers, before I ordered it. It took two people two hours to do the work, it was really nice to have an extra set of eyes, to remember what direction pieces of metal from the stove went. I would do it all over in a heart beat instead of buying a new stove.
Read less
Was this instruction helpful to you?
Thank you for voting!
- Customer:
- james from long beach, NY
- Parts Used:
- 814269
- Difficulty Level:
- Easy
- Total Repair Time:
- 30 - 60 mins
- Tools:
- Nutdriver, Pliers, Screw drivers
ignitor glowed but did not ignite
took oven base plate out. diconnected ignitor , put new clips on neutral wire as per instructions, inserted new ignitor, put everything back, worked ok.
Was this instruction helpful to you?
Thank you for voting!