


Models
>
B995CXM5P
B995CXM5P Maytag Range
Jump to:
Find Part by Name
Keep searches simple, eg. "belt" or "pump".
Keep searches simple, eg. "belt" or "pump".
 – Part Number: WP7406P012-60")
This spade style bake element is 16 inches long and 16 inches wide. The depth of the terminals is two inches. Use it for your Maytag brand electric range or oven.
In Stock
Order now and your part arrives by Jul 23


Common Problems and Symptoms for B995CXM5P
Viewing 1 of 1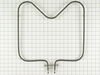
Keep searches simple. Use keywords, e.g. "leaking", "pump", "broken" or "fit".
- Customer:
- Mary from Salisbury, NC
- Parts Used:
- WP7406P012-60
- Difficulty Level:
- Really Easy
- Total Repair Time:
- Less than 15 mins
- Tools:
- Pliers, Screw drivers
heat element wouldn't heat after 30 years of cooking
Pulled screws loose from element, pulled old element out and replaced with new..really simple
Was this instruction helpful to you?
Thank you for voting!
- Customer:
- tom from cincinnati, OH
- Parts Used:
- WP7406P012-60
- Difficulty Level:
- Really Easy
- Total Repair Time:
- 15 - 30 mins
- Tools:
- Screw drivers
Lower element in oven not heating.
Removed, tested and measured the old element. Got on line to find the part and ran across Part Select. Ordered and received the part in three business days. It was an exact fit and in good order. The total operation including removal and replacement of the element, locating and ordering the part only took about thirty minutes.....and that
... Read more
includes the ten minutes it took me to find my #2 Phillips screwdriver! : )
Read less
Was this instruction helpful to you?
Thank you for voting!
- Customer:
- Daniel from Prescott, MI
- Parts Used:
- 7201P036-60
- Difficulty Level:
- A Bit Difficult
- Total Repair Time:
- 1- 2 hours
- Tools:
- Pliers, Screw drivers, Wrench (Adjustable)
Burned up oven door gasket needed replaced.
I started by removing the door, then trying to remove all of the screws in the oven casing. Of course the very middle screw in the bottom of the oven was rusted and dammged by use. I had to use a drill bit and remove the old screw. After dissasembly of the oven casing, I found that the lip that supports the gasket was rusted and burnt awa
... Read more
y about 3/4 in. I placed the new gasket in and found that when closed it covered this defect and sealed. I reassembled and cheked for operation.Ok! Imortant--remove the elements before removing oven casing.
Read less
Was this instruction helpful to you?
Thank you for voting!