


Models
>
YMIT8795BS00
YMIT8795BS00 Maytag Range
Jump to:
Find Part by Name
Keep searches simple, eg. "belt" or "pump".
Diagrams for YMIT8795BS00
Viewing 7 of 7


 Diagram and Parts List for Maytag Range")
Keep searches simple, eg. "belt" or "pump".
 – Part Number: W11665456")
$23.05
This part includes one range leveling leg, sourced directly from the original manufacturer. The leveling leg is what supports the range and ensures it is sitting level, stable, and at the proper heigh...
In Stock
Order now and your part arrives by Mar 19

$20.95
This is a screw and it is made for multiple appliances in your home. This model is called a sheet metal screw because it has sharp points, and the threads are closer together. This screw is designed t...
In Stock
Order now and your part arrives by Mar 19

$7.30
This is a multi-use screw and can be used on a variety of appliances. The measurements of the screw are: 8/18 x 3/8. *Please note: the screw is sold individually. Refer to the manual provided by the m...
In Stock
Order now and your part arrives by Mar 19

$11.50
This 18 ml bottle of white appliance touch-up paint is used to cover scratches or marks on your appliance. The white touch-up paint can be used on refrigerators, microwaves, ranges, clothes dryers, an...
In Stock
Order now and your part arrives by Mar 19

$26.73
It provides a way of connecting individual electrical wires and offers protection of the device from electrical surges (voltages and/or currents).
In Stock
Order now and your part arrives by Mar 19

In Stock
Order now and your part arrives by Mar 19

$65.23
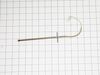
The light socket on your electric range connects the power source to the light bulb. If your oven light is malfunctioning, you may need to replace the light socket. The light socket is located in the ...
In Stock
Order now and your part arrives by Mar 19

In Stock
Order now and your part arrives by Mar 19

In Stock
Order now and your part arrives by Mar 19

In Stock
Order now and your part arrives by Mar 19

In Stock
Order now and your part arrives by Mar 19

In Stock
Order now and your part arrives by Mar 19
Questions and Answers
We're sorry, but our Q&A experts are temporarily unavailable.
Please check back later if you still haven't found the answer you need.
Common Problems and Symptoms for YMIT8795BS00
Viewing 6 of 6Will Not Start
Fixed by these parts


How to fix it
Little to no heat when baking
Fixed by these parts

How to fix it
Element will not heat
Fixed by these parts
How to fix it
Door won’t close
Fixed by these parts

How to fix it
Touchpad does not respond
Fixed by these parts
How to fix it
Oven not heating evenly
Fixed by these parts
How to fix it


")


Keep searches simple. Use keywords, e.g. "leaking", "pump", "broken" or "fit".
- Customer:
- Wendy from Red Hook, NY
- Parts Used:
- WPW10208653
- Difficulty Level:
- Easy
- Total Repair Time:
- More than 2 hours
- Tools:
- Screw drivers
mice had made nests in the insulation wrap in the range
I numbered every part. ex: 1 L., for first part removed left side. I used a magic marker to circle the holes and wrote the number of screws used on the part, set the srews in a separete place, so that I new where these screws went to. The cleanup was pretty time consuming, but I was able to keep my stove, when every repairman I called to
... Read more
fix my stove told me I was better off buying a new stove. ($600.00 stove 2 years old)Please Note: The insulation blanket needed for the entire stove is two pieces, the sides and top are one part # and the bottom and back, are another part #. I did not know this. I just purchased the top and sides. I got lucky, the back and bottom were still in good shape. So I guess I should have read the description of the part more carefully to see what it covers, before I ordered it. It took two people two hours to do the work, it was really nice to have an extra set of eyes, to remember what direction pieces of metal from the stove went. I would do it all over in a heart beat instead of buying a new stove.
Read less
Was this instruction helpful to you?
Thank you for voting!
- Customer:
- Joseph from Decatur, GA
- Parts Used:
- WPW10245259
- Difficulty Level:
- Easy
- Total Repair Time:
- 30 - 60 mins
- Tools:
- Nutdriver, Screw drivers, Socket set, Wrench set
Burned terminal block and filter board
Removed and replaced above named parts, rewired.Be sure to tighten all nuts that secure wires. I believe this is what caused the problem.
Was this instruction helpful to you?
Thank you for voting!
- Customer:
- Edmund from Emporium, PA
- Parts Used:
- W11594027
- Difficulty Level:
- Easy
- Total Repair Time:
- 15 - 30 mins
- Tools:
- Pliers, Screw drivers
Socket Light had a bad thread
Socket Lite come with clips attached to the outside
of the housing. After you unhook the 3 lead wires
that are attached to the unit. All you have to do is push in on the clips and release the unit. Then you
snap in the new unit. Attach the 3 wire leads, put a
oven bulb in the socket end, and the install the light cove ... Read more r
of the housing. After you unhook the 3 lead wires
that are attached to the unit. All you have to do is push in on the clips and release the unit. Then you
snap in the new unit. Attach the 3 wire leads, put a
oven bulb in the socket end, and the install the light cove ... Read more r
Read less
Was this instruction helpful to you?
Thank you for voting!