


Models
>
MER6600FB2
MER6600FB2 Maytag Range
Jump to:
Find Part by Name
Keep searches simple, eg. "belt" or "pump".
Diagrams for MER6600FB2
Viewing 6 of 6


 Diagram and Parts List for Maytag Range")
Keep searches simple, eg. "belt" or "pump".

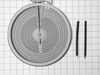
If the large surface burner on your range will not heat up, you may need to replace the switch. This genuine OEM switch is used to control the temperature of the large 8-inch burner, along with turnin...
In Stock
Order now and your part arrives by Jul 30

$76.42
This genuine OEM part is a replacement sensor for your oven. The sensor works with the control board to measure and regulate the temperature in your oven. If the sensor has become defective, the tempe...
In Stock
Order now and your part arrives by Jul 30

$21.82
This is a screw and it is made for multiple appliances in your home. This model is called a sheet metal screw because it has sharp points, and the threads are closer together. This screw is designed t...
In Stock
Order now and your part arrives by Jul 30

$24.15
This 18 ml bottle of white appliance touch-up paint is used to cover scratches or marks on your appliance. The white touch-up paint can be used on refrigerators, microwaves, ranges, clothes dryers, an...
In Stock
Order now and your part arrives by Jul 30

$82.67
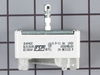
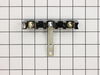
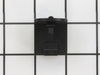
Having trouble with your cooktop’s heat settings? This dual element control switch helps regulate temperature for dual burners, giving you better control while cooking. It’s a direct replacement for s...
In Stock
Order now and your part arrives by Jul 30

$27.83
It provides a way of connecting individual electrical wires and offers protection of the device from electrical surges (voltages and/or currents).
In Stock
Order now and your part arrives by Jul 30

$53.58
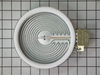
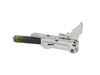
This OEM surface element control switch regulates heat for 6-inch electric burners. It fits Whirlpool, KitchenAid, Maytag, and other compatible ranges. Common signs of failure include no heat, stuck o...
In Stock
Order now and your part arrives by Jul 30

$50.36
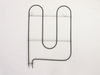
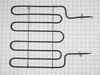
This broiler pan and roasting rack set features a two-piece design that allows fat to drain away for cleaner cooking and reduced splatter. Made with a durable, high-heat resistant porcelain finish, it...
In Stock
Order now and your part arrives by Jul 30

$52.50
Need a new oven rack? This chrome wire rack is built to handle the heat and give you a solid surface for baking, broiling, or roasting. It fits a variety of compatible ovens and is tough enough for ev...
In Stock
Order now and your part arrives by Jul 30

$67.93
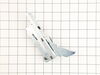
The light socket on your electric range connects the power source to the light bulb. If your oven light is malfunctioning, you may need to replace the light socket. The light socket is located in the ...
In Stock
Order now and your part arrives by Jul 30

$35.34
This part is used as a safety feature. If your range overheats this part will shut the range down.
In Stock
Order now and your part arrives by Jul 30

In Stock
Order now and your part arrives by Jul 30
Common Problems and Symptoms for MER6600FB2
Viewing 10 of 10Element will not heat
Fixed by these parts
How to fix it
Little to no heat when baking
Fixed by these parts

How to fix it
Oven is too hot
Fixed by these parts
How to fix it
Oven not heating evenly
Fixed by these parts
How to fix it
Will Not Start
Fixed by these parts
How to fix it
Door won’t close
Fixed by these parts
How to fix it
Little to no heat when broiling
Fixed by these parts
How to fix it
Will not program
Fixed by these parts
How to fix it
Touchpad does not respond
Fixed by these parts
How to fix it
Door won’t open after self cleaning cycle
Fixed by these parts

How to fix it


Keep searches simple. Use keywords, e.g. "leaking", "pump", "broken" or "fit".
- Customer:
- Ruth from Oregon, IL
- Parts Used:
- WPW10181986
- Difficulty Level:
- Really Easy
- Total Repair Time:
- 15 - 30 mins
- Tools:
- Screw drivers
temperature not accurate after 3 1/2 years of happy usage
Opened up the back of the stove. Unpluged the sensor. Replaced the sensor. Replace the back of the stove.
The sensor that has been replaced is not what is expected. After reading all of the instructions for adjusting the temperatures, the only temp that stays steady is when we first turn on the oven to 350 degrees. That stays s ... Read more teady but when I turn it to 400 it slowly goes up to 425 degrees.
The sensor that has been replaced is not what is expected. After reading all of the instructions for adjusting the temperatures, the only temp that stays steady is when we first turn on the oven to 350 degrees. That stays s ... Read more teady but when I turn it to 400 it slowly goes up to 425 degrees.
Read less
Was this instruction helpful to you?
Thank you for voting!
- Customer:
- chaz from fairplay, CO
- Parts Used:
- WP3149400
- Difficulty Level:
- Easy
- Total Repair Time:
- 15 - 30 mins
- Tools:
- Screw drivers
the element did not turn compleatly off, the on light stayed on.
removed the screws holding the back metal panel, this exposed the wires to the switch. tested the wires to find that they were live when the switch was in the off position. ordered a new switch. UNPLUGED THE STOVE. removed the knob on the front of the stove. this exposed 2 screws, removed screws and the switch came away from the stove. re
... Read more
moved each wire from the old switch and replaced them in the same position on the new switch. inserted new switch into the stove and attached the 2 screws. replaced back panel and pluged in stove. all tested well
Read less
Was this instruction helpful to you?
Thank you for voting!
- Customer:
- John from Clinton, CT
- Parts Used:
- WP3149400
- Difficulty Level:
- Easy
- Total Repair Time:
- 15 - 30 mins
- Tools:
- Pliers, Screw drivers
Burner would go high without warning
We felt the only possible problem could be the switch assembly. I removed the switch panel, removed the wires from the old switch, one at a time, removed the old switch assembly and installed the new switch assembly. The extended stem did have to be snapped off (per your instructions) and that too was a very simple task.
Was this instruction helpful to you?
Thank you for voting!