


Models
>
28FA-7CXW-19
28FA-7CXW-19 Magic Chef Range
Jump to:
Find Part by Name
Keep searches simple, eg. "belt" or "pump".
Diagrams for 28FA-7CXW-19
Viewing 5 of 5 Diagram and Parts List for Magic Chef Range")
 Diagram and Parts List for Magic Chef Range")

 Diagram and Parts List for Magic Chef Range")
 Diagram and Parts List for Magic Chef Range")
Keep searches simple, eg. "belt" or "pump".

$19.75
This is a genuine OEM 40-Watt replacement light bulb that is compatible with various types of appliances. It has a frosted glass bulb with a standard metal socket base, making it easy to screw and uns...
In Stock
Order now and your part arrives by Aug 1

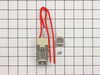
This genuine OEM kit includes the parts required to replace a surface burner receptable on your range. The kit comes with a plastic block, a metal bracket, high temperature wire nuts, and wires. The b...
In Stock
Order now and your part arrives by Aug 1

$27.83
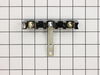
It provides a way of connecting individual electrical wires and offers protection of the device from electrical surges (voltages and/or currents).
In Stock
Order now and your part arrives by Aug 1

$50.36
This broiler pan and roasting rack set features a two-piece design that allows fat to drain away for cleaner cooking and reduced splatter. Made with a durable, high-heat resistant porcelain finish, it...
In Stock
Order now and your part arrives by Aug 1

In Stock
Order now and your part arrives by Aug 1

This clock knob is just under an inch long. It is black in color and is made of plastic. There is a chrome disc of decoration on its top.
No Longer Available
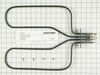
 – Part Number: WPY04000041")
This spade style bake element with push on wire terminals is 15 inches long and 19 inches wide. The depth of the terminals is three inches.
In Stock
Order now and your part arrives by Aug 1

In Stock
Order now and your part arrives by Aug 1
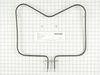
 – Part Number: WPY04000048")
This oven broil element with push on terminals can be used with some electric ranges or ovens. It comes with four screws and an instructions sheet. This element also has a terminal depth of three inch...
In Stock
Order now and your part arrives by Aug 1

$63.68
This oven door seal is seventeen and a half inches long. It is made of rubber and has a metal hook on either end to hold it in place. This seal sits on top of the glass window pane.
In Stock
Order now and your part arrives by Aug 1

Special Order

In Stock
Order now and your part arrives by Aug 1
Common Problems and Symptoms for 28FA-7CXW-19
Viewing 7 of 7Element will not heat
Fixed by these parts
How to fix it
Little to no heat when baking
Fixed by these parts
How to fix it
Will Not Start
Fixed by these parts
How to fix it
Little to no heat when broiling
Fixed by these parts
How to fix it
Door won’t close
Fixed by these parts
How to fix it
Touchpad does not respond
Fixed by these parts
How to fix it
Oven not heating evenly
Fixed by these parts
How to fix it


Keep searches simple. Use keywords, e.g. "leaking", "pump", "broken" or "fit".
- Customer:
- Richard from Carthage, NC
- Parts Used:
- 12001676
- Difficulty Level:
- Really Easy
- Total Repair Time:
- Less than 15 mins
- Tools:
- Pliers, Screw drivers
Stove top element not working due to bad receptacle.
Turned off the power at the breaker box, cut the wires approximately 5 inches from the bad receptacle and removed it after removing one screw. Stripped back the wires about 1/2 inch and attached the new wires with the ceramic wire nuts provided and secured the receptacle back in place with the new screw provided in the kit.
My sister ... Read more 's husband wanted to scrap the whole range but I repaired it with $14.00 worth of parts.
The element is working great now.
Whenever I need appliance parts again I'll use partselect.com.
My sister ... Read more 's husband wanted to scrap the whole range but I repaired it with $14.00 worth of parts.
The element is working great now.
Whenever I need appliance parts again I'll use partselect.com.
Read less
Was this instruction helpful to you?
Thank you for voting!
- Customer:
- Joseph from Decatur, GA
- Parts Used:
- WPW10245259
- Difficulty Level:
- Easy
- Total Repair Time:
- 30 - 60 mins
- Tools:
- Nutdriver, Screw drivers, Socket set, Wrench set
Burned terminal block and filter board
Removed and replaced above named parts, rewired.Be sure to tighten all nuts that secure wires. I believe this is what caused the problem.
Was this instruction helpful to you?
Thank you for voting!
- Customer:
- Anita from Hudson, CO
- Parts Used:
- WPY04000041
- Difficulty Level:
- Really Easy
- Total Repair Time:
- 15 - 30 mins
- Tools:
- Pliers, Screw drivers
Element burned out
Unplug Stove removed screws pulled out
element. Lifted off the wires with a pliers they slid
onto the element ends that were pointed up
was very easy.
element. Lifted off the wires with a pliers they slid
onto the element ends that were pointed up
was very easy.
Was this instruction helpful to you?
Thank you for voting!