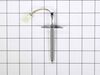
If your appliance isn’t heating or cooling the way it should, this temperature sensor might be the issue. Also known as a thermistor, it helps your appliance stay at the right temperature by working w...
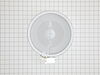
This top-mounted heating element helps your oven broil and bake evenly. If your oven isn’t heating properly or the element looks damaged, this genuine replacement can restore performance. It’s built t...
Ask our experts a question about this part and we'll get back to you as soon as possible!
2 questions answered by our experts.
< Prev
1
Next >
Sort by:
Search filter:
Clear Filter
Your search term must have 3 or more characters.
Keep searches simple. Use keywords, e.g. "leaking", "pump", "broken" or "fit".
Sorry, we couldn't find any existing answers that matched. Try using some different or simpler keywords, or submit your new question by using the "Ask a Question" button above!
Harry
May 27, 2026
The oven works fine but the right side elements don't work and the left side rear works but using it makes the front left turn on!!
For model number LRE3061ST
Hi Harry, thank you for reaching out. According to our research, replacing the oven relay control board can fix the cross-firing left relay and restore the dead right-side power gateway simultaneously. Because both the leaking left-rear relay and the dead right-side power line are housed entirely on this one centralized part. The oven relay control board for your model is part number FIX12080414. We hope this sorts out your problem!
Where, behind the removable back panel,is the oven relay board (FIX12080414) located?? I'm looking around back there and I don't see this part!! Thanks in advance. -
For model number LRE3061ST
Hello Harry, thank you for getting in touch. It is located inside the lower back service compartment (near the bottom of the unit), rather than the upper console. Remove the lower rear access panel. You will see a large metal panel at the lower half of the range's back. Remove the screws holding this panel in place. Once the panel is off, you will see the main relay board mounted to the frame or a metal bracket in this lower electronics compartment. Before removing the panel you will need to note down or take a clear picture of the wires connected to it. We hope this helps.
Dropped a hammer on the range while removing a ceiling light. Viewed a How-To video on Google. Ordered the needed parts. Followed the steps from the How-To video. Reinstall was a bit tricky by myself - could have used an extra set of hands. I have a few words of caution: 1) Put something between the range top and range - like a
... Read moresheet or drop cloth - to prevent a dropped screw from falling into a crevice in the stove. I dropped a screw and was unable to retrieve it, even with a magnet. 2) Makes sure you remove all bumpers, screws, clips, etc. from the item being replaced and put them on the new item if the new item does not come with replacement bumpers, screws, etc.
The repair person could not complete the job as the part sent is totally wrong for the appliance. The company has not responded to me email sent 12/30/23 and there is no way to leave a voice mail or ask for a call back, due to large call volume. A live representative does not answer the phone.
Please check your emails. You ask
... Read morefor feedback on repair, but obviously do not take time to check emails for issues. Because the error is on the part of PartSelect I requested an RMA to return an incorrect part. Please respond by sending a shipping label so it can be returned for a refund. I have submitted a dispute with the credit card company since your company is negligent in customer service. Please email RMA shipping label to [email protected]