


Models
>
KESH307GBS0
KESH307GBS0 KitchenAid Range
Jump to:
Find Part by Name
Keep searches simple, eg. "belt" or "pump".
Diagrams for KESH307GBS0
Viewing 6 of 6


Manuals & Guides for KESH307GBS0
Click to downloadKeep searches simple, eg. "belt" or "pump".

$18.54
This is a genuine OEM 40-Watt replacement light bulb that is compatible with various types of appliances. It has a frosted glass bulb with a standard metal socket base, making it easy to screw and uns...
In Stock
Order now and your part arrives by Apr 6

$81.19
Glass only. This inner door glass is used in ranges. It creates a transparent heat barrier inside your oven door.
In Stock
Order now and your part arrives by Apr 6

$11.98
This 18 ml bottle of white appliance touch-up paint is used to cover scratches or marks on your appliance. The white touch-up paint can be used on refrigerators, microwaves, ranges, clothes dryers, an...
In Stock
Order now and your part arrives by Apr 6

In Stock
Order now and your part arrives by Apr 6

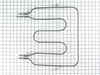
This bake element has push-on wire terminals and is found at the bottom of your oven cavity.
No Longer Available

In Stock
Order now and your part arrives by Apr 6

In Stock
Order now and your part arrives by Apr 6

$67.93
The light socket on your electric range connects the power source to the light bulb. If your oven light is malfunctioning, you may need to replace the light socket. The light socket is located in the ...
In Stock
Order now and your part arrives by Apr 6

This 10 oz bottle of cooktop cleaner is formulated to safely and effectively remove tough, baked-on residues from glass, ceramic, and porcelain surfaces. Its non-abrasive, creamy texture breaks down s...
No Longer Available

In Stock
Order now and your part arrives by Apr 6

In Stock
Order now and your part arrives by Apr 6

In Stock
Order now and your part arrives by Apr 6
Questions and Answers
We're sorry, but our Q&A experts are temporarily unavailable.
Please check back later if you still haven't found the answer you need.
Common Problems and Symptoms for KESH307GBS0
Viewing 8 of 8Element will not heat
Fixed by these parts


How to fix it
Little to no heat when baking
Fixed by these parts

How to fix it
Door won’t close
Fixed by these parts


How to fix it
Little to no heat when broiling
Fixed by these parts
How to fix it
Oven not heating evenly
Fixed by these parts

How to fix it
Noisy
Fixed by these parts

How to fix it
Will Not Start
Fixed by these parts

How to fix it
Oven is too hot
Fixed by these parts
How to fix it


Keep searches simple. Use keywords, e.g. "leaking", "pump", "broken" or "fit".
- Customer:
- MANNY from LIVERMORE, CA
- Parts Used:
- WP9781593
- Difficulty Level:
- Easy
- Total Repair Time:
- 15 - 30 mins
- Tools:
- Screw drivers
Inside door glass broke
I removed the oven door by lifting it off with the hinges. Disassembled the door parts one at time making sure I remember where I removed the screws until I am able to get to the broken glass. The most difficult part is making sure that the insulation strip & the gasket stayed in place after I replaced the broken glass & doing the reverse
... Read more
process of installing the parts together. Relatively easy process as long as you remember where the parts go. When in doubt, I had to refer to the pictorial of the disassembled door shown on your website.
Read less
Was this instruction helpful to you?
Thank you for voting!
Inner Oven Door Shattered during cooking.
First, layed tape across all broken glass to keep glass from shattering more and releasing more bits of glass. Pull up and out the oven door. Had table set aside covered with an old sheet to lay door on, After laying door on table, Removed outer screws. Needed phillips #2 & #3 tip widths and electric screwdriver, for inner screws that whe
... Read more
re difficult to remove. Making notes of what came off first! ( (rt & left, bottom,/top) when removing metal frame braces, and in what order they go in when reassembled . Did the same with screws & set them aside in groups. Then marked the groups of screws. Removed the metal door panel. Carefully removed the in between panel of glass. Set Outer glass aside along with metal "door"and inner door glass,and proped them up in a safe place. Carefully removed the broken & shattered inside glass wearing rubber gloves. Had a garbage can next to the table to with news paper to wrap glass. Cleaned area. Replaced glass taking care not to tighted screws so much as to break the glass. Put added insulation.(Whcih was not the same as in diagram), around the edge. put back the inner glass panel, care not to leave prints, tighten screw ( care not to break glass) Cleaned the door sides and bottom, all had alot of grease buildup.
Put back the metal door portion. Cleaned the outer glass door front and back. Being careful not to break it (or leave prints inside). Replaced the side and bottom metal frames. Wiped it down and put door back on stove.
Put back the metal door portion. Cleaned the outer glass door front and back. Being careful not to break it (or leave prints inside). Replaced the side and bottom metal frames. Wiped it down and put door back on stove.
Read less
Was this instruction helpful to you?
Thank you for voting!
- Customer:
- Edmund from Emporium, PA
- Parts Used:
- W11594027
- Difficulty Level:
- Easy
- Total Repair Time:
- 15 - 30 mins
- Tools:
- Pliers, Screw drivers
Socket Light had a bad thread
Socket Lite come with clips attached to the outside
of the housing. After you unhook the 3 lead wires
that are attached to the unit. All you have to do is push in on the clips and release the unit. Then you
snap in the new unit. Attach the 3 wire leads, put a
oven bulb in the socket end, and the install the light cove ... Read more r
of the housing. After you unhook the 3 lead wires
that are attached to the unit. All you have to do is push in on the clips and release the unit. Then you
snap in the new unit. Attach the 3 wire leads, put a
oven bulb in the socket end, and the install the light cove ... Read more r
Read less
Was this instruction helpful to you?
Thank you for voting!