


Models
>
91195859991
91195859991 Kenmore Range
Jump to:
Find Part by Name
Keep searches simple, eg. "belt" or "pump".
Keep searches simple, eg. "belt" or "pump".

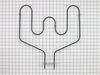
The bake element sits at the bottom of the oven to provide heat for cooking and baking. You may need to replace the element if you notice your oven is not coming up to temperature, has hot spots, or i...
In Stock
Order now and your part arrives by Jul 27

$21.95
This 40-Watt light bulb is sold individually.
It is specially designed to withstand extreme temperatures, so this bulb is compatible with a variety of appliance types including refrigerators, ranges,...
In Stock
Order now and your part arrives by Jul 27

$133.21
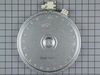
This is a large dual haliant element with a limiter or sensor for glass cooktops and freestanding ranges. It is a 2500-watt part. The inner diameter measures 9 inches, while the outer diameter measure...
In Stock
Order now and your part arrives by Jul 27

In Stock
Order now and your part arrives by Jul 27

$52.50
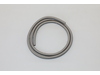
The oven door gasket creates a seal between the oven door and the opening of the oven to prevent heat from escaping when the oven is closed.
In Stock
Order now and your part arrives by Jul 27

$15.26
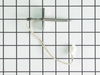
This part is the replacement light socket for your oven. The oven light socket provides power to the light, and at the same time holds the light bulb in place.
In Stock
Order now and your part arrives by Jul 27

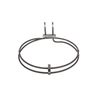
This haliant burner element is a gneuine OEM replacement part for your stove. This element is 8 inches in diameter. The element lies underneath the stovetop, and will need to be replaced if it stops h...
In Stock
Order now and your part arrives by Jul 27

In Stock
Order now and your part arrives by Jul 27

In Stock
Order now and your part arrives by Jul 27

In Stock
Order now and your part arrives by Jul 27

$151.25
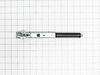
This kit includes the sensor as well as the connectors. NOTE This sensor is 2" long.
In Stock
Order now and your part arrives by Jul 27

$139.41
If your cooktop isn?t heating evenly or won?t turn on, this 6-inch radiant heating element might be the fix. It sits under the glass surface and glows red when it?s working, giving you steady heat for...
In Stock
Order now and your part arrives by Jul 27
Common Problems and Symptoms for 91195859991
Viewing 6 of 6Element will not heat
Fixed by these parts

How to fix it
Little to no heat when baking
Fixed by these parts
How to fix it
Oven not heating evenly
Fixed by these parts
How to fix it
Oven is too hot
Fixed by these parts
How to fix it
Door won’t close
Fixed by these parts
How to fix it
Will Not Start
Fixed by these parts
How to fix it


Keep searches simple. Use keywords, e.g. "leaking", "pump", "broken" or "fit".
- Customer:
- Dennis from Bondville, VT
- Parts Used:
- WB44T10011
- Difficulty Level:
- Really Easy
- Total Repair Time:
- 15 - 30 mins
- Tools:
- Screw drivers, Socket set
oven element burned itself up
Turned off circuit breaker to range.
Removed the 2 oven racks. Removed two screws in back of oven compartment. Pulled element forward and the terminal connections get exposed.
The right terminal clip disconnected by itself and the wire went back into the stove and could not be retrieved.
Removed range draw under the oven an ... Read more d pulled entire range out from wall about 4 feet.. Removed metal backing with a socket wrench and exposed the oven element wires and terminals.
Reinstalled new element and metal backing.
Since range was out from wall, cleaned and vacuumed before pushing stove back in place.
Since range draw was out re-leveled by setting adjustable feet.
Reinstalled drawer and racks.
Turned on circuit breaker.
Tested element by setting bake cycle on.
Read less
Was this instruction helpful to you?
Thank you for voting!
- Customer:
- Theresa from Sherman, TX
- Parts Used:
- WB44T10011
- Difficulty Level:
- Easy
- Total Repair Time:
- 15 - 30 mins
- Tools:
- Nutdriver, Pliers
The baking assembly in the oven burst into flames one day, then broke apart.
After the element cooled down, I pulled the racks out of the oven, turned off the oven at the breaker box, then, using a nut driver, loosened the screws that held the baking assembly in the back of the oven, and pulled the connecting wires off. I bent the wires to make sure they would stay out, because if they get back in the insulation,
... Read more
they are hard to find. I would recommend getting a pair of locking pliers and putting them on the ends of the wires just to keep them from getting back into the insulation. Then I attached the left connection wire and then the right one, pushed them back into the insulation, tightened the baking assembly to the back wall of the oven, turned it back on at the breaker box, then tested the oven to see if it heated up. It did. Total repair time 15 -20 minutes. Would have been less if I didn't have to chase one of the wires back in the insulation. Shamless plug for the company ...By paying extra for 2-day shipping to receive the part, I saved just over $20 from buying it at Sears, which would have had to order the part anyway.
Read less
Was this instruction helpful to you?
Thank you for voting!
- Customer:
- Scot from Oakland, FL
- Parts Used:
- WB30T10099
- Difficulty Level:
- Easy
- Total Repair Time:
- 15 - 30 mins
- Tools:
- Pliers, Screw drivers, Wrench (Adjustable)
Large burner on dual element burned out
This was really easy, and pretty with no problems or issues It took me longer to write this than to do the actual installation. I used a digital camera to help me remember where things were, but a pen/paper works fine. Here's what I did:
1. Turn off the breaker for the cooktop.
2. Remove (2) 1/4" hex screws directly ... Read more under cooktop. You may need to open oven door to reveal them.
2. Prop up cooktop. I used the box the replacement element came in.
3. The element is held in place with (3) brackets held in by a #2 philips screw each. Mark the location of each of the brackets. There are numbers on the element to help you do this.
4. Write down where each of the wires connects to the element. There's only a few of them, but I tend to forget that stuff. The wires have female spade-type connectors that connect to the male ends on the element.
5. Using a needle-nose or small pliers wiggle each wire off the element. Grab the wires by the end of the female connector when you do this. I found it helpful to use a small flat screwdriver to help pry them off. Mine were on pretty tight, so expect this to take a few mins. If you have problems getting to the wires, remove the brackets (next step) first and come back to this one. I let the element hang from the wires without any problems, but I still wouldn't recommend it.
6. Remove each of the screws with a #2 philips screwdriver. Support the element with your hand and gently pull each bracket away from the element. Once they're all gone, the element should just come out. I took a look at my old element and saw that the large burner wires were melted in a couple places, so it was definitely broken.
7. If necessary, clean the underside of the cooktop surface with a clean papertowel. There was a little dust from the old element on mine.
8. Connect the new element and test to make sure it works by turning on the breaker and turning on the burner for a second or two. Note: This will make the top of the element hot for some time, so test it and go away for a few mins. If it works OK, proceed. If not, disconnect and figure out what else may be wrong.
9. Using the old element, make copies of the marks you made for the bracket locations onto the new element. You'll have to punch through the insulation when re-attaching the screws.
10. Re-wire the new element, if necessary and re-attach the brackets over the marks you made. This may be a pretty tight fit because the new element was thicker than the old on mine. I opened up the brackets a bit to make it not so hard to re-attach. Hook the brackets on and squeeze them over the element. The holes in the brackets need to line up with the holes drilled into the bottom of the element. If they don't, spin the element around (or detach and re-attach the brackets) till they do.
11. Screw in the (3) screws over the brackets pushing them through the insulation on the element.
12. Close the cooktop and reattach the hex screws under it (1/4" hex).
13. Turn on the breaker and test again.
Thats it, works great now. Good Luck
Read less
Was this instruction helpful to you?
Thank you for voting!