


Models
>
1036428413
1036428413 Kenmore Range
Jump to:
Find Part by Name
Keep searches simple, eg. "belt" or "pump".
Keep searches simple, eg. "belt" or "pump".

$65.95
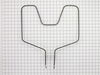
This is a genuine OEM part is a partially open-style bake element for your oven, and comes with 1/4-inch push-on terminals. The bake element is found in the bottom of your oven, and it is responsible ...
In Stock
Order now and your part arrives by Jul 24

$21.95
This genuine OEM part is a 6-inch chrome drip bowl. The drip bowl fits under the coiled burner elements on your electric range and is used to collect drips and spills that happen while cooking. If the...
In Stock
Order now and your part arrives by Jul 24

$27.95
Drip bowls are designed to catch any spills or messes from cooking on your stove top. The bowls sit underneath the burner elements on your stove and can easily be removed for cleaning. If your drip bo...
In Stock
Order now and your part arrives by Jul 24

This metallic clip is used to help support the broil element. Sold individually.
In Stock
Order now and your part arrives by Jul 24

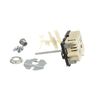
The infinite switch controls the stove top surface burner. This switch will work with most of the electrical range models with coil burner elements.
In Stock
Order now and your part arrives by Jul 24

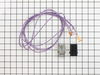
This kit comes with the terminal block, mounting clip and wires.
In Stock
Order now and your part arrives by Jul 24

In Stock
Order now and your part arrives by Jul 24

In Stock
Order now and your part arrives by Jul 24


This part attaches to the drawer support to help guide the bottom drawer.
No Longer Available

Common Problems and Symptoms for 1036428413
Viewing 6 of 6Little to no heat when baking
Fixed by these parts
How to fix it
Element will not heat
Fixed by these parts
How to fix it
Oven not heating evenly
Fixed by these parts
How to fix it
Oven is too hot
Fixed by these parts
How to fix it
Will Not Start
Fixed by these parts
How to fix it
Little to no heat when broiling
Fixed by these parts
How to fix it


Keep searches simple. Use keywords, e.g. "leaking", "pump", "broken" or "fit".
- Customer:
- Timothy from Cordova, TN
- Parts Used:
- WB44K5012
- Difficulty Level:
- Really Easy
- Total Repair Time:
- 15 - 30 mins
- Tools:
- Nutdriver
Bake element cracked on its own
Flipped the breaker. Removed shelf, Find the right size nut socket, unscrew the two screws, pull the element out a little bit, disconnect the wires (on pretty tight), pull out element, clean out any mess in the oven, compare element with new one to make sure its the same size and such, connect wires to new element, replace screws, fl
... Read more
ip breaker back, turn on for a few minutes to make sure it works. Piece of cake.
Read less
Was this instruction helpful to you?
Thank you for voting!
- Customer:
- Sandra from Hayward, CA
- Parts Used:
- WB44K5012
- Difficulty Level:
- Really Easy
- Total Repair Time:
- Less than 15 mins
- Tools:
- Screw drivers
Oven took 30 minutes to get to 380 degrees-no hotter
First I searched this site and read about the repairs - which made me feel like my husband could do it with ease. Then he removed two screws inside the oven, removed the broken element (didn't know it was broken til removed) and replaced the new one - just like that! The real key was being able to read how it was for other people who ha
... Read more
d already done it. That's the only reason I'm submitting my storey. Thanks
Read less
Was this instruction helpful to you?
Thank you for voting!
- Customer:
- Laura from N. Little Rock, AR
- Parts Used:
- WB44K5012
- Difficulty Level:
- Really Easy
- Total Repair Time:
- Less than 15 mins
- Tools:
- Screw drivers
Bake element burned out
I turned off the power to the oven at the breaker. Then I removed the two screws from the old element, pulled the old element out about 3 inches and disconnected the wires from the element and installed the new one.
Was this instruction helpful to you?
Thank you for voting!