


Models
>
79060012604
79060012604 Kenmore Range
Jump to:
Find Part by Name
Keep searches simple, eg. "belt" or "pump".
Manuals & Guides for 79060012604
Click to downloadInstall
Installation Instructions
(1.07MB)
Install
Installation Instructions
(2.48MB)
Manual
Owner's Manuals
(1.94MB)
Keep searches simple, eg. "belt" or "pump".

In Stock
Order now and your part arrives by Aug 1

$93.29
If the oven burner igniter in your gas range is no longer working, this is a genuine OEM replacement. The igniter is used to ignite the gas in order to light the oven burner. If the igniter is not wor...
In Stock
Order now and your part arrives by Aug 1

$84.65
This part establishes and maintains the internal temperature of the oven cavity.
In Stock
Order now and your part arrives by Aug 1

$27.14
This is an anti-tip kit for your range. The kit comes with two installation screws, one metal bracket, and instructions. The kit stops your freestanding range from tipping over due to extra weight on ...
In Stock
Order now and your part arrives by Aug 1

$12.05
Sold Individually. These legs should be adjusted to make your appliance level on uneven flooring.
In Stock
Order now and your part arrives by Aug 1

$25.10
This 18 ml bottle of white appliance touch up paint is a little over two inches tall. It can be used for refrigerators, microwaves, ranges, clothes dryers, and freezers.
In Stock
Order now and your part arrives by Aug 1

In Stock
Order now and your part arrives by Aug 1

$113.55
If your oven isn’t holding heat like it used to, the door gasket might be the culprit. This flexible seal lines the edge of the oven door to keep heat inside while you cook, helping your meals bake ev...
In Stock
Order now and your part arrives by Aug 1

$56.05
This genuine OEM oven thermostat control knob replaces a worn or missing temperature knob on select ranges, restoring smooth operation and clear temperature selection. Finished in white with grey mark...
In Stock
Order now and your part arrives by Aug 1

$274.08
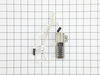
This safety valve ensures that no gas is released until the igniter has received the proper voltage needed to ignite the gas range.
In Stock
Order now and your part arrives by Aug 1

$26.35
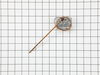
This is a screw for your range or microwave. This part is sold individually. It has a pan head, a pointed tip for use with sheet metal, and an x-shaped drive. This screw is a #8, has 18 threads to the...
In Stock
Order now and your part arrives by Aug 1

In Stock
Order now and your part arrives by Aug 1
Common Problems and Symptoms for 79060012604
Viewing 6 of 6Gas igniter glows, but will not light
Fixed by these parts
How to fix it
Little to no heat when baking
Fixed by these parts
How to fix it
Element will not heat
Fixed by these parts
How to fix it
Will Not Start
Fixed by these parts
How to fix it
Oven is too hot
Fixed by these parts
How to fix it
Oven not heating evenly
Fixed by these parts
How to fix it


Keep searches simple. Use keywords, e.g. "leaking", "pump", "broken" or "fit".
- Customer:
- Ed from Darby, PA
- Parts Used:
- 3203459
- Difficulty Level:
- Easy
- Total Repair Time:
- 15 - 30 mins
- Tools:
- Nutdriver, Screw drivers, Wrench set
Safety valve would not open
I am an HVAC tech by trade so it wasn't difficult to diagnose problem with safety valve. The hard part was being without an oven for a week. Repair was simple and effective--oven works good as new.
Shut off gas and unplugged oven. Removed floor of oven between broiler and bake section, used wrenches to disconnect gas line from saf ... Read more ety valve in back of oven, used philipps head screwdriver to remove burner assembly and gas valve, reversed process to replace. Checked out operation--OK.
Shut off gas and unplugged oven. Removed floor of oven between broiler and bake section, used wrenches to disconnect gas line from saf ... Read more ety valve in back of oven, used philipps head screwdriver to remove burner assembly and gas valve, reversed process to replace. Checked out operation--OK.
Read less
Was this instruction helpful to you?
Thank you for voting!
- Customer:
- Brian from Panama City Beach, FL
- Parts Used:
- 316112005
- Difficulty Level:
- Really Easy
- Total Repair Time:
- Less than 15 mins
anti-tip bracket not installed
I was selling my home and did not realize that the anti-tip bracket was not originally installed. A home inspection caught the problem and the buyers required that I install one. I could not find the original and obviously the installer never put it in place to begin with. The buyers wanted this resolved within a week so I had to act f
... Read more
ast. I could not find one locally so I found what I needed on your website. It arrived in a couple of days and was easy to install. I used the template provided in the kit and drove the screws through the bracket into the wood plate behind the drywall. Pushed the range back in place and that's it. Couldn't get any easier.
Read less
Was this instruction helpful to you?
Thank you for voting!
- Customer:
- Thomas from CAMPTON, NH
- Parts Used:
- 5304509706
- Difficulty Level:
- Really Easy
- Total Repair Time:
- 30 - 60 mins
- Tools:
- Nutdriver, Screw drivers
Long time before oven would light / propane smell
Unplug range, remove oven racks, remove 2 screws at the rear of oven bottom sheet metal panel. Lift the back of the panel and slide to the rear a little , then remove panel. Remove nut on top of heat shield and remove shield.. Open broiler draw slightly Note wire connections to gas valve. Remove Philips head screw from sheet metal guard
... Read more
bottom left rear to access wire connection. remove 2 hex head screws the hold igniter in place and install new igniter. remove spade connectors from gas valve and connect spade connectors from new igniter. , remove molex connector from bottom left rear and connect one from new igniter..Install shield in left rear bottom. install heat shield over burner and install nut. Install sheet metal panel in bottom of oven and 2 rear screws.. install oven racks and plug range back in. set clock and test your repair.
Read less
Was this instruction helpful to you?
Thank you for voting!