


Models
>
79090812406
79090812406 Kenmore Range
Jump to:
Find Part by Name
Keep searches simple, eg. "belt" or "pump".
Manuals & Guides for 79090812406
Click to downloadKeep searches simple, eg. "belt" or "pump".

$14.25
This OEM drip bowl fits under 8-inch burner elements and has a diameter of approximately 10-inches. Drip bowls catch any spills, and are a quick, easy, and cheap way to improve your cooktop aesthetic....
In Stock
Order now and your part arrives by Jul 30

$13.15
This drip bowl is an OEM approved replacement part designed for use with various electric ranges and cooktops. This part is located underneath the burner to contain any spills while cooking. It fits ...
In Stock
Order now and your part arrives by Jul 30

$9.30
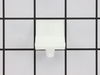
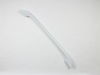
If you are having difficulty opening or closing the drawer at the bottom of your range, the drawer glides may be damaged. These genuine OEM rear drawer glides help to support the side of the drawer an...
In Stock
Order now and your part arrives by Jul 30

$7.65
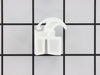
If the storage drawer at the bottom of your range has become difficult to pull in or out, there may be an issue with one of your drawer glides. The drawer glides are used to help the drawer slide in a...
In Stock
Order now and your part arrives by Jul 30

$15.35
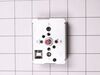
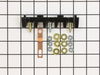
This kit comes with the necessary components to replace your burner terminal block. It includes interchangeable mounting brackets, a terminal box, ceramic wire nuts, heat shrink protective tubing, and...
In Stock
Order now and your part arrives by Jul 30

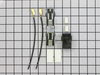
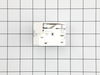
The infinite burner switch is used to control the temperature of the burner element on your stove top. This model is for the larger, eight-inch element. If your burner is not heating up or has uneven ...
In Stock
Order now and your part arrives by Jul 30

The surface elements provide heat for cooking on the top your range, typically in a smaller and larger size to fit your various pots and pans. If an element is not heating up, it is a sign that it sho...
In Stock
Order now and your part arrives by Jul 30

$27.45
This 40-watt light bulb has a standard screw-in base and is used in many different appliances. If your current bulb is burnt out or broken you will need to replace it. This light bulb is a genuine OEM...
In Stock
Order now and your part arrives by Jul 30

$57.70
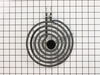
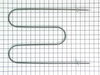
This element has looped terminal ends and comes with a black medallion center. This element is a genuine OEM replacement part, has looped terminal ends, comes with a black medallion center, and fits m...
In Stock
Order now and your part arrives by Jul 30

$143.60
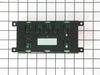
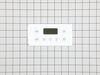
This is the electronic clock timer mechanism only. The overlay or touch pad is NOT included. To get the overlay, please use the model# of your appliance to search.
In Stock
Order now and your part arrives by Jul 30

$53.85
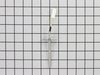
This is a genuine OEM replacement temperature sensor for your range. You may need to replace the sensor if there is little to no heat in the oven, the oven will not start, it is not heating evenly, or...
In Stock
Order now and your part arrives by Jul 30

$41.29
Terminal blocks (also called terminal boards or strips) provide a convenient means of connecting individual electrical wires.
In Stock
Order now and your part arrives by Jul 30
Common Problems and Symptoms for 79090812406
Viewing 10 of 10Element will not heat
Fixed by these parts
How to fix it
Little to no heat when baking
Fixed by these parts
How to fix it
Door won’t close
Fixed by these parts
How to fix it
Will Not Start
Fixed by these parts
How to fix it
Little to no heat when broiling
Fixed by these parts
How to fix it
Oven is too hot
Fixed by these parts
How to fix it
Oven not heating evenly
Fixed by these parts
How to fix it
Touchpad does not respond
Fixed by these parts
How to fix it
Will not program
Fixed by these parts
How to fix it
Gas igniter glows, but will not light
Fixed by these parts
How to fix it


Keep searches simple. Use keywords, e.g. "leaking", "pump", "broken" or "fit".
drawer glides were broke on front and back
used a screwdriver pushed the old ones out put the new in. the video instructions were great.
Was this instruction helpful to you?
Thank you for voting!
- Customer:
- Jeanette from Alpharetta, GA
- Parts Used:
- 3051162
- Difficulty Level:
- Really Easy
- Total Repair Time:
- Less than 15 mins
Front slide of bottom drawer broke off.
Inserted new slide as directed by video. Very easy and video was very helpful.
Was this instruction helpful to you?
Thank you for voting!
- Customer:
- Steven from Taylors, SC
- Parts Used:
- 5303935058, 3051163, 3051162
- Difficulty Level:
- Easy
- Total Repair Time:
- 1- 2 hours
- Tools:
- Pliers, Screw drivers
rental property stove only had 2 working burners and bottom drawer off track
first i took out burners then i took out the screws of the termnal block bracket. i then raised the lid on the stoveand clipped the wires on all 4 of the terminal block kits.i then slipped the shrink wrap on wires and used the wire nuts to connect wires together then heated the shrink wrap. I then put screws back in terminal block bracke
... Read more
ts. I then put the burners on while looking under lid so i would know they were making good connections as this is a bad design from factory. if you pull out burners to clean them and they are not put back in right you dont have a good connection and that causes the terminal blocks to get hot and melt. thats what happened in my case.
As far as the drawer glides they just snap into place
As far as the drawer glides they just snap into place
Read less
Was this instruction helpful to you?
Thank you for voting!