


Models
>
79046781901
79046781901 Kenmore Range
Jump to:
Find Part by Name
Keep searches simple, eg. "belt" or "pump".
Manuals & Guides for 79046781901
Click to downloadKeep searches simple, eg. "belt" or "pump".

$27.45
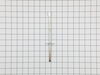
This 40-watt light bulb has a standard screw-in base and is used in many different appliances. If your current bulb is burnt out or broken you will need to replace it. This light bulb is a genuine OEM...
In Stock
Order now and your part arrives by Jul 24

In Stock
Order now and your part arrives by Jul 24

$26.83
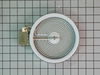
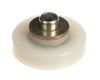
This is a light bulb lens, and it is made for your oven. This part protects the light bulb inside your oven by covering it. The lens is made of glass, and has a 3-inch diameter. Before making this rep...
In Stock
Order now and your part arrives by Jul 24

$91.95
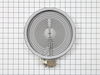
This dual radiant surface element features both 9-inch and 6-inch heating zones, making it versatile for different cookware sizes. It provides fast, even heating and includes a sturdy metal temperatur...
In Stock
Order now and your part arrives by Jul 24

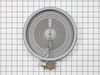
The 6” radiant cooking element with limiter fits under the glass cooktop and supplies heat to the cooking area. If your element is not heating, you can test the element for continuity with a multimete...
In Stock
Order now and your part arrives by Jul 24

$152.72
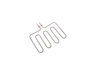
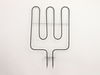
This broil element is found on the roof of the oven and heats food. The most common reasons you would need to replace this part is due to the oven not giving off enough heat, not turning on, or not ba...
In Stock
Order now and your part arrives by Jul 24

$53.85
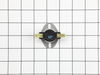
This is an authentic temperature sensor, which works with ranges, wall ovens, microwave oven combos, microwaves and warming drawers.
In Stock
Order now and your part arrives by Jul 24

$186.80
This 3400-watt bake element has screw style connections. The bake element is located on the bottom of the oven cavity and supplies the heat for baking. If your oven is not heating evenly, element will...
In Stock
Order now and your part arrives by Jul 24

In Stock
Order now and your part arrives by Jul 24

In Stock
Order now and your part arrives by Jul 24

This black oven rack gives you a sturdy place to set your cookware while baking or roasting. It?s easy to slide into place and doesn?t need any tools to install. If your old rack is bent or worn out, ...
No Longer Available

In Stock
Order now and your part arrives by Jul 24
Common Problems and Symptoms for 79046781901
Viewing 7 of 7Element will not heat
Fixed by these parts
How to fix it
Little to no heat when baking
Fixed by these parts
How to fix it
Oven is too hot
Fixed by these parts
How to fix it
Oven not heating evenly
Fixed by these parts
How to fix it
Little to no heat when broiling
Fixed by these parts
How to fix it
Door won’t close
Fixed by these parts
How to fix it
Will Not Start
Fixed by these parts
How to fix it


Keep searches simple. Use keywords, e.g. "leaking", "pump", "broken" or "fit".
- Customer:
- Kevin from Alexandria, VA
- Parts Used:
- 318255605
- Difficulty Level:
- Really Easy
- Total Repair Time:
- Less than 15 mins
- Tools:
- Screw drivers
Broil element wasn't working...
I pulled my unit out of the wall and noticed that the insulation around the top broiler element was a bit brown. Closer inspection revealed that the element had shorted somehow to the oven itself and caused the element to become non-functional. I tried measuring the resistance first, and it was within typical values for the other elemen
... Read more
ts, but I decided to replace the element anyway.
I ordered from PD and the part arrived just a few days letter by regular shipping. I undid the screws holding in the element, undid the wire connectors and replaced the broken element with the new one. The element worked like a charm and I was back in business for cooking.
I ordered from PD and the part arrived just a few days letter by regular shipping. I undid the screws holding in the element, undid the wire connectors and replaced the broken element with the new one. The element worked like a charm and I was back in business for cooking.
Read less
Was this instruction helpful to you?
Thank you for voting!
- Customer:
- Lori from Winter Haven, FL
- Parts Used:
- 318178110
- Difficulty Level:
- Easy
- Total Repair Time:
- Less than 15 mins
- Tools:
- Pliers, Screw drivers
burned out burner
First we removed two screws under the rim of the range top to open the lid. Lifted the lid and removed the screws from the bracket that holds the elements, Be careful with the clips that hold the element in, if you break them or bend them there aren't any more! Also note which holes they were in, they are marked according to the differ
... Read more
ent sizes of elements. Disconnected the wires, needed needlenose pliers to grip them...connected new element, popped it back in place, replaced bracket, closed top ...Easy peasy!!!
Read less
Was this instruction helpful to you?
Thank you for voting!
- Customer:
- Mitch from Fernandina Beach, FL
- Parts Used:
- 5304503232
- Difficulty Level:
- Easy
- Total Repair Time:
- 15 - 30 mins
- Tools:
- Screw drivers
Cracked oven door inner glass
Repair was quite easy, as long as you have the instructions for removing the door. The screws that hold the bottom of the door to the fixed hinge are placed into the side of the hinge assembly after removal; this holds the door at a 45 degree angle for easy removal. After that, just place the door on a flat surface and dismantle the door
... Read more
from the inside. The inner glass is contained in a metal frame with another piece of glass; this frame comes apart easily using the clips in each side. The door assembles easily after the glass is replaced; just take your time and give yourself enough room to lay out the parts as you go. Good luck!
Read less
Was this instruction helpful to you?
Thank you for voting!