


Models
>
91195141000
91195141000 Kenmore Range
Jump to:
Find Part by Name
Keep searches simple, eg. "belt" or "pump".
Keep searches simple, eg. "belt" or "pump".

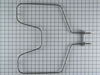
If your oven is not coming up to temperature, is not heating at all, or has inconsistent temperatures, it may be time to replace your bake element. The bake element is found at the bottom of your oven...
In Stock
Order now and your part arrives by Aug 1

In Stock
Order now and your part arrives by Aug 1

In Stock
Order now and your part arrives by Aug 1

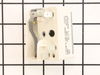
This infinite switch controls the heat level of a 6-inch, 1560-watt surface element by regulating power flow. It operates at 240 volts and helps maintain consistent temperatures. Replacing it can fix ...
In Stock
Order now and your part arrives by Aug 1

In Stock
Order now and your part arrives by Aug 1

$52.50
The oven door gasket creates a seal between the oven door and the opening of the oven to prevent heat from escaping when the oven is closed.
In Stock
Order now and your part arrives by Aug 1

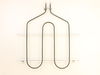
This haliant burner element is a gneuine OEM replacement part for your stove. This element is 8 inches in diameter. The element lies underneath the stovetop, and will need to be replaced if it stops h...
In Stock
Order now and your part arrives by Aug 1

This switch controls the large burner on a range/stove top.
In Stock
Order now and your part arrives by Aug 1

In Stock
Order now and your part arrives by Aug 1

$43.92
This is a broiler pan for your range. It catches drippings from the cookware, when broiling in the oven. This assembly includes the grill/grate and the bottom pan. These parts are made of porcelain. T...
In Stock
Order now and your part arrives by Aug 1

In Stock
Order now and your part arrives by Aug 1

$151.25
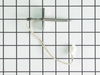
This kit includes the sensor as well as the connectors. NOTE This sensor is 2" long.
In Stock
Order now and your part arrives by Aug 1
Common Problems and Symptoms for 91195141000
Viewing 7 of 7Element will not heat
Fixed by these parts
How to fix it
Little to no heat when baking
Fixed by these parts
How to fix it
Little to no heat when broiling
Fixed by these parts
How to fix it
Oven not heating evenly
Fixed by these parts
How to fix it
Oven is too hot
Fixed by these parts
How to fix it
Will Not Start
Fixed by these parts
How to fix it
Door won’t close
Fixed by these parts
How to fix it


Keep searches simple. Use keywords, e.g. "leaking", "pump", "broken" or "fit".
- Customer:
- Brad from Bedford, KY
- Parts Used:
- WB44T10010
- Difficulty Level:
- Easy
- Total Repair Time:
- 15 - 30 mins
- Tools:
- Pliers, Screw drivers
Bake Element burned out, bunt like a sparkler.
Ordered the part on Friday, got it on Saturday, very impressive. Be sure to unplug the range or disconnect the power at the breaker box before any repairs are started.
The lower (Bake) element is held in by 2 screws. Remove them and gently pull out the element to remove the power wires connected to the element. These wires are ... Read more very short and there is not much room in which to work. After having removed the wire connectors one slipped from my fingers and went back in the small opening in the back of the oven where the element is inserted. It took some time to fish out the wire. Not wanting to slide out the range I used some surgical forcepts I happen to have grab the wire ( handy to clip wires or compontents in place for some delicate repairs). Its all blind and the opening is very small plus the insulation must be pushed back to gain access. Anyway I managed to grab the wire, attached both wires to the element, replaced the plate and screws holding the element in place, all finished. Worked great. Other ranges I have owned provided a socket to plug in the element, I guess the bottom line gets in the way of quality.. Being 60 years old the worst part of this job is the getting down on my knees to do the work and getting back up again.
The lower (Bake) element is held in by 2 screws. Remove them and gently pull out the element to remove the power wires connected to the element. These wires are ... Read more very short and there is not much room in which to work. After having removed the wire connectors one slipped from my fingers and went back in the small opening in the back of the oven where the element is inserted. It took some time to fish out the wire. Not wanting to slide out the range I used some surgical forcepts I happen to have grab the wire ( handy to clip wires or compontents in place for some delicate repairs). Its all blind and the opening is very small plus the insulation must be pushed back to gain access. Anyway I managed to grab the wire, attached both wires to the element, replaced the plate and screws holding the element in place, all finished. Worked great. Other ranges I have owned provided a socket to plug in the element, I guess the bottom line gets in the way of quality.. Being 60 years old the worst part of this job is the getting down on my knees to do the work and getting back up again.
Read less
Was this instruction helpful to you?
Thank you for voting!
- Customer:
- Ronald from Citrus Springs, FL
- Parts Used:
- WB44T10010
- Difficulty Level:
- Really Easy
- Total Repair Time:
- Less than 15 mins
- Tools:
- Nutdriver, Screw drivers
Bake Element fell apart
Cut the Power! pull out stove remove the 4 screws in the back, disconnect the two wires from the element.Open oven door, remove racks and remove 2 screws holding the element in place. Replace element and the 2 retaining screws, replace racks.On the back of the oven connect the two wires and replace cover. Slide back in place and turn on
... Read more
the power. Done =)
Read less
Was this instruction helpful to you?
Thank you for voting!
- Customer:
- paul from west grove, PA
- Parts Used:
- WB44T10009
- Difficulty Level:
- Really Easy
- Total Repair Time:
- 15 - 30 mins
- Tools:
- Nutdriver
Broiler element failed
repair took about 30minutes total tiem..first turn off power to stove..then open oven removed racks..used nut drive to loosen top two screw hold element..then remove screw hold temp sensor element...then removed two screws holding broiler element...then removed the top screw ...then pulled element out about 7 inches to expose wire connect
... Read more
ion..held on with spade lugs.. pulled wires off...element now free to remove ...placed spade lug on new element...put element in pace with top two screws..loosely...then did rear screw that held temp element and broiler element...then tighten all screws ..turned on power..did 15 sec test to make sure wired properly..then 5 minutes to operating temperature... job done...hardest part was crazwling in and out the stove...old bones..
Read less
Was this instruction helpful to you?
Thank you for voting!