


Models
>
91193508990
91193508990 Kenmore Range
Jump to:
Find Part by Name
Keep searches simple, eg. "belt" or "pump".
Manuals & Guides for 91193508990
Click to downloadKeep searches simple, eg. "belt" or "pump".

$22.91
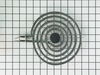
This burner bowl, also known as a drip bowl, is an authentic OEM part for your electric range or cooktop. This part is black in color and designed to fit under the 8-inch coiled burner elements and is...
In Stock
Order now and your part arrives by Jul 23

$18.95
This genuine OEM burner bowl, also known as a drip tray, is black and color and measures 6 inches in diameter. It is designed to be used under the coiled elements on an electric stove or range, in ord...
In Stock
Order now and your part arrives by Jul 23

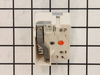
If your burner element is not turning on or heating up, it is possible there is an issue with the switch. The surface burner switch, also known as an infinite heat switch, is what turns your burner el...
On Order

In Stock
Order now and your part arrives by Jul 23

This infinite switch controls the heat level of a 6-inch, 1560-watt surface element by regulating power flow. It operates at 240 volts and helps maintain consistent temperatures. Replacing it can fix ...
In Stock
Order now and your part arrives by Jul 23

In Stock
Order now and your part arrives by Jul 23

$52.50
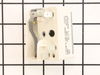
The oven door gasket creates a seal between the oven door and the opening of the oven to prevent heat from escaping when the oven is closed.
In Stock
Order now and your part arrives by Jul 23

$15.26
This part is the replacement light socket for your oven. The oven light socket provides power to the light, and at the same time holds the light bulb in place.
In Stock
Order now and your part arrives by Jul 23

In Stock
Order now and your part arrives by Jul 23

In Stock
Order now and your part arrives by Jul 23

In Stock
Order now and your part arrives by Jul 23

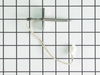
$151.25
This kit includes the sensor as well as the connectors. NOTE This sensor is 2" long.
In Stock
Order now and your part arrives by Jul 23
Common Problems and Symptoms for 91193508990
Viewing 6 of 6Element will not heat
Fixed by these parts
How to fix it
Little to no heat when baking
Fixed by these parts
How to fix it
Oven not heating evenly
Fixed by these parts
How to fix it
Oven is too hot
Fixed by these parts
How to fix it
Will Not Start
Fixed by these parts
How to fix it
Door won’t close
Fixed by these parts
How to fix it


Keep searches simple. Use keywords, e.g. "leaking", "pump", "broken" or "fit".
- Customer:
- Marc from Columbia, NJ
- Parts Used:
- WB24T10029, WB24T10025
- Difficulty Level:
- Easy
- Total Repair Time:
- 15 - 30 mins
- Tools:
- Nutdriver, Screw drivers
The switches failed on both front burners.
Remove nobs from both switches.
Pull out the range (the hardest part).
REMOVE THE POWER PLUG FROM THE WALL
Remove 7 screws with nut driver and take off upper back panel.
Remove 2 phillips screws from front, they hold the switch brackets.
The new switches don't fit in the bracket so discard the bracket keeping the ... Read more screws.
Removing 1 wire at a time from the old switch transfer to the new noting the letter/number ie "H1 P1" combos they are all there just not in the same places on the new switch.
When wiring is complete, using the bracket ,screws from the front screw on the switches.
Replace the back panel with 7 screws.
In my case the old nobs did not fit the shafts of the new switches. I found some at the local hardware store. I bought 4 for $0.29 each! I expect to be replacing the other burner switches shortly.
Read less
Was this instruction helpful to you?
Thank you for voting!
- Customer:
- jamie from MORRISVILLE, PA
- Parts Used:
- WB48T10011
- Difficulty Level:
- Really Easy
- Total Repair Time:
- Less than 15 mins
I needed new oven racks
My husband had turned the oven on to cook something and didn't know that I have a plastic tray in there. Well, needless to say I needed to get some new oven racks. I tried to get them through the manufacturer (GE). They were 68$ each. I thought that was a bit steep, so I looked online. I decided to order through PartsSelect. Well...they
... Read more
can 2 days later (the week before Christmas!!)and were a PERFECT fit.
Between the price, shipping speed and quality I will
definitely buy from again and recommend this site to everyone I know!!!!
Oh yeah, I work for Sears too. we have access to all sorts of parts....this site is the BEST for prices and delivery speed!!!!
Between the price, shipping speed and quality I will
definitely buy from again and recommend this site to everyone I know!!!!
Oh yeah, I work for Sears too. we have access to all sorts of parts....this site is the BEST for prices and delivery speed!!!!
Read less
Was this instruction helpful to you?
Thank you for voting!
- Customer:
- Rick from Avon Park, FL
- Parts Used:
- WB24T10025
- Difficulty Level:
- Really Easy
- Total Repair Time:
- Less than 15 mins
- Tools:
- Pliers, Screw drivers
Burner was constantly at high heat
I removed the rear cover from the stove then removed the knob and two screws on the front panel that hold the control in place. I then took the wires off the old control one at a time and placed them on the new control. Then I placed the control in position and tightened the two screws on the front panel, replaced the knob and screwed t
... Read more
he back panel in place.
Read less
Was this instruction helpful to you?
Thank you for voting!