


Models
>
9113618810
9113618810 Kenmore Range
Jump to:
Find Part by Name
Keep searches simple, eg. "belt" or "pump".
Keep searches simple, eg. "belt" or "pump".

$21.95
This 40-Watt light bulb is sold individually.
It is specially designed to withstand extreme temperatures, so this bulb is compatible with a variety of appliance types including refrigerators, ranges,...
In Stock
Order now and your part arrives by Aug 4

In Stock
Order now and your part arrives by Aug 4

Special Order

In Stock
Order now and your part arrives by Aug 4

In Stock
Order now and your part arrives by Aug 4

In Stock
Order now and your part arrives by Aug 4


In Stock
Order now and your part arrives by Aug 4

Special Order


In Stock
Order now and your part arrives by Aug 4
Common Problems and Symptoms for 9113618810
Viewing 2 of 2Door won’t close
Fixed by these parts
How to fix it
Door won’t open after self cleaning cycle
Fixed by these parts
How to fix it


Keep searches simple. Use keywords, e.g. "leaking", "pump", "broken" or "fit".
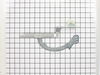
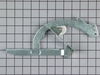
The right side hinge assembly broke. Replaced both sides
First I removed the door by lifting it off the hinge assemblies.
Then I removed the drawer to access the spring.
Removed the spring, noting which attachment hole was used.
Removed the hinge assembly with a Phillips screwdriver.
Replacef the unit.
Repeated for the other hinge assembly. ... Read more
Note: it took longer to find the correct parts in the parts diagrams than it did to replace them.
Read less
Was this instruction helpful to you?
Thank you for voting!
Oven door hinge rollers broke, hard to open door
Before removing screws, I reached in and felt for where the upper end of the spring attached to the hinge. There are three holes in the end of the hinge arm, so I wanted to be sure of which hole to use. (The holes are very close together, so if the spring falls out before you determine which hole it was in, it probably won't matter so l
... Read more
ong as you are sure to use the same hole on both new hinges.) I then removed three Phillips screws per hinge. Once the hinge was loose, I could wiggle it around and release enough of the spring tension to slip the top end of the spring out of the hole on the hinge arm. Then I pulled out the old hinge and inserted the new one and replaced the three screws. Without the tension, the lower end of the spring fell out of the little hole in the oven bottom where it normally attaches. Our gas oven has a broiler rather than a storage drawer, so it was a little difficult to get the lower tip of the spring back into that hole. It actually ended up being easier to get the lower tip of the spring back into that hole first, before trying to reattach it to the hinge arm. Once I got the lower end into that hole, I pulled up on the spring and maintained upward pressure on the spring while I fiddled around to get the upper end into the hinge arm hole. Took about 20 minutes, door works perfectly now. Lots of sharp edges inside the oven, so had to be careful.
Read less
Was this instruction helpful to you?
Thank you for voting!
- Customer:
- Jack from Spencerport, NY
- Parts Used:
- WB14X103
- Difficulty Level:
- Really Easy
- Total Repair Time:
- 15 - 30 mins
- Tools:
- Screw drivers
Failed oven door hinge
Pull oven door open about a couple of inches. Grab the door by the sides and pull up to remove from the hinges. Set it aside. Remove the storage drawer under the oven. This gives you access to the tension spring attached to the hinge. Detach it by hand. Using a phillips head, unscrew and remove the damaged hinge. Replace the new hinge. Re
... Read more
attach the spring. Replace the storage drawer. Replace the oven door. Done.
Read less
Was this instruction helpful to you?
Thank you for voting!