


Models
>
79097413410
79097413410 Kenmore Range
Jump to:
Find Part by Name
Keep searches simple, eg. "belt" or "pump".
Keep searches simple, eg. "belt" or "pump".

$20.85
This range indicator light lens is designed to cover and protect the appliance’s indicator light, allowing you to easily see when a burner or oven is in use. Made from clear, heat-resistant plastic, i...
In Stock
Order now and your part arrives by Jul 30

$78.05
This switch controls the stove top surface burner. This surface element control switch is for ranges.
Surface element control switch turns the surface element on and off and controls how much heat...
In Stock
Order now and your part arrives by Jul 30

In Stock
Order now and your part arrives by Jul 30

$8.75
This is an authentic mounting screw, which works with ranges, wall ovens, cooktops and warming drawers.
In Stock
Order now and your part arrives by Jul 30

*Sold Individually. Washerhead Screw 10 - 24 x 1.81
No Longer Available

$46.97
This genuine OEM oven temperature sensor probe monitors the internal temperature of the oven to ensure accurate and consistent cooking performance. By sending temperature readings to the control syste...
In Stock
Order now and your part arrives by Jul 30

In Stock
Order now and your part arrives by Jul 30

In Stock
Order now and your part arrives by Jul 30

$72.68
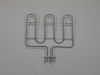
This broiler heating element sits at the top of the oven and provides the heat needed for broiling. It’s a durable replacement part that helps restore proper cooking performance. Be sure to confirm yo...
In Stock
Order now and your part arrives by Jul 30


$90.95
This infinite switch controls surface burner temperature on electric ranges and cooktops. It allows smooth heat adjustment and replaces faulty switches that cause inconsistent heating. Compatible with...
In Stock
Order now and your part arrives by Jul 30

In Stock
Order now and your part arrives by Jul 30
Common Problems and Symptoms for 79097413410
Viewing 1 of 1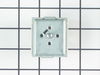


Keep searches simple. Use keywords, e.g. "leaking", "pump", "broken" or "fit".
- Customer:
- Kathy from NEW BERN, NC
- Parts Used:
- 316557300
- Difficulty Level:
- Really Easy
- Total Repair Time:
- Less than 15 mins
- Tools:
- Nutdriver
Burner indicator light lense broke off
The light apparatus was loose behind the panel. Remove the remaining part of the lens. Install the new lens from the outside of the panel and hold it in position, protruding into the inside of the panel. Slide the light apparatus onto the lens from the inside, allowing the bracket to hold it in place - it will be spring loaded, which will
... Read more
hold it in place.
Read less
Was this instruction helpful to you?
Thank you for voting!
- Customer:
- William from BENTON, IL
- Parts Used:
- 316238201
- Difficulty Level:
- Really Easy
- Total Repair Time:
- 15 - 30 mins
- Tools:
- Socket set
The range element was not coming on
After settling that it was the Surface Element Switch, ordering and securing the switch, the first step was to disconnect the power to the Oven/Range. Next pull out the Range and remove the back and disconnect the switch from the top of the Range. Using the new switch I removed the wire connectors from the old switch and reconnected them
... Read more
to the new switch in the same spot that they came from. After connections were secure I reattached the switch to the back of the Range and reattached the back of the Range. When everything was back in place the power source was reconnected and that was it.
Read less
Was this instruction helpful to you?
Thank you for voting!
- Customer:
- John J from UPTON, MA
- Parts Used:
- 139001800
- Difficulty Level:
- Really Easy
- Total Repair Time:
- 15 - 30 mins
- Tools:
- Screw drivers
Washer would not spin.
Remove two screws in back to release the top.
Lift the top from the back and pull backwards to remove.
Open washer door and unscrew two screws to release the switch.
Reach down inside from the front and remove the switch.
Unplug the switch and replace with the new one. Reverse the process to install.
I found it ea ... Read more sier to have someone hold the switch while I screwed it back in.
Read less
Was this instruction helpful to you?
Thank you for voting!