


Models
>
79032643310
79032643310 Kenmore Range
Jump to:
Find Part by Name
Keep searches simple, eg. "belt" or "pump".
Keep searches simple, eg. "belt" or "pump".

$40.51
Sold individually. This part helps the flame to spread for even heat. Also protects your burner head from spills. The surface burner cap is located on the top of the burner head and is used in ranges ...
In Stock
Order now and your part arrives by Jul 30

$43.56
Sold individually. This part helps the flame to spread for even heat. Also protects your burner head from spills.
In Stock
Order now and your part arrives by Jul 30

This part is the igniter/orifice mounting screw for your cooktop or range. It is approximately ½ an inch in length and is made of metal. The mounting screw connects the orifice to the cooktop. If the ...
In Stock
Order now and your part arrives by Jul 30

$36.92
This orifice is a replacement fuel-delivery component designed to regulate gas flow to a burner. It plays a critical role in maintaining proper flame size and efficiency and is commonly replaced when ...
In Stock
Order now and your part arrives by Jul 30

$26.35
This is a screw for your range or microwave. This part is sold individually. It has a pan head, a pointed tip for use with sheet metal, and an x-shaped drive. This screw is a #8, has 18 threads to the...
In Stock
Order now and your part arrives by Jul 30

$81.32
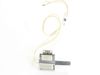
This spark module provides the electrical spark needed to ignite surface burners on a gas range or cooktop, helping ensure safe and reliable burner operation. It is commonly replaced when burners will...
In Stock
Order now and your part arrives by Jul 30

In Stock
Order now and your part arrives by Jul 30

$54.95
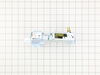
This sealed burner delivers consistent heat output for precise cooking performance. Its design helps contain spills and simplifies cleanup while ensuring efficient flame control. Installation is strai...
In Stock
Order now and your part arrives by Jul 30

In Stock
Order now and your part arrives by Jul 30

In Stock
Order now and your part arrives by Jul 30

$93.24
This oven door glass panel forms the clear outer viewing window of the oven door while helping maintain proper internal cooking temperatures. Designed for ovens with air-wash style airflow, it helps k...
In Stock
Order now and your part arrives by Jul 30

In Stock
Order now and your part arrives by Jul 30
Common Problems and Symptoms for 79032643310
Viewing 2 of 2Will Not Start
Fixed by these parts
How to fix it
Gas igniter glows, but will not light
Fixed by these parts
How to fix it


Keep searches simple. Use keywords, e.g. "leaking", "pump", "broken" or "fit".
- Customer:
- Brian from DUDLEY, MA
- Parts Used:
- 5304508269
- Difficulty Level:
- Easy
- Total Repair Time:
- More than 2 hours
- Tools:
- Pliers, Screw drivers
Stove top spark module broken
Worst part was cleaning my disgusting stove, installation was easy, remember the positioning of the wires from defective module(take picture)
Was this instruction helpful to you?
Thank you for voting!
- Customer:
- Hans from JERUSALEM, AR
- Parts Used:
- 316031501
- Difficulty Level:
- A Bit Difficult
- Total Repair Time:
- 1- 2 hours
- Tools:
- Nutdriver, Pliers, Screw drivers, Wrench set
Replace oven gas safety valve.
It went really well until test when the flame was reaching up into the oven itself, not good. Much research finally found an older repairman who informed me the nozzle that injects the gas into the oven burner had to be fully screwed down for LP Gas. The unit is pre-set for Natural Gas. Tightened it all the way down and everything work
... Read more
s just fine. We live rurally so use Liquid Propane Gas, not Natural Gas.
Read less
Was this instruction helpful to you?
Thank you for voting!
- Customer:
- Richard from MERCERVILLE, NJ
- Parts Used:
- 5303935059
- Difficulty Level:
- Very Easy
- Total Repair Time:
- Less than 15 mins
- Tools:
- Nutdriver
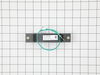
Igniter failing to energize even though there was 120 volts being supplied.
Slide Range away from wall, unplug Range, remove rear cover (4) screws, removed burner assembly (5) screws, unplugged Igniter connector, loosen Igniter bracket, remove Igniter (2) screws. Reverse process to install new Igniter. I also wore latex gloves to prevent touching graphite portion of Igniter. Tested Broiler for operation, slid Ran
... Read more
ge back into position. All good.
Read less
Was this instruction helpful to you?
Thank you for voting!