


Models
>
79046814991
79046814991 Kenmore Range
Jump to:
Find Part by Name
Keep searches simple, eg. "belt" or "pump".
Keep searches simple, eg. "belt" or "pump".

$173.13
This is an oven bake element for a range, sourced directly from the original manufacturer. It is located at the bottom of the oven, responsible for supplying heat for the baking function. If your oven...
In Stock
Order now and your part arrives by Jul 30

$41.29
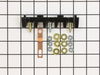
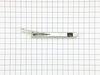
Terminal blocks (also called terminal boards or strips) provide a convenient means of connecting individual electrical wires.
In Stock
Order now and your part arrives by Jul 30

$26.83
This is a light bulb lens, and it is made for your oven. This part protects the light bulb inside your oven by covering it. The lens is made of glass, and has a 3-inch diameter. Before making this rep...
In Stock
Order now and your part arrives by Jul 30

$68.15
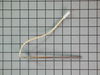
If your oven isn’t heating properly or cooks unevenly, this temperature sensor might be the fix. It helps your oven stay at the right temperature by sending heat readings to the control board. Made to...
In Stock
Order now and your part arrives by Jul 30

$152.72
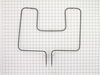
This broil element is found on the roof of the oven and heats food. The most common reasons you would need to replace this part is due to the oven not giving off enough heat, not turning on, or not ba...
In Stock
Order now and your part arrives by Jul 30

In Stock
Order now and your part arrives by Jul 30

$53.88
This burner cap is a replacement cooking surface component designed to distribute heat evenly across the burner. It is commonly replaced when chipped, warped, or damaged by heat exposure.
In Stock
Order now and your part arrives by Jul 30


In Stock
Order now and your part arrives by Jul 30

$26.35
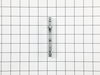
This is a screw for your range or microwave. This part is sold individually. It has a pan head, a pointed tip for use with sheet metal, and an x-shaped drive. This screw is a #8, has 18 threads to the...
In Stock
Order now and your part arrives by Jul 30

Special Order

In Stock
Order now and your part arrives by Jul 30
Common Problems and Symptoms for 79046814991
Viewing 8 of 8Little to no heat when baking
Fixed by these parts
How to fix it
Element will not heat
Fixed by these parts

How to fix it
Will Not Start
Fixed by these parts
How to fix it
Oven not heating evenly
Fixed by these parts
How to fix it
Oven is too hot
Fixed by these parts
How to fix it
Little to no heat when broiling
Fixed by these parts
How to fix it
Door won’t close
Fixed by these parts
How to fix it
Gas igniter glows, but will not light
Fixed by these parts
How to fix it


Keep searches simple. Use keywords, e.g. "leaking", "pump", "broken" or "fit".
- Customer:
- Van from Sanford, NC
- Parts Used:
- 318255006
- Difficulty Level:
- Really Easy
- Total Repair Time:
- Less than 15 mins
- Tools:
- Screw drivers
oven element broken
The repair was simple; first I removed the 2 screws from the old element and disconnected the wires and then I inserted the new element reconnected the wires and replaced the screws . The repair was easy and took less that 15 min. The oven works as good as new and I saved alot of money by doing it myself.
Was this instruction helpful to you?
Thank you for voting!
- Customer:
- Timothy from Spring Valley, AL
- Parts Used:
- 5304409888
- Difficulty Level:
- Really Easy
- Total Repair Time:
- 15 - 30 mins
- Tools:
- Screw drivers, Socket set
Cord was not tightened enough by delivery crew.
PF alarm appeared on display. Noticed clicking when cord was moved. Had arced for some time and melted original block. New part slightly different. Only has 3 lugs, old one had six. Stack using washers provided. Take note of colors before disassembly. Use caution while working through access opening. The edges are sharp. Only tools neede
... Read more
d are phillips screwdriver, deep socket for lug nuts. Nut driver optional. Hope this is helpful.
Read less
Was this instruction helpful to you?
Thank you for voting!
- Customer:
- Kevin from Alexandria, VA
- Parts Used:
- 318255605
- Difficulty Level:
- Really Easy
- Total Repair Time:
- Less than 15 mins
- Tools:
- Screw drivers
Broil element wasn't working...
I pulled my unit out of the wall and noticed that the insulation around the top broiler element was a bit brown. Closer inspection revealed that the element had shorted somehow to the oven itself and caused the element to become non-functional. I tried measuring the resistance first, and it was within typical values for the other elemen
... Read more
ts, but I decided to replace the element anyway.
I ordered from PD and the part arrived just a few days letter by regular shipping. I undid the screws holding in the element, undid the wire connectors and replaced the broken element with the new one. The element worked like a charm and I was back in business for cooking.
I ordered from PD and the part arrived just a few days letter by regular shipping. I undid the screws holding in the element, undid the wire connectors and replaced the broken element with the new one. The element worked like a charm and I was back in business for cooking.
Read less
Was this instruction helpful to you?
Thank you for voting!