


Models
>
1039567811
1039567811 Kenmore Range
Jump to:
Find Part by Name
Keep searches simple, eg. "belt" or "pump".
Keep searches simple, eg. "belt" or "pump".

$21.95
This genuine OEM part is a 6-inch chrome drip bowl. The drip bowl fits under the coiled burner elements on your electric range and is used to collect drips and spills that happen while cooking. If the...
In Stock
Order now and your part arrives by Jul 31

$27.95
Drip bowls are designed to catch any spills or messes from cooking on your stove top. The bowls sit underneath the burner elements on your stove and can easily be removed for cleaning. If your drip bo...
In Stock
Order now and your part arrives by Jul 31

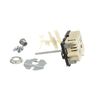
The infinite switch controls the stove top surface burner. This switch will work with most of the electrical range models with coil burner elements.
In Stock
Order now and your part arrives by Jul 31

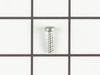
This is a multi-use cover screw. It fits appliances such as dryers, ranges, washers, dishwashers, refrigerators, air conditioners, washer dryer combos, freezers, wall ovens, microwaves, dehumidifiers,...
In Stock
Order now and your part arrives by Jul 31

In Stock
Order now and your part arrives by Jul 31

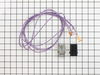
This kit comes with the terminal block, mounting clip and wires.
In Stock
Order now and your part arrives by Jul 31

In Stock
Order now and your part arrives by Jul 31

In Stock
Order now and your part arrives by Jul 31

In Stock
Order now and your part arrives by Jul 31


 – Part Number: WP4314961")
$54.12
This rocker switch can be used for both the oven selector and/or the oven light.
Special Order
Common Problems and Symptoms for 1039567811
Viewing 4 of 4Element will not heat
Fixed by these parts
How to fix it
Not cleaning dishes properly
Fixed by these parts
How to fix it
Leaking
Fixed by these parts
How to fix it
Will Not Start
Fixed by these parts
How to fix it

Keep searches simple. Use keywords, e.g. "leaking", "pump", "broken" or "fit".
- Customer:
- Shaohui from East Lansing, MI
- Parts Used:
- WB17X210
- Difficulty Level:
- Easy
- Total Repair Time:
- 15 - 30 mins
- Tools:
- Pliers
There was no heat on the coils.
I opened the lid, and found that the terminal blocks were burnt, the wires were melted. I ordered one set of terminal block to replace the burnt one, and it worked. Before I started, I shut off the electricity in the whole house to be safe.
Was this instruction helpful to you?
Thank you for voting!
- Customer:
- Edward from Malvern, AR
- Parts Used:
- W10900107
- Difficulty Level:
- A Bit Difficult
- Total Repair Time:
- 30 - 60 mins
- Tools:
- Pliers, Screw drivers
Burner would not heat
First i shut off the power since this is an electric cook top/range. I then removed the knob and the two screws that hold the burner switch in place. I removed the wires one at a time and connected each to the new switch. I then reattached the screws to the switch. The most difficult part to me was breaking off the switch stem at the
... Read more
right level. I got that done and finally selected the appropriate adapter for the stem/knob fit.
Read less
Was this instruction helpful to you?
Thank you for voting!
- Customer:
- Ernest from Bellevue, NE
- Parts Used:
- WB21X36771
- Difficulty Level:
- Really Easy
- Total Repair Time:
- 15 - 30 mins
- Tools:
- Pliers, Socket set
Large burner would operate on high setting only.
1. Removed the back panel.
2. Disconnected the wires from the old switch while connecting wires to the new switch one at a time.
3. Installed the new switch and broke off the excess metal on the post which fits into the burner knob on front of the range.
4. Replaced the burner knob and replaced the back panel.
2. Disconnected the wires from the old switch while connecting wires to the new switch one at a time.
3. Installed the new switch and broke off the excess metal on the post which fits into the burner knob on front of the range.
4. Replaced the burner knob and replaced the back panel.
Was this instruction helpful to you?
Thank you for voting!