


Models
>
JDS9865BDP22
JDS9865BDP22 Jenn-Air Range
Jump to:
Find Part by Name
Keep searches simple, eg. "belt" or "pump".
Diagrams for JDS9865BDP22
Viewing 8 of 8


 Diagram and Parts List for Jenn-Air Range")
Keep searches simple, eg. "belt" or "pump".

$26.19
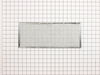
This part is an authentic OEM replacement grease filter for your range or cooktop. The grease filter is used to trap particles that result from cooking such as grease, smoke, and dust. The filter is v...
In Stock
Order now and your part arrives by Aug 3

$43.92
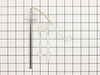
This is a factory-certified oven sensor kit with two harness adapters. Its purpose is to sense the temperature inside the oven. Replacing this part can fix an oven that is not reaching the proper temp...
In Stock
Order now and your part arrives by Aug 3

$21.82
This is a screw and it is made for multiple appliances in your home. This model is called a sheet metal screw because it has sharp points, and the threads are closer together. This screw is designed t...
In Stock
Order now and your part arrives by Aug 3

$7.60
This is a multi-use screw and can be used on a variety of appliances. The measurements of the screw are: 8/18 x 3/8. *Please note: the screw is sold individually. Refer to the manual provided by the m...
In Stock
Order now and your part arrives by Aug 3

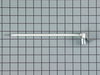
This is an oven rack for your range. It is a stable surface for your cookware to sit when baking and broiling. It measures to be roughly 23 inches wide and 16 inches long. It is made of durable metal ...
No Longer Available

$29.98
This stainless steel surface burner control knob allows you to easily select and adjust the heat level of your cooktop or range burners. Designed to fit a D-shaped shaft, it provides precise control a...
In Stock
Order now and your part arrives by Aug 3

$92.47
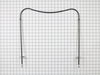
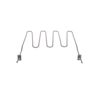
This bake element is found on the bottom of the oven. his bake element is for ranges.
The bake element is at the bottom of the oven and supplies the heat for baking.
Unplug the range or shut off...
In Stock
Order now and your part arrives by Aug 3

In Stock
Order now and your part arrives by Aug 3

$24.15
This 18 ml bottle of white appliance touch-up paint is used to cover scratches or marks on your appliance. The white touch-up paint can be used on refrigerators, microwaves, ranges, clothes dryers, an...
In Stock
Order now and your part arrives by Aug 3

In Stock
Order now and your part arrives by Aug 3

$114.45
The interior oven door glass is the innermost heat resistant piece of glass that faces in your oven. The see-through glass measures approximately 20 5/8” x 13 1/8”. If the glass is cracked it should b...
In Stock
Order now and your part arrives by Aug 3

Special Order
Common Problems and Symptoms for JDS9865BDP22
Viewing 11 of 11Little to no heat when baking
Fixed by these parts

How to fix it
Element will not heat
Fixed by these parts
How to fix it
Will Not Start
Fixed by these parts
How to fix it
Oven not heating evenly
Fixed by these parts
How to fix it
Oven is too hot
Fixed by these parts
How to fix it
Touchpad does not respond
Fixed by these parts
How to fix it
Door won’t close
Fixed by these parts
How to fix it
Gas igniter glows, but will not light
Fixed by these parts
How to fix it
Will not program
Fixed by these parts
How to fix it
Door won’t open after self cleaning cycle
Fixed by these parts
How to fix it
Little to no heat when broiling
Fixed by these parts
How to fix it


Keep searches simple. Use keywords, e.g. "leaking", "pump", "broken" or "fit".
- Customer:
- Gene from Washington C.H., OH
- Parts Used:
- WP71002111
- Difficulty Level:
- Really Easy
- Total Repair Time:
- Less than 15 mins
Replace Grease Filter
Just a couple of minutes to left off the cover grid, left out the old filter and drop in the new one.
Was this instruction helpful to you?
Thank you for voting!
- Customer:
- David from Westford, MA
- Parts Used:
- 12001656
- Difficulty Level:
- Really Easy
- Total Repair Time:
- 15 - 30 mins
- Tools:
- Screw drivers
Oven not holding 350 F, when cooling the coils did not reheat
Removed the oven door by opening slightly, then pic door up to remove. Remove 2 screws holding oven sensor in place, gently pull on sensor to remove, had to remove about 8 inches to get at plastic connector. Unplug connector, had to use an adapter cable supplied with the PartSelect kit to install new sensor, push cable back into opening,
... Read more
reinstall 2 screws. The oven works fine! Note that due to thermal lag the temperature overshoots to 370 degrees and undershoots to 340 degrees, this appears to be normal oven operation. Putting door back in place was easy.
Read less
Was this instruction helpful to you?
Thank you for voting!
- Customer:
- Wendy from Red Hook, NY
- Parts Used:
- WPW10208653
- Difficulty Level:
- Easy
- Total Repair Time:
- More than 2 hours
- Tools:
- Screw drivers
mice had made nests in the insulation wrap in the range
I numbered every part. ex: 1 L., for first part removed left side. I used a magic marker to circle the holes and wrote the number of screws used on the part, set the srews in a separete place, so that I new where these screws went to. The cleanup was pretty time consuming, but I was able to keep my stove, when every repairman I called to
... Read more
fix my stove told me I was better off buying a new stove. ($600.00 stove 2 years old)Please Note: The insulation blanket needed for the entire stove is two pieces, the sides and top are one part # and the bottom and back, are another part #. I did not know this. I just purchased the top and sides. I got lucky, the back and bottom were still in good shape. So I guess I should have read the description of the part more carefully to see what it covers, before I ordered it. It took two people two hours to do the work, it was really nice to have an extra set of eyes, to remember what direction pieces of metal from the stove went. I would do it all over in a heart beat instead of buying a new stove.
Read less
Was this instruction helpful to you?
Thank you for voting!