This is a genuine OEM 40-Watt replacement light bulb that is compatible with various types of appliances. It has a frosted glass bulb with a standard metal socket base, making it easy to screw and uns...
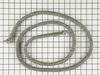
This part is an authentic OEM replacement grease filter for your range or cooktop. The grease filter is used to trap particles that result from cooking such as grease, smoke, and dust. The filter is v...
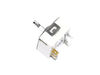
This is a factory-certified oven sensor kit with two harness adapters. Its purpose is to sense the temperature inside the oven. Replacing this part can fix an oven that is not reaching the proper temp...
This is a screw and it is made for multiple appliances in your home. This model is called a sheet metal screw because it has sharp points, and the threads are closer together. This screw is designed t...
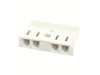
This surface burner switch, also known as an infinite switch, controls the heat level of stovetop burners. When you turn the knob, the switch adjusts the power to the burner for precise temperature co...
This is a multi-use screw and can be used on a variety of appliances. The measurements of the screw are: 8/18 x 3/8. *Please note: the screw is sold individually. Refer to the manual provided by the m...
This oven control board and clock is for ranges.
Oven control board and clock monitors the oven temperature and controls the oven heating functions in the range, and includes the digital display fo...
This 2800-watt, 240-volt bake element sits at the bottom of the oven and provides the heat needed for baking and roasting. It helps ensure even cooking and can fix problems like no heat or uneven temp...
This broiler pan and roasting rack set features a two-piece design that allows fat to drain away for cleaner cooking and reduced splatter. Made with a durable, high-heat resistant porcelain finish, it...
Ask our experts a question about this part and we'll get back to you as soon as possible!
1 question answered by our experts.
< Prev
1
Next >
Sort by:
Search filter:
Clear Filter
Your search term must have 3 or more characters.
Keep searches simple. Use keywords, e.g. "leaking", "pump", "broken" or "fit".
Sorry, we couldn't find any existing answers that matched. Try using some different or simpler keywords, or submit your new question by using the "Ask a Question" button above!
Steve
December 3, 2021
The oven turns on by itself as soon as the circuit breaker is turned on and get hot. None of the buttons work to cancel or shut off the oven and we need to turn off the circuit breaker to shut it off. The display does not show an f code in the first 20 minutes it takes to get to ~350 degrees--it may if we let it get too hot. We replaced the membrane (wp71002033) and still see the same symptoms (the "5' was not working). What part would control the oven on/off like that?
For model number SVE47600W
Hello Steve, Thank you for the question. Normally this is an indication the Electronic Clock Control Board is faulty and would need to be replaced. If you need help placing an order, customer service is open 7 days a week. Please feel free to give us a call. We look forward to hearing from you!
Removed the oven door by opening slightly, then pic door up to remove. Remove 2 screws holding oven sensor in place, gently pull on sensor to remove, had to remove about 8 inches to get at plastic connector. Unplug connector, had to use an adapter cable supplied with the PartSelect kit to install new sensor, push cable back into opening,
... Read morereinstall 2 screws. The oven works fine! Note that due to thermal lag the temperature overshoots to 370 degrees and undershoots to 340 degrees, this appears to be normal oven operation. Putting door back in place was easy.
1. Killed power and removed the regulator's knob, noted the position of the old control. 2. Took off the cover for the center vent and loosened the two screw holding the housing in place--the screws didn't have to come out completely as it is a U-shaped friction hold. 3. Unscrewed the two screws holding the old control switch in
... Read more place--lifted the housing enough to get at the old switch and carefully pulled it loose--it was a front burner so the control switch was about as far back as it could be but still wasn't that hard to get at. 4. Turned the new switch to orient the wire connectors, then, using a needle-nose pliers, removed each friction connector, one at a time, and fitted them on the new switch (note: one of the wires fitted best if it went under as opposed to around the base of the new switch). 5. Replaced the control back through the housing and screwed it in place, making sure the orientation of the control matched the way it looked originally. 6. Slide the housing back over the two screws and tightened, replace vent. 7. Replaced the knob and turned on the power.
(The above took me about twice as long to write as it did to make the repair and I write professionally but am not a professional electrician.)
Also, I bought a second control switch because, given the age of the unit, I'm sure another one will go. The second one will assure that it won't happen :-).


 Diagram and Parts List for Jenn-Air Range")