


Models
>
109RB55
109RB55 Hotpoint Range
Jump to:
Find Part by Name
Keep searches simple, eg. "belt" or "pump".
Keep searches simple, eg. "belt" or "pump".

$21.82
If the drip bowls on your range or cooktop have become damaged, rusty, or are missing, they should be replaced. This is a genuine OEM replacement drip bowl that is chrome in color and 6 inches in diam...
In Stock
Order now and your part arrives by Jul 31

$43.92
This is a broiler pan for your range. It catches drippings from the cookware, when broiling in the oven. This assembly includes the grill/grate and the bottom pan. These parts are made of porcelain. T...
In Stock
Order now and your part arrives by Jul 31

This 6-inch high-rise surface element is designed to deliver consistent and efficient heat distribution for electric cooktops. Engineered for rapid heating, it supports a wide range of cooking tasks—f...
In Stock
Order now and your part arrives by Jul 31

In Stock
Order now and your part arrives by Jul 31


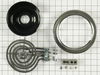
This 6 inch low rise burner trim ring is intended for use with attached style low rise tilt lock surface mount burners on GE electric ranges.
No Longer Available
Common Problems and Symptoms for 109RB55
Viewing 2 of 2Element will not heat
Fixed by these parts
How to fix it
Little to no heat when baking
Fixed by these parts
How to fix it
Keep searches simple. Use keywords, e.g. "leaking", "pump", "broken" or "fit".
- Customer:
- Dennis from Los Alamos, NM
- Parts Used:
- WB44X5043
- Difficulty Level:
- Really Easy
- Total Repair Time:
- Less than 15 mins
- Tools:
- Socket set
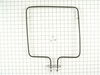
The oven's bottom bake element burned up
First I turned the circuit breaker switch off for the stove unit. I then removed the two screws that hold the element in place at the back of the oven. I then pulled the element out about 3 inches and disconnected the two wires. I attached the new element, bolting the wires into place and then screwed the element back into place on the
... Read more
back wall of the oven. I flipped the breaker switch back on, and turned on the oven. I was done in roughly 15 minutes. The most difficult part was having to shine a flash light into the oven to replace the part, and negotiating the hard cold kitchen floor.
Read less
Was this instruction helpful to you?
Thank you for voting!
- Customer:
- John from Granite City, IL
- Parts Used:
- WB30X356
- Difficulty Level:
- Really Easy
- Total Repair Time:
- Less than 15 mins
- Tools:
- Nutdriver
Burner had shorted out
It was so easy. I turned off the power to the range, loosened the hinge screw and removed the burner unit from the stovetop. Next I removed the two spring clips holding the ceramic housing covering the three connectors. Then I loosened the three screws holding the 3 wire connectors to the burner, reconnected the 3 wires to the new bur
... Read more
ner unit, positioned the ceramic insulator housing and reinstalled the spring clips and finally replaced and tightened the hinge screw. It took about 5 or six minutes, max.
You can do this!
You can do this!
Read less
Was this instruction helpful to you?
Thank you for voting!
- Customer:
- John from Kiowa, CO
- Parts Used:
- WB44X5043
- Difficulty Level:
- Really Easy
- Total Repair Time:
- Less than 15 mins
- Tools:
- Nutdriver
The oven element burned completely into.
I first removed the two screws holding the element in place. Then I pulled the element out about 2 or 3 inches and then took out the 2 small screws holding the 2 wires in place. I then removed the old element and discarded it and installed the new one in the reverse order that I took out the old one. It was quite easy to do, only took abo
... Read more
ut 10 to 15 minutes total time.
Read less
Was this instruction helpful to you?
Thank you for voting!