


Models
>
1J4081N2
1J4081N2 General Electric Range
Jump to:
Find Part by Name
Keep searches simple, eg. "belt" or "pump".
Keep searches simple, eg. "belt" or "pump".

$21.82
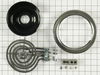
If the drip bowls on your range or cooktop have become damaged, rusty, or are missing, they should be replaced. This is a genuine OEM replacement drip bowl that is chrome in color and 6 inches in diam...
In Stock
Order now and your part arrives by Jul 31

$28.91
This 8-inch chrome drip bowl is a genuine OEM replacement part for your electric range. The drip bowl is designed to fit underneath the coiled burner elements, and is used to catch spills that result ...
In Stock
Order now and your part arrives by Jul 31

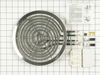
This kit includes an 8", three wire, 2450W surface element. This low rise element has an attached trim ring, and a terminal block with all three-wire units.
In Stock
Order now and your part arrives by Jul 31

This 6-inch high-rise surface element is designed to deliver consistent and efficient heat distribution for electric cooktops. Engineered for rapid heating, it supports a wide range of cooking tasks—f...
In Stock
Order now and your part arrives by Jul 31

In Stock
Order now and your part arrives by Jul 31


Special Order
Common Problems and Symptoms for 1J4081N2
Viewing 2 of 2Element will not heat
Fixed by these parts
How to fix it
Little to no heat when baking
Fixed by these parts
How to fix it
Keep searches simple. Use keywords, e.g. "leaking", "pump", "broken" or "fit".
- Customer:
- Barbara from Smyrna, GA
- Parts Used:
- WB30X354
- Difficulty Level:
- Easy
- Total Repair Time:
- 30 - 60 mins
- Tools:
- Nutdriver, Pliers, Screw drivers
50+ Yr Old Cooktop Burner had one of its two coils burn out
The hardest thing was finding the part to order! The GE Cooktop is from 1957 when the house was built. I followed the instructions that came with it. After seeing where the screw on hinge was supposed to be, I cleaned away the caked grease and finally saw the screw. I had to use a nut driver to remove it since it didn't have a slot for a
... Read more
screwdriver. Once that screw was out, the rest was easy. Before disconnecting any wires, I laid the new and old parts beside each other and drew a diagram showing where each wire (red, black & white) connected. It was a bit scary stripping the wires since they were old and fragile. It said to bend them into a "U" and solder but I didn't have soldering skill or equipment so I just tightened the screws holding the wires carefully. The connections are all nicely isolated in the bakelite insulator so it didn't seem cruicial. After working the new unit into place and turning on the power (at the circuit breaker), the burner worked perfectly. The replacement part looked exactly like the original. I was so amazed to be able to obtain the replacement burner after all these years! Thank-you PartsSelect!
Read less
Was this instruction helpful to you?
Thank you for voting!
- Customer:
- Dennis from Los Alamos, NM
- Parts Used:
- WB44X5043
- Difficulty Level:
- Really Easy
- Total Repair Time:
- Less than 15 mins
- Tools:
- Socket set
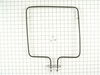
The oven's bottom bake element burned up
First I turned the circuit breaker switch off for the stove unit. I then removed the two screws that hold the element in place at the back of the oven. I then pulled the element out about 3 inches and disconnected the two wires. I attached the new element, bolting the wires into place and then screwed the element back into place on the
... Read more
back wall of the oven. I flipped the breaker switch back on, and turned on the oven. I was done in roughly 15 minutes. The most difficult part was having to shine a flash light into the oven to replace the part, and negotiating the hard cold kitchen floor.
Read less
Was this instruction helpful to you?
Thank you for voting!
- Customer:
- John from Granite City, IL
- Parts Used:
- WB30X356
- Difficulty Level:
- Really Easy
- Total Repair Time:
- Less than 15 mins
- Tools:
- Nutdriver
Burner had shorted out
It was so easy. I turned off the power to the range, loosened the hinge screw and removed the burner unit from the stovetop. Next I removed the two spring clips holding the ceramic housing covering the three connectors. Then I loosened the three screws holding the 3 wire connectors to the burner, reconnected the 3 wires to the new bur
... Read more
ner unit, positioned the ceramic insulator housing and reinstalled the spring clips and finally replaced and tightened the hinge screw. It took about 5 or six minutes, max.
You can do this!
You can do this!
Read less
Was this instruction helpful to you?
Thank you for voting!