


Models
>
JCB870SF1SS
JCB870SF1SS General Electric Range
Jump to:
Find Part by Name
Keep searches simple, eg. "belt" or "pump".
Diagrams for JCB870SF1SS
Viewing 4 of 4


Keep searches simple, eg. "belt" or "pump".

$19.90
This 40-Watt light bulb is sold individually.
It is specially designed to withstand extreme temperatures, so this bulb is compatible with a variety of appliance types including refrigerators, ranges,...
In Stock
Order now and your part arrives by Mar 21

This infinite switch controls the heat level of a 6-inch, 1560-watt surface element by regulating power flow. It operates at 240 volts and helps maintain consistent temperatures. Replacing it can fix ...
In Stock
Order now and your part arrives by Mar 21

$14.65
This part is the replacement light socket for your oven. The oven light socket provides power to the light, and at the same time holds the light bulb in place.
In Stock
Order now and your part arrives by Mar 21

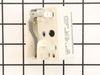
This switch controls the large burner on a range/stove top.
In Stock
Order now and your part arrives by Mar 21

$128.48
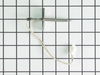
This kit includes the sensor as well as the connectors. NOTE This sensor is 2" long.
In Stock
Order now and your part arrives by Mar 21

$14.65
This part is a replacement screw for your oven. It is made of black metal and is sold individually. This screw is approximately 1/4 inch in diameter and about 1/2 inch in length. It is designed to con...
In Stock
Order now and your part arrives by Mar 21

Control your cooktop’s heat settings with this durable burner control knob, designed with a D-shaped shaft opening for precise alignment and accurate temperature markings. Made from high-quality stain...
No Longer Available

Special Order

In Stock
Order now and your part arrives by Mar 21

$47.33
This oven door gasket assembly forms a tight, heat-retaining seal around the oven cavity to keep temperatures consistent and ensure even baking and roasting. Made from durable, heat-resistant rubber, ...
In Stock
Order now and your part arrives by Mar 21

In Stock
Order now and your part arrives by Mar 21

On Order
Questions and Answers
We're sorry, but our Q&A experts are temporarily unavailable.
Please check back later if you still haven't found the answer you need.
Common Problems and Symptoms for JCB870SF1SS
Viewing 5 of 5Element will not heat
Fixed by these parts

How to fix it
Little to no heat when baking
Fixed by these parts
How to fix it
Oven not heating evenly
Fixed by these parts
How to fix it
Oven is too hot
Fixed by these parts
How to fix it
Will Not Start
Fixed by these parts
How to fix it


Keep searches simple. Use keywords, e.g. "leaking", "pump", "broken" or "fit".
- Customer:
- CHARLA from NEW BRAUNFELS, TX
- Parts Used:
- WB23X5340
- Difficulty Level:
- Really Easy
- Total Repair Time:
- Less than 15 mins
- Tools:
- Nutdriver
Oven sensor was not holding temperature range.
Per the instructions included with part.
Was this instruction helpful to you?
Thank you for voting!
- Customer:
- Armand from COVENTRY, CT
- Parts Used:
- WB23X5340
- Difficulty Level:
- Easy
- Total Repair Time:
- 30 - 60 mins
- Tools:
- Screw drivers
defective temp. sensor
Removed oven from cabinet. unblug old sensor pluged in new and reinstalled oven. Esay repair though wish oven was designed so did not have to pull itout of cabinet which requires disconect electric cabel
Was this instruction helpful to you?
Thank you for voting!
- Customer:
- Jack from Cypress, TX
- Parts Used:
- WB23X5340
- Difficulty Level:
- Easy
- Total Repair Time:
- 30 - 60 mins
- Tools:
- Nutdriver, Screw drivers
When baking at temps > 400 the oven would beep with an error code F5 and shut off
I downloaded the installaion manual from the web for this model. First htings first, I located the circuit breaker for the oven and turned it off. Removed the lower trim piece from the bottom, next lifted the oven door off its hinges and set it to the side. I then wrapped a couple of small towels around the hinges for the door as per
... Read more
the manual (the hinges can pinch a finger). I then removed the four screws which secured the oven into the cabinet. Next I slid the oven forward allowing me access to the rear. I removed the pieces from the rear to gain access to the sensors connector, and unpl;ugged the sensor. Went around to the front and unscrewed the 2 screws securing the sensor and removed it. I then installed the new sensor, replaced the rear covers, slid the oven back into the cabinet, secured the four screws, snapped on the lower trim, remounted the oven door, and turned the breaker on. Oven working fine now.
Read less
Was this instruction helpful to you?
Thank you for voting!