This genuine GE drawer support is an original replacement part sourced from the manufacturer and is designed for use with electric ranges. Made of durable plastic, it attaches to the rear of the drawe...
Designed for electric ranges and cooktops, this 8-inch radiant element heats cookware evenly and efficiently. It’s a direct replacement for faulty or damaged burners. To install, lift the cooktop and ...
This window pack assembly, also known as inner door glass, is supplied directly by the manufacturer for use in range ovens. It has measurements of approximately 22 inches by 14 inches. The inner door ...
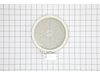
This surface element is for ranges. Surface elements supply the heat to a cooking area on top of the range. Unplug the range or shut off the house circuit breaker for the range before installing this ...
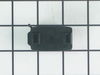
This part provides a way of connecting individual electrical wires and offers protection of the device from electrical surges (voltages and/or currents).
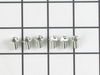
This part is a replacement screw for your oven. It is made of black metal and is sold individually. This screw is approximately 1/4 inch in diameter and about 1/2 inch in length. It is designed to con...
In Stock
Order now and your part arrives by Jun 28
Questions and Answers
Ask our experts a question about this part and we'll get back to you as soon as possible!
1 question answered by our experts.
< Prev
1
Next >
Sort by:
Search filter:
Clear Filter
Your search term must have 3 or more characters.
Keep searches simple. Use keywords, e.g. "leaking", "pump", "broken" or "fit".
Sorry, we couldn't find any existing answers that matched. Try using some different or simpler keywords, or submit your new question by using the "Ask a Question" button above!
Jim
March 2, 2022
How to replace the glass top
For model number JS750EF2ES
Hello Jim, Thank you for your inquiry. Here is some information that you may use as a general reference on how to install the glass top on your stove. Before you begin any repair please unplug the appliance from the electrical outlet or turn the circuit breaker off. First open the oven door and then remove the 2 screws that hold the glass top. Lift the cooktop up and slide it to one side in order to release it's rear hinges from the mounting brackets. Be careful as the part is heavy. Remove the hinges from the old cooktop. Secure the hinges on the new cooktop with the screws. Place the new cooktop assembly hinge into the opening on the side mounting bracket. Slide it into the opposite mounting bracket, check if it is properly installed and lower the cooktop. Secure it place with the 2 screws at the front. Close the door and restore power to the oven. restore power to the stove and everything should now work for you. We hope this helps and if you need help placing an order, customer service is open 7 days a week. Please feel free to give us a call. We look forward to hearing from you!
Was this helpful?
Thank you for voting!
Ask a Question
Ask our experts a question on this part and we'll respond as soon as we can.
I had to remove the oven from the wall because the sensor plug connction is behind the unit. Two screws hold the sensor inside the oven and then I disconnected the lead and pulled the sensor out from the front. I installed the new sensor, tightened the two screws holding it in and connected the lead. Then reinstalled the oven into the wal
... Read morel. Overall, a very easy repair once you get the oven out.
The existing terminal block on my Ge oven/Range had melted due to a loose wire causing sparking and starting the plastic casing of the terminal block on fire and melting it, Part select made the part easy to find and had it at my house in 2 days. All I had to do was remove six screws to take the back sheet metal cover off of the oven. U
... Read morenscrew the terminal connections remove two mounting screws that held the terminal on to the oven body. This was a little trickier than it should have been because the melted plastic had reformed making it very hard to access the mounting screws. i then mounted the new piece and plugged the oven in, it took 15 minutes and was very easy. definitely saved me at-least a $100 for the service call i would have made if finding the part wasn't so convenient
The repair went very easy. The replacement part was designed differently than the original part. It installed on the rear of the drawer with a screw as the original snapped into the side. This was a bit confusing when researching and looking up the part online.