


Models
>
JD750SF2SS
JD750SF2SS General Electric Range
Jump to:
Find Part by Name
Keep searches simple, eg. "belt" or "pump".
Diagrams for JD750SF2SS
Viewing 7 of 7


Keep searches simple, eg. "belt" or "pump".

In Stock
Order now and your part arrives by Aug 6

$61.61
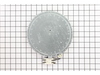
Designed for electric ranges and cooktops, this 8-inch radiant element heats cookware evenly and efficiently. It’s a direct replacement for faulty or damaged burners. To install, lift the cooktop and ...
In Stock
Order now and your part arrives by Aug 6

$54.95
This light bulb is used in the interior oven. NOTE: This bulb has looped pins, not the straight pins.
In Stock
Order now and your part arrives by Aug 6

$355.32
This window pack assembly, also known as inner door glass, is supplied directly by the manufacturer for use in range ovens. It has measurements of approximately 22 inches by 14 inches. The inner door ...
In Stock
Order now and your part arrives by Aug 6

In Stock
Order now and your part arrives by Aug 6

$225.27
This surface element is for ranges. Surface elements supply the heat to a cooking area on top of the range. Unplug the range or shut off the house circuit breaker for the range before installing this ...
In Stock
Order now and your part arrives by Aug 6

In Stock
Order now and your part arrives by Aug 6

$15.26
This part is a replacement screw for your oven. It is made of black metal and is sold individually. This screw is approximately 1/4 inch in diameter and about 1/2 inch in length. It is designed to con...
In Stock
Order now and your part arrives by Aug 6

$115.09
Designed for use with electric ranges, this surface element provides dependable heat to a specific burner area, helping you cook meals with precision and efficiency. Positioned under the cooktop surfa...
In Stock
Order now and your part arrives by Aug 6

In Stock
Order now and your part arrives by Aug 6

In Stock
Order now and your part arrives by Aug 6

$53.95
This surface element control switch is for ranges.
Surface element control switch turns the surface element on and off and controls how much heat the element produces.
Unplug the range or shut o...
In Stock
Order now and your part arrives by Aug 6
Common Problems and Symptoms for JD750SF2SS
Viewing 5 of 5Element will not heat
Fixed by these parts


How to fix it
Little to no heat when baking
Fixed by these parts
How to fix it
Oven not heating evenly
Fixed by these parts
How to fix it
Oven is too hot
Fixed by these parts
How to fix it
Will Not Start
Fixed by these parts
How to fix it


Keep searches simple. Use keywords, e.g. "leaking", "pump", "broken" or "fit".
- Customer:
- Sean from Highlands Ranch, CO
- Parts Used:
- WB23T10015
- Difficulty Level:
- Really Easy
- Total Repair Time:
- 15 - 30 mins
- Tools:
- Nutdriver, Screw drivers
Oven was not coming up to temperature
I had to remove the oven from the wall because the sensor plug connction is behind the unit. Two screws hold the sensor inside the oven and then I disconnected the lead and pulled the sensor out from the front. I installed the new sensor, tightened the two screws holding it in and connected the lead. Then reinstalled the oven into the wal
... Read more
l. Overall, a very easy repair once you get the oven out.
Read less
Was this instruction helpful to you?
Thank you for voting!
- Customer:
- Brian from Fairfield, CA
- Parts Used:
- WB23T10015
- Difficulty Level:
- Easy
- Total Repair Time:
- 15 - 30 mins
- Tools:
- Screw drivers
Actual temperature did not match set temp
Removed the oven door for easy acces to oven. Unscrewed (philips screwdriver) the screw holding temp sensor in place. Gently pulled the wiring until quick connector was located. Pushed down on locking level on quick connect while holding other end of wiring (so wiring would not fall back behind oven). Connected the new sensor and scre
... Read more
wed back in place. Reinstalled oven door. Tested temperature settings by turning on oven and comparing with a separate oven thermometer.
Read less
Was this instruction helpful to you?
Thank you for voting!
- Customer:
- Charlotte from ORLANDO, FL
- Parts Used:
- WB56X22160
- Difficulty Level:
- Really Easy
- Total Repair Time:
- 30 - 60 mins
Something in oven exploded and stained glass so couldn’t see what’s baking
Ordered window pack from PartSelect then removed oven door from front of stove, then removed back of door and silver backing and glass pack. Dropped new glass into place. Replaced all backing,put door back onto stove. Tip. When removing screw keep them separated from each other as not to get mixed up when putting everything together. Goo
... Read more
d Luck, PartSelect has all the parts you need, this my second getting a part from them.
Read less
Was this instruction helpful to you?
Thank you for voting!