


Models
>
JGBP24BEH6WH
JGBP24BEH6WH General Electric Range
Jump to:
Find Part by Name
Keep searches simple, eg. "belt" or "pump".
Diagrams for JGBP24BEH6WH
Viewing 4 of 4


Manuals & Guides for JGBP24BEH6WH
Click to downloadKeep searches simple, eg. "belt" or "pump".

$21.95
This 40-Watt light bulb is sold individually.
It is specially designed to withstand extreme temperatures, so this bulb is compatible with a variety of appliance types including refrigerators, ranges,...
In Stock
Order now and your part arrives by Jul 31

$70.95
If the racks in your oven have become discolored, or if you need a spare, this is a genuine OEM replacement. The rack is used to hold cookware in the oven, and slides in and out of the oven for easy a...
In Stock
Order now and your part arrives by Jul 31

In Stock
Order now and your part arrives by Jul 31

$15.26
This is the replacement propane orifice for your gas range. You will find the orifice under the cooktop, beneath the burner. This part supplies liquid propane from the gas line to the stove top. Be su...
In Stock
Order now and your part arrives by Jul 31

In Stock
Order now and your part arrives by Jul 31

$15.26
This part is the replacement light socket for your oven. The oven light socket provides power to the light, and at the same time holds the light bulb in place.
In Stock
Order now and your part arrives by Jul 31

$43.92
This is a broiler pan for your range. It catches drippings from the cookware, when broiling in the oven. This assembly includes the grill/grate and the bottom pan. These parts are made of porcelain. T...
In Stock
Order now and your part arrives by Jul 31

This bottom oven and deflector assembly is a durable metal panel designed to fit beneath the oven floor, protecting the bake element from spills while promoting even heat distribution for consistent c...
In Stock
Order now and your part arrives by Jul 31

In Stock
Order now and your part arrives by Jul 31

$115.95
Please note: With this control the wiring could be different from the original. It will possibly need to be installed by an appliance repair person.
In Stock
Order now and your part arrives by Jul 31

In Stock
Order now and your part arrives by Jul 31

In Stock
Order now and your part arrives by Jul 31
Common Problems and Symptoms for JGBP24BEH6WH
Viewing 5 of 5Gas igniter glows, but will not light
Fixed by these parts
How to fix it
Will Not Start
Fixed by these parts
How to fix it
Element will not heat
Fixed by these parts
How to fix it
Touchpad does not respond
Fixed by these parts
How to fix it
Gas smell
Fixed by these parts
How to fix it


Keep searches simple. Use keywords, e.g. "leaking", "pump", "broken" or "fit".
- Customer:
- victor from thatcher, AZ
- Parts Used:
- WB27K10354
- Difficulty Level:
- Really Easy
- Total Repair Time:
- 15 - 30 mins
- Tools:
- Screw drivers, Socket set
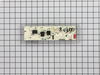
No power to electronic readout screen there was no control to the oven at all. The troubleshooting guide in the oven manual several symtoms said to replace the electronic control board. So I did.
First of all disconnect the power cord and then remove the top section of the oven which consisted of 2 small allen screws located in the front bottom corners [ left and right ] on the frontside. On the backside there was 2 phillip screws on top corners [ left and right ]. Also there was 2 bolthead screws that I use my small socket set or
... Read more
you can use a small ajustable wrench. Once all these were removed it rolled forward right off. The control board was located in the center of the panel. Made sure the part matched up and it did, removed 4 small corner phillip screws and 4 or 5 removable plug in wire connectors which were easily identified. Put everything back together, plug power cord back in and the electronic display came on. Everything worked on the oven. done deal.
Read less
Was this instruction helpful to you?
Thank you for voting!
- Customer:
- Helen from Flemington, NJ
- Parts Used:
- WB16K10026
- Difficulty Level:
- Easy
- Total Repair Time:
- Less than 15 mins
My old burners were beyond the point of coming clean and made my stove top look bad.
My husband and I simply took the burner units out of the packing, took the old ones off, put the new ones in. The new units needed to be leveled, but the leveling nuts included fit perfectly, and the entire repair took less than 15 minutes.
Was this instruction helpful to you?
Thank you for voting!
- Customer:
- Marjorie from Yucca Valley, CA
- Parts Used:
- WB35X37973
- Difficulty Level:
- Really Easy
- Total Repair Time:
- Less than 15 mins
- Tools:
- Screw drivers
Pies Boiled Over And Baked On Oven Bottom
Removed the two screws put the heat shield off the old one onto the new one put new bottom in and tightened two screws. Done #38. 69 Cost of part with shipping cost included.
Was this instruction helpful to you?
Thank you for voting!