


Models
>
PB975TP3WW
PB975TP3WW General Electric Range
Jump to:
Find Part by Name
Keep searches simple, eg. "belt" or "pump".
Diagrams for PB975TP3WW
Viewing 8 of 8


Manuals & Guides for PB975TP3WW
Click to downloadKeep searches simple, eg. "belt" or "pump".

$29.82
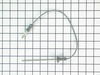
If your oven is running hot, not heating evenly, not coming up to temperature, or just not heating up at all, there may be an issue with the temperature sensor. This sensor is usually found in the bac...
In Stock
Order now and your part arrives by Mar 20

$19.90
This 40-Watt light bulb is sold individually.
It is specially designed to withstand extreme temperatures, so this bulb is compatible with a variety of appliance types including refrigerators, ranges,...
In Stock
Order now and your part arrives by Mar 20

In Stock
Order now and your part arrives by Mar 20

$14.65
This part is the replacement oven bulb lens cover. It is made of glass and is approximately 3 inches in diameter. The lens cover is rigid and protects the oven light bulb from being damaged. The main ...
In Stock
Order now and your part arrives by Mar 20

$58.09
This probe is used to check the internal temperature of the meat to ensure proper temperature is reached. Also known as a Meat Probe.
In Stock
Order now and your part arrives by Mar 20

In Stock
Order now and your part arrives by Mar 20

In Stock
Order now and your part arrives by Mar 20

$170.95
This 12-inch haliant surface element fits under the glass top of flat cooktops and ranges, providing heat to the cooking surface. It’s sold individually and replaces a non-heating burner. To install, ...
In Stock
Order now and your part arrives by Mar 20

In Stock
Order now and your part arrives by Mar 20

$48.36
This part is the replacement surface burner switch or element control switch for your range or cooktop. The burner switch turns the surface element on and off and controls the amount of heat the eleme...
In Stock
Order now and your part arrives by Mar 20

$58.09
This oven door gasket helps seal in heat, ensuring even cooking and better energy efficiency. Made from durable rubber and fiberglass, it fits securely around the oven opening and is easy to install w...
In Stock
Order now and your part arrives by Mar 20

In Stock
Order now and your part arrives by Mar 20
Questions and Answers
We're sorry, but our Q&A experts are temporarily unavailable.
Please check back later if you still haven't found the answer you need.
Common Problems and Symptoms for PB975TP3WW
Viewing 8 of 8Element will not heat
Fixed by these parts


How to fix it
Little to no heat when baking
Fixed by these parts


How to fix it
Oven not heating evenly
Fixed by these parts

How to fix it
Oven is too hot
Fixed by these parts
How to fix it
Will Not Start
Fixed by these parts
How to fix it
Little to no heat when broiling
Fixed by these parts
How to fix it
Door won’t close
Fixed by these parts

How to fix it
Will not program
Fixed by these parts
How to fix it


Keep searches simple. Use keywords, e.g. "leaking", "pump", "broken" or "fit".
- Customer:
- Peter from stamford, CT
- Parts Used:
- WB21X22134
- Difficulty Level:
- Really Easy
- Total Repair Time:
- 15 - 30 mins
- Tools:
- Nutdriver
Oven would go in to a F2 Error
Removed six 1/4" hex nuts on rear of oven. Then through front/inside removed a single 1/4" hex nut to actually remove sensor. Unplug sensor connector, remove. Reversed steps, push oven back in place and plugged in. Tested oven function.
Was this instruction helpful to you?
Thank you for voting!
- Customer:
- Sean from Highlands Ranch, CO
- Parts Used:
- WB23T10015
- Difficulty Level:
- Really Easy
- Total Repair Time:
- 15 - 30 mins
- Tools:
- Nutdriver, Screw drivers
Oven was not coming up to temperature
I had to remove the oven from the wall because the sensor plug connction is behind the unit. Two screws hold the sensor inside the oven and then I disconnected the lead and pulled the sensor out from the front. I installed the new sensor, tightened the two screws holding it in and connected the lead. Then reinstalled the oven into the wal
... Read more
l. Overall, a very easy repair once you get the oven out.
Read less
Was this instruction helpful to you?
Thank you for voting!
- Customer:
- Gerald from Cape Canaveral, FL
- Parts Used:
- WB21X22134
- Difficulty Level:
- Really Easy
- Total Repair Time:
- 15 - 30 mins
- Tools:
- Nutdriver
Oven wouldn't preheat above 300 degrees
Unplugged appliance and removed 5 screws on back of stove/oven and removed plate. Disconnected the sensor and unscrewed it on the inside of the oven. Pulled the cord through and replaced with new sensor. Replaced all parts and plugged in the appliance and tested. Worked great.
Was this instruction helpful to you?
Thank you for voting!