


Models
>
JB840TP2WW
JB840TP2WW General Electric Range
Jump to:
Find Part by Name
Keep searches simple, eg. "belt" or "pump".
Diagrams for JB840TP2WW
Viewing 5 of 5


Manuals & Guides for JB840TP2WW
Click to downloadKeep searches simple, eg. "belt" or "pump".

$33.95
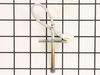
If your oven is running hot, not heating evenly, not coming up to temperature, or just not heating up at all, there may be an issue with the temperature sensor. This sensor is usually found in the bac...
In Stock
Order now and your part arrives by Aug 2

In Stock
Order now and your part arrives by Aug 2

$52.50
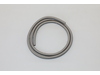
The oven door gasket creates a seal between the oven door and the opening of the oven to prevent heat from escaping when the oven is closed.
In Stock
Order now and your part arrives by Aug 2
 – Part Number: WB07X42948")
$19.88
This part is the replacement door trim for your oven. It is white in color and is approximately 30 inches long and 2 inches wide. The bottom door trim supports the outer glass from the bottom. The mai...
In Stock
Order now and your part arrives by Aug 2

$208.93
This 12-inch haliant surface element fits under the glass top of flat cooktops and ranges, providing heat to the cooking surface. It’s sold individually and replaces a non-heating burner. To install, ...
In Stock
Order now and your part arrives by Aug 2

In Stock
Order now and your part arrives by Aug 2

In Stock
Order now and your part arrives by Aug 2

$48.35
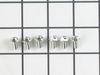
This part is the replacement surface burner switch or element control switch for your range or cooktop. The burner switch turns the surface element on and off and controls the amount of heat the eleme...
In Stock
Order now and your part arrives by Aug 2

In Stock
Order now and your part arrives by Aug 2

$155.32
The GE Oven Door Window Pack Assembly is a genuine OEM part that fits select GE ranges and ovens. It includes a heat-resistant inner glass panel, frame, and seals, providing insulation and clear visib...
On Order

$31.05
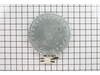
This halogen lamp bulb is a genuine OEM replacement part for your oven. If the light has burned out in your oven, replace it with this part. This is a 35 watt bulb. Replacing this bulb is fairly easy ...
In Stock
Order now and your part arrives by Aug 2

$61.55
This part provides a way of connecting individual electrical wires and offers protection of the device from electrical surges (voltages and/or currents).
In Stock
Order now and your part arrives by Aug 2
Common Problems and Symptoms for JB840TP2WW
Viewing 6 of 6Element will not heat
Fixed by these parts

How to fix it
Little to no heat when baking
Fixed by these parts
How to fix it
Oven not heating evenly
Fixed by these parts
How to fix it
Oven is too hot
Fixed by these parts
How to fix it
Will Not Start
Fixed by these parts
How to fix it
Little to no heat when broiling
Fixed by these parts
How to fix it


Keep searches simple. Use keywords, e.g. "leaking", "pump", "broken" or "fit".
- Customer:
- Peter from stamford, CT
- Parts Used:
- WB21X22134
- Difficulty Level:
- Really Easy
- Total Repair Time:
- 15 - 30 mins
- Tools:
- Nutdriver
Oven would go in to a F2 Error
Removed six 1/4" hex nuts on rear of oven. Then through front/inside removed a single 1/4" hex nut to actually remove sensor. Unplug sensor connector, remove. Reversed steps, push oven back in place and plugged in. Tested oven function.
Was this instruction helpful to you?
Thank you for voting!
- Customer:
- jonathan from willow springs, IL
- Parts Used:
- WB17T10011
- Difficulty Level:
- Easy
- Total Repair Time:
- Less than 15 mins
- Tools:
- Nutdriver, Screw drivers
terminal block melted
The existing terminal block on my Ge oven/Range had melted due to a loose wire causing sparking and starting the plastic casing of the terminal block on fire and melting it, Part select made the part easy to find and had it at my house in 2 days. All I had to do was remove six screws to take the back sheet metal cover off of the oven. U
... Read more
nscrew the terminal connections remove two mounting screws that held the terminal on to the oven body. This was a little trickier than it should have been because the melted plastic had reformed making it very hard to access the mounting screws. i then mounted the new piece and plugged the oven in, it took 15 minutes and was very easy. definitely saved me at-least a $100 for the service call i would have made if finding the part wasn't so convenient
Read less
Was this instruction helpful to you?
Thank you for voting!
- Customer:
- Gerald from Cape Canaveral, FL
- Parts Used:
- WB21X22134
- Difficulty Level:
- Really Easy
- Total Repair Time:
- 15 - 30 mins
- Tools:
- Nutdriver
Oven wouldn't preheat above 300 degrees
Unplugged appliance and removed 5 screws on back of stove/oven and removed plate. Disconnected the sensor and unscrewed it on the inside of the oven. Pulled the cord through and replaced with new sensor. Replaced all parts and plugged in the appliance and tested. Worked great.
Was this instruction helpful to you?
Thank you for voting!