


Models
>
JDP36GH3
JDP36GH3 General Electric Range
Jump to:
Find Part by Name
Keep searches simple, eg. "belt" or "pump".
Diagrams for JDP36GH3
Viewing 2 of 2

Manuals & Guides for JDP36GH3
Click to downloadKeep searches simple, eg. "belt" or "pump".

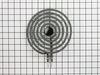
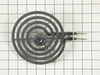
NOTE: The manufacturer recommends that you replace the burner receptacle at the same time.
In Stock
Order now and your part arrives by Aug 3

$43.92
This is a broiler pan for your range. It catches drippings from the cookware, when broiling in the oven. This assembly includes the grill/grate and the bottom pan. These parts are made of porcelain. T...
In Stock
Order now and your part arrives by Aug 3

In Stock
Order now and your part arrives by Aug 3

In Stock
Order now and your part arrives by Aug 3

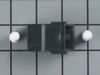
This kit comes with the terminal block, mounting clip and wires.
No Longer Available


Special Order
Special Order
Common Problems and Symptoms for JDP36GH3
Viewing 3 of 3Element will not heat
Fixed by these parts
How to fix it
Little to no heat when baking
Fixed by these parts
How to fix it
Will Not Start
Fixed by these parts
How to fix it
Keep searches simple. Use keywords, e.g. "leaking", "pump", "broken" or "fit".
- Customer:
- Lois from KNOXVILLE, TN
- Parts Used:
- WP660533
- Difficulty Level:
- Really Easy
- Total Repair Time:
- Less than 15 mins
two large burners wouldn't heat or would smoke even after cleaning
i really wanted a new stove, but budget wouldn't permit; so just had to insert the new ones and they work great with level cooking.
Was this instruction helpful to you?
Thank you for voting!
- Customer:
- Kitty from Marion, NC
- Parts Used:
- WB44X5089
- Difficulty Level:
- Easy
- Total Repair Time:
- 15 - 30 mins
- Tools:
- Pliers, Screw drivers
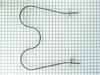
Lower Bake Element Died
Step 1--cut power to the unit off at the breaker box! Step 2--take a deep breath and dive in. The most difficult part, after getting over the fear, was unscrewing the old unit from the back plate -- been there a LONG time. Step 3, slowly pull the old part forward to see the wires on either side of the old coil. Note how the 'clips' attach
... Read more
to the ends. Remove the old unit, being careful not to bend the clips. Slide the new part into the stove. Attach the clips until click securely--be careful not to bend; make sure the clips are secure or you risk losing the wire inside the stove. Once the clips are secure, gently and slowly slide the ends into the holes. The wires and ends will glide into a hole such that the plates on the part align with the back of the stove. Use the old screws and attach the face plate of the part to the back of the stove. The part may rest slightly above the bottom of the stove; this will resolve itself as the part 'adjusts' to the new environment. Turn the breaker back on and turn on the stove. There may be a slight odor the firs time the unit is used; I suggest leaving the door open and heat the coil completely for about 20 minutes. Should be ready to go. (The old unit should be discarded; ask your recycle team if they accept electronic parts or alert the garbage guys that the old part is in the weekly trask.)
Read less
Was this instruction helpful to you?
Thank you for voting!
- Customer:
- Layne from New Kensington, PA
- Parts Used:
- WB44X5089
- Difficulty Level:
- Easy
- Total Repair Time:
- 15 - 30 mins
- Tools:
- Nutdriver
replacement of bake heating element
No instructions for installation came w/ part. Used some instruction from order web site that someone else had submitted. Once I figured out how the new part connected to the oven's wiring, it was a very easy to install. If you need to ever replace the bake unit all you need to do are basically 5 things: 1. Using a nut driver, remove the
... Read more
nut at each of the connection points of the old bake heating element (these are located at the back of the stove). 2. Slowly and gently pull the old element towards you until you see the wires that connect it to the back of the stove emerge from their holes. 3. Gently pull up the ends of the old bake unit which will remove it from the vertical wiring posts--don't let the wired posts slip back into the holes at the back of the oven--I used a little strip of tape to keep them from sliding back into their holes. 4. Gently slip the posts (one at a time) of the new bake unit down and over the vertical wiring posts connectors (press all the way down over the wiring posts) then w/ both hands gently squeeze both of the bake unit ends at the same time and slowly push them back into their holes until the fastening plates press against the back wall of the oven. 5. Align the nut holes, replace nuts and tighten them. I turned the oven on to make sure it worked and let it heat up for a 1/2 hour. Everything worked fine. Don't let this repair intimidate you--just use the right tools, take a deep breath, go slow and be gentle. I'm not in any way mechanically inclined and I did it--so can you.
Read less
Was this instruction helpful to you?
Thank you for voting!